Why the Barbell Back Squat Is Still the King of Leg Day (And How to Actually Do It Right)
내 훈련 방식을 영원히 바꿔놓은 스쿼트
저는 거의 2년 동안 바벨 백 스쿼트를 피했습니다. 솔직히 말해서, 무거운 바벨, 스쿼트 랙, 그리고 사람들 앞에서 실패할지도 모른다는 생각에 겁이 났거든요. 그래서 레그 프레스 머신만 고집하며 그걸 다리 운동이라고 불렀습니다. 허벅지 근육은 조금 커졌지만, 둔근은 거의 변화가 없었고, 허리는 여전히 약했습니다. 그러다 코치 한 분이 제가 고블릿 스쿼트를 힘겹게 하는 모습을 보고 “바 아래로 들어가야 해요”라고 말씀하시자 모든 게 바뀌었습니다.
40kg의 바벨을 등에 얹고 처음 스쿼트를 시작했을 때는 어색하고 불안한 기분이 들었습니다. 하지만 6주 동안 꾸준히 바벨 스쿼트를 한 결과, 다리 모양이 확연히 달라졌습니다. 더 중요한 건, 다리가 훨씬 강해지고, 균형 감각이 좋아지고, 진정으로 제 기능을 발휘할 수 있게 되었다는 것입니다. 그 후로 저는 스쿼트 중량을 제 체중의 두 배가 넘는 수준까지 늘렸고, 수십 명의 초보자들에게 바벨 스쿼트의 첫 경험을 지도해 왔습니다. 제 확신은 더욱 깊어졌습니다. 어떤 기구 운동도, 어떤 변형 운동도, 어떤 유행하는 동작 패턴도 바벨 백 스쿼트가 인체에 미치는 효과를 대체할 수 없습니다.
이 글에서는 스쿼트가 효과적인 과학적 원리, 처음부터 올바른 자세를 잡는 방법, 운동 효과를 저해하는 가장 흔한 실수, 그리고 수개월에서 수년에 걸쳐 스쿼트 능력을 향상시키는 방법에 대해 다룹니다. 바벨을 한 번도 잡아본 적이 없거나, 수년간 스쿼트를 해왔지만 자세 문제로 고민해 온 사람이라도 이 가이드를 통해 바벨 백 스쿼트를 훈련의 핵심으로 삼을 수 있는 명확하고 연구에 기반한 체계적인 방법을 배울 수 있습니다.
모든 진지한 웨이트 트레이너가 결국 스쿼트로 돌아오는 이유
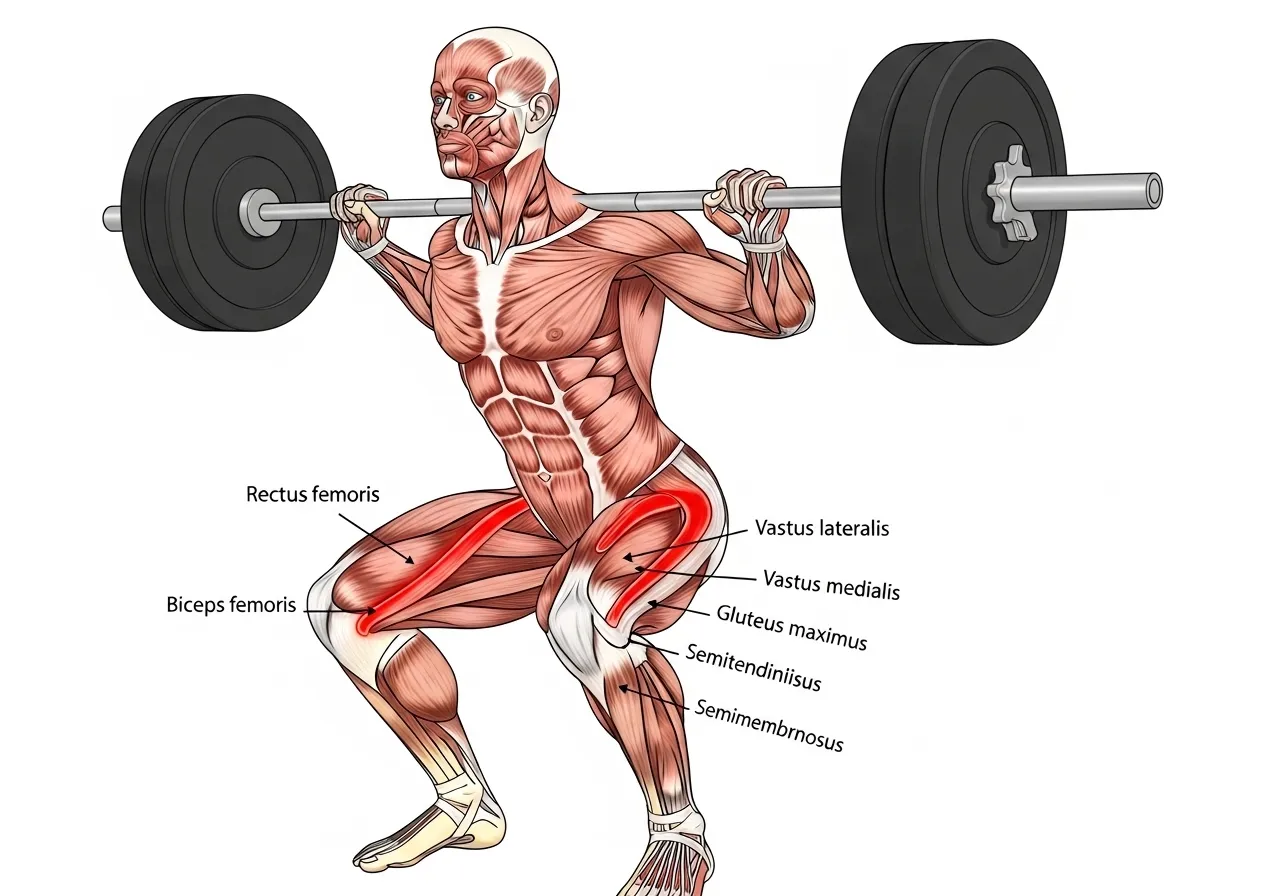
The barbell back squat is classified as a compound, closed-chain movement — meaning it involves multiple joints moving simultaneously while your feet remain fixed to the ground. In a single set of squats, you’re loading the quadriceps, hamstrings, glutes, adductors, spinal erectors, and core all at once. Research published in the Journal of Strength and Conditioning Research reviewing 18 separate EMG studies confirmed that the barbell squat produces high-level muscle activation across the entire lower body, with prime movers activating more intensely as external load increases.
Compare this to a leg press. On the leg press machine, your torso is fixed, your core is not challenged, your spinal erectors are not involved, and the movement pattern has minimal carryover to real-world or athletic movements. You can leg press impressive numbers and still find yourself weak in real life. The barbell squat doesn’t allow that disconnect — it forces the whole body to work as a coordinated system.
There’s also the hormonal argument. Heavy compound movements like squats produce acute elevations in testosterone and growth hormone that isolation exercises simply do not match. While this doesn’t mean squats are magic, it does mean that sessions built around heavy squatting create a more anabolic environment than sessions built around machines — an advantage that compounds across months and years of training.
The Muscles Working During Every Rep
Understanding which muscles fire during the squat helps you train them intentionally and identify weaknesses when form breaks down. The primary movers are the quadriceps (front of the thigh), which extend the knee during the ascent, and the gluteus maximus, which extends the hip as you drive out of the bottom. The hamstrings act as stabilizers at the knee joint and assist hip extension, particularly in deeper squats. The adductor magnus — the large inner thigh muscle — contributes significantly to hip extension and is often undertrained in people who only machine train.
The secondary contributors are equally important: the spinal erectors maintain the neutral spine position throughout the movement, the core musculature generates the intra-abdominal pressure that protects the spine under load, and the upper back muscles hold the bar in position and prevent forward collapse. A weak upper back is one of the most common reasons people fold forward during heavy squats — the legs are strong enough but the torso can’t maintain position under load.
How to Set Up the Barbell Back Squat Correctly
The setup is where most beginners lose half the value of the exercise. Spending two minutes setting up correctly pays dividends in every single rep. Here is the complete setup sequence that I teach every new lifter I work with.
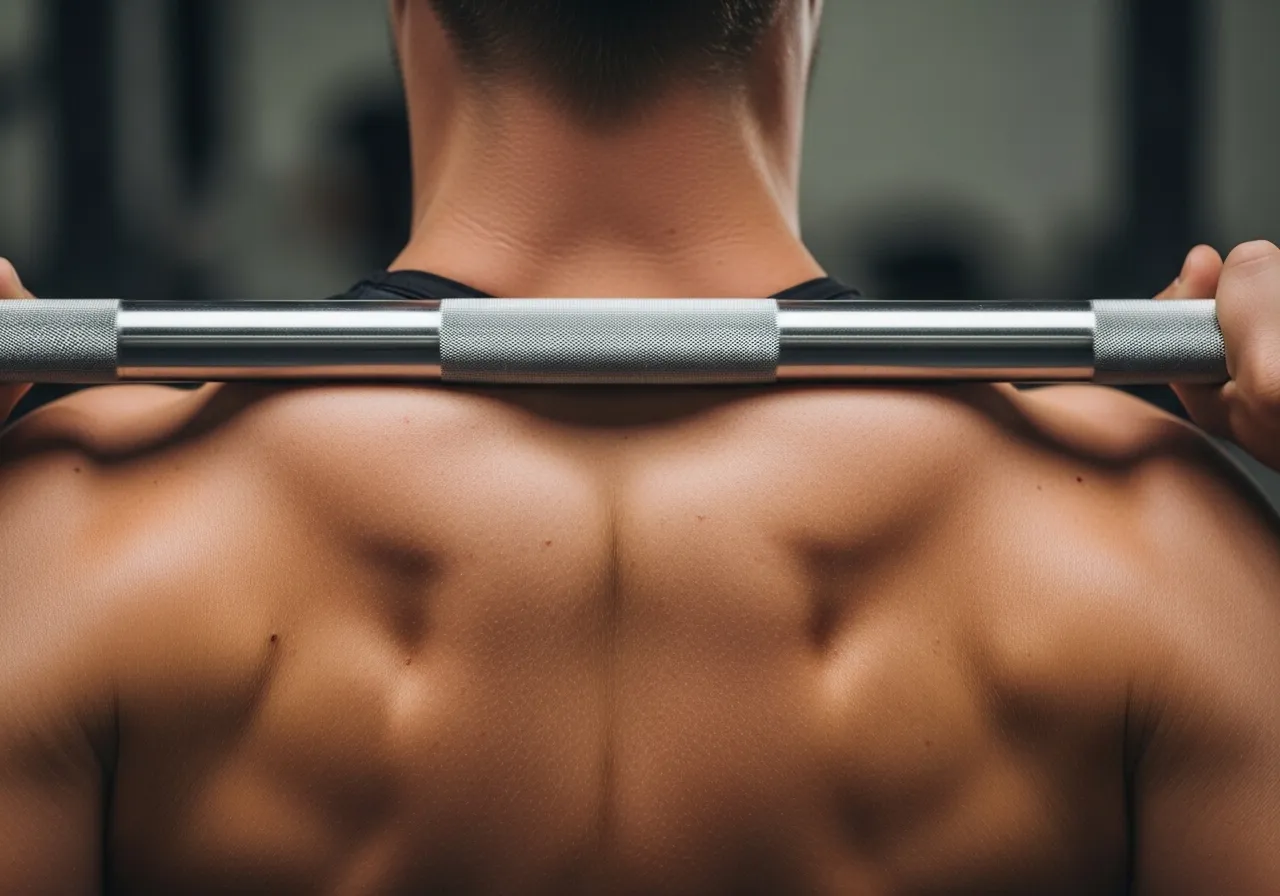
Bar Position: High Bar vs Low Bar
The two standard back squat positions are high bar and low bar. In the high bar squat, the barbell rests on the upper trapezius muscles, just below the base of the neck. This produces a more upright torso and emphasizes the quadriceps. In the low bar squat, the bar sits lower on the rear deltoids, allowing the torso to lean forward more and shifting greater load to the posterior chain — glutes, hamstrings, and spinal erectors.
For most beginners, the high bar position is easier to learn because the upright torso reduces the technical demands on hip mobility and spinal position. Powerlifters typically use the low bar because the forward lean allows heavier absolute loading. Neither is inherently superior — your choice should reflect your goals and your anatomy. If you have long femurs relative to your torso, you’ll naturally lean forward more regardless of bar position, making low bar potentially more comfortable.
Foot Position and Stance Width
Foot width and toe angle are highly individual and should be determined by your hip anatomy, not by copying someone else’s stance. A general starting point is shoulder-width stance with toes pointed out 15-30 degrees. From there, you adjust based on where your squat feels natural and where you can reach depth without your heels rising or your lower back rounding.
People with wider hips generally squat better with a wider stance. People with shallow hip sockets can typically squat narrow with toes more forward. The test is simple: squat with no weight using different stances and find the one that feels most natural at the bottom. That’s your stance. Don’t force a narrow powerlifter stance if your hips don’t allow it comfortably.
The Descent and Bottom Position
Before unracking the bar, take a deep breath into your belly — not your chest — and brace your core as if you’re about to take a punch. This creates intra-abdominal pressure that stabilizes your spine under load. Maintain this brace throughout the descent and ascent. Only exhale at the top between reps, then re-brace before the next descent.
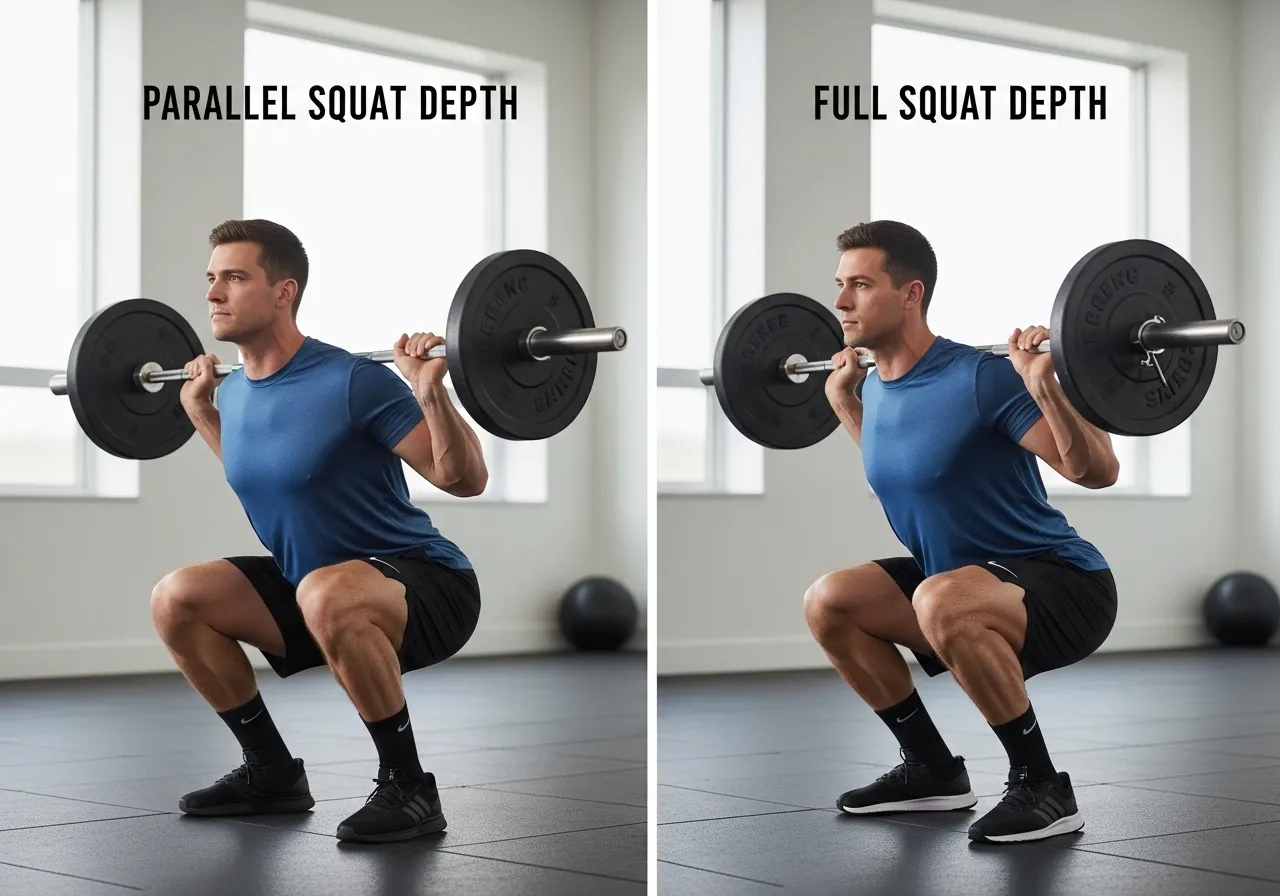
Initiate the descent by pushing your hips back and bending your knees simultaneously. Don’t think “sit down” — think “spread the floor” by pushing your knees out in the direction your toes are pointing. This external rotation cue engages the glutes and prevents the knee cave (valgus collapse) that causes knee pain and reduces force production. Descend until your hip crease drops below the top of your knee — this is parallel depth. Going deeper is fine if your mobility allows and your lower back stays neutral.
The Most Common Squat Mistakes (And Exactly How to Fix Them)
After watching hundreds of squats, the same errors appear consistently. Knowing them in advance lets you self-correct before they become ingrained habits.
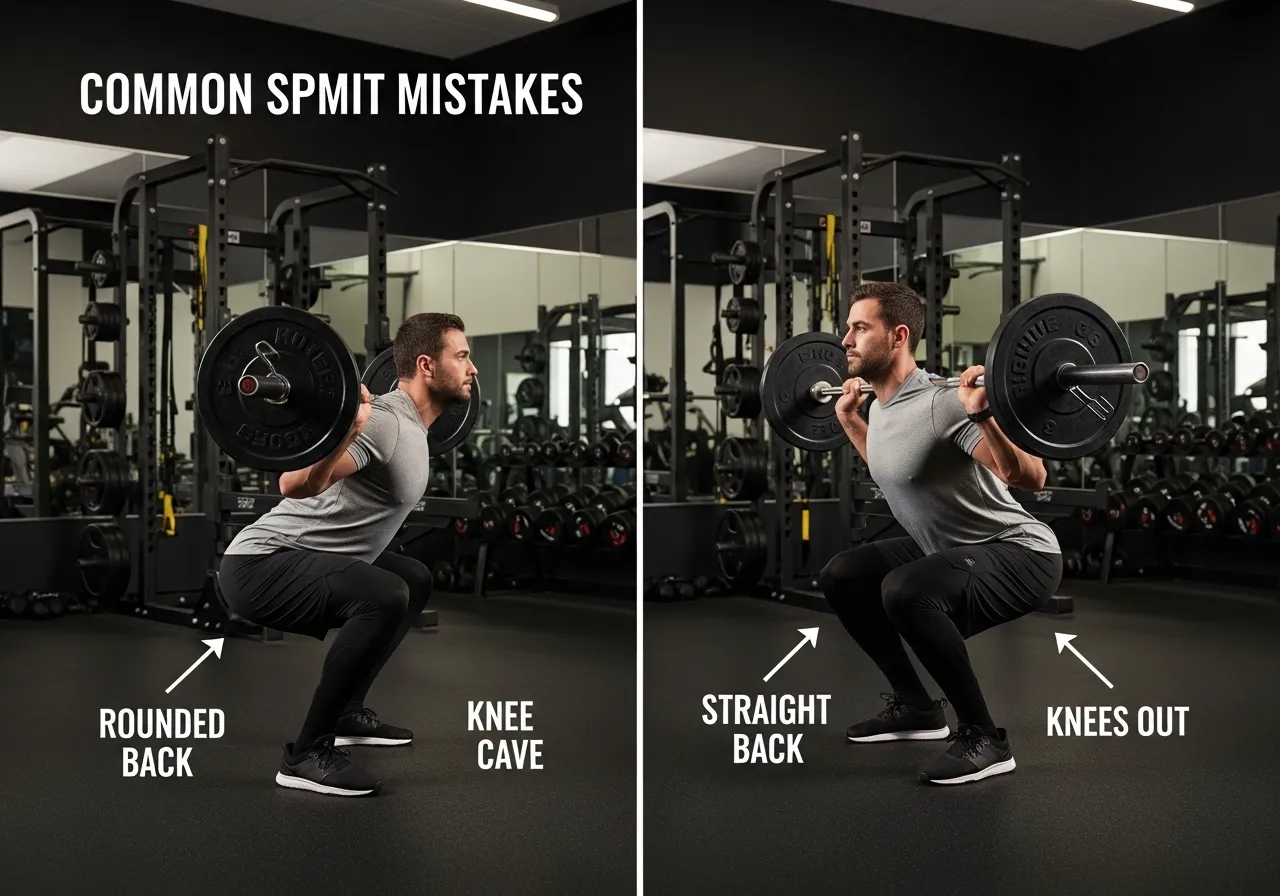
Mistake 1: Knees Caving Inward (Valgus Collapse)
This is the most common squat error and one of the most damaging for long-term knee health. Valgus collapse happens when the knees track inward rather than over the toes, loading the medial knee structures in ways they’re not designed to handle. The primary cause is weak glute medius muscles combined with tight adductors. The fix is twofold: consciously cue “knees out” throughout every rep, and add dedicated glute medius work (banded clamshells, lateral band walks) to your accessory training. A resistance band placed above the knees during warm-up sets also forces the glutes to fire and builds the pattern of pushing out.
Mistake 2: Heels Rising Off the Floor
When heels lift during the descent, it almost always means ankle dorsiflexion is limited — the ankle can’t bend enough to allow the shin to travel forward. The short-term fix is elevating your heels on 5 lb plates or a squat wedge, which reduces the dorsiflexion demand and allows proper depth immediately. The long-term fix is dedicated ankle mobility work: ankle circles, deep squat holds, calf stretching, and wall ankle stretches performed daily over 4-8 weeks. Don’t ignore this — limited ankle mobility forces compensations at the knee and hip that accumulate into injury over time.
Mistake 3: Forward Lean Excessive (Good Morning Squat)
When the torso collapses forward aggressively on the descent, the movement looks more like a good morning than a squat. This overloads the lower back and reduces the leg drive component. Causes include weak upper back, tight hip flexors, or programming the bar position too high for the lifter’s anatomy. Fix the upper back by incorporating heavy barbell rows, face pulls, and band pull-aparts. Fix hip flexor tightness through couch stretches and hip flexor stretches held for 2 minutes per side.
Mistake 4: Half Reps
Squatting to half depth feels easier and allows heavier loading, but it significantly reduces the training stimulus for the glutes and hamstrings, which are most activated in the lower range of motion. A 2024 biomechanical review in the International Journal of Sports Physical Therapy confirmed that squat depth significantly changes muscle recruitment patterns — partial squats predominantly load the quads while full squats distribute load more evenly across the entire lower body. Train full range of motion unless a specific injury requires modification.
Programming the Barbell Back Squat for Continuous Progress
The squat is only as valuable as the progression model applied to it. Technique without progressive overload produces maintenance, not growth. Here’s how to structure squat progression across different training levels.
Beginner Phase: Linear Progression (Weeks 1-12)
In the first 3 months of barbell squatting, your nervous system adapts rapidly and you can add weight to the bar nearly every session. A simple linear progression works perfectly: squat 3 sets of 5 reps, and add 2.5-5 kg every workout. Start conservatively — 50-60% of what you think you could handle for 5 reps. This leaves room for technique work and prevents the early burnout that over-ambitious beginners experience. A beginner following this protocol should be able to squat bodyweight for 5 reps within 8-12 weeks regardless of starting point.
Squat 2-3 times per week at this stage. The frequency accelerates the neural learning that makes the movement feel natural and allows more practice repetitions within the weekly volume. Treat every session as a technique session first, a strength session second.
Intermediate Phase: Weekly Progression (Months 3-12)
As neural adaptation plateaus, weekly progress replaces session-by-session progress. A simple weekly progression: Monday heavy (5×5 at 85%), Thursday moderate (4×8 at 75%). Add weight once per week when all sets are completed with good form. Intermediate lifters should expect to add approximately 5-10 kg to their squat per month during this phase.
Accessory work becomes more important here. Include Romanian deadlifts for posterior chain development, leg press for quad volume, and single-leg work (Bulgarian split squats, step-ups) to address asymmetries and build the unilateral strength that supports bilateral squat performance.
Advanced Phase: Block Periodization (Year 2+)
Advanced lifters require planned variation in training stimulus. A basic block structure: 4-week accumulation block (higher volume, 65-75% intensity), followed by 4-week intensification block (lower volume, 80-90% intensity), followed by 1-week deload. This structure manages fatigue while continuing to drive adaptation. Advanced squatters may only add 2-5 kg per month but the absolute loads involved mean even small increases represent significant progress.
Squat Variations Worth Adding to Your Training
Once the barbell back squat is established as a foundation, targeted variations add specific stimuli that accelerate overall lower body development.
Front Squat
The front squat places the barbell on the front of the shoulders (clavicles and front deltoids), which forces a more upright torso and shifts emphasis to the quadriceps and upper back. Research comparing front and back squats found that the front squat produces lower compressive forces at the knee joint while maintaining equivalent muscle recruitment — making it valuable for athletes with knee sensitivity or those wanting additional quad development. The catch: front squat requires significant wrist and thoracic mobility that many people need to work up to.
Pause Squat
Adding a 2-3 second pause at the bottom of the squat eliminates the stretch-shortening cycle benefit and forces the muscles to generate force from a dead stop. This builds strength specifically at the position where most people are weakest, addresses the tendency to bounce out of the hole, and dramatically improves positional awareness. Use 70-80% of your back squat weight for pause squats — the pause makes the movement significantly harder than the load suggests.
Box Squat
Squatting to a box (set at parallel height) is an excellent teaching tool for beginners who struggle to find depth and a valuable training variation for intermediate lifters who want to work specific positions. The box provides a consistent depth target and forces a brief pause that eliminates momentum. Box squats also allow comfortable training for people with knee issues because the more vertical shin angle reduces patellofemoral stress.
Goblet Squat
Holding a dumbbell or kettlebell at chest height, the goblet squat provides counterbalance that makes achieving depth and an upright torso much easier. It’s the perfect teaching tool for barbell squat mechanics and an excellent warm-up exercise before barbell work. More advanced lifters can load goblet squats heavy enough to provide a meaningful training stimulus for high-rep metabolic work.

Injury Prevention and Long-Term Squat Health
The barbell back squat has a reputation for causing knee and lower back injuries that the research doesn’t fully support. Most squat-related injuries result from poor technique, excessive loading before technique is established, or inadequate recovery — not from the movement itself. Applied correctly, the squat builds the joint resilience that prevents the injuries people fear it causes.
Protecting Your Knees
The knees are protected by training through full range of motion, maintaining proper knee tracking over the toes, and building balanced strength between the quadriceps and hamstrings. Avoid the common mistake of always squatting in a knee sleeve before developing the strength the sleeve is compensating for — sleeves can mask weakness that eventually becomes injury when the sleeve isn’t available. Build the knee’s capacity directly rather than always supporting it externally.
Protecting Your Lower Back
Lower back issues during squatting almost always trace to one of two sources: butt wink (posterior pelvic tilt at the bottom of the squat causing lumbar flexion under load) or excessive forward lean placing shear forces on the lumbar discs. Address butt wink by finding the depth at which your pelvis stays neutral and working hip and ankle mobility to gradually increase that depth over time. Address forward lean by strengthening the upper back and improving hip flexor mobility as described in the technique section above.
The Role of Warm-Up
워밍업을 할 때는 절대로 준비운동을 하지 마세요. 제대로 된 스쿼트 워밍업에는 5분간의 유산소 운동, 관절 준비를 위한 고관절 돌리기 및 다리 흔들기, 그리고 점진적인 무게 추가(본중량 운동 전 빈 바 세트)가 포함됩니다. 이 워밍업 시간은 낭비가 아니라, 부상 없이 강도 높은 훈련을 반복할 수 있도록 해주는 준비 운동입니다. 저는 고중량 스쿼트 훈련을 위해 15분간 워밍업을 하는데, 시간이 아무리 부족하더라도 이 워밍업 시간은 절대 생략하지 않습니다.
바벨 백 스쿼트에 대한 자주 묻는 질문
스쿼트는 얼마나 깊게 해야 할까요? 최소한 엉덩이 주름이 무릎 위쪽보다 아래로 내려가는 평행 스쿼트는 되어야 합니다. 가동성이 허락하고 허리가 전체 가동 범위 동안 중립을 유지한다면, 더 깊게 스쿼트하는 것이 전반적인 근육 발달에 일반적으로 더 좋습니다. 평행 스쿼트부터 시작해서 가동성이 향상됨에 따라 점차 깊이를 늘려가세요.
벨트를 사용해야 할까요? 리프팅 벨트는 도구이지, 목발이 아닙니다. 먼저 벨트 없이 코어 근육을 단단히 조이는 법을 배우세요. 이렇게 하면 실생활과 모든 운동에서 몸을 보호하는 내재적인 척추 안정성이 강화됩니다. 스쿼트 중량이 체중의 약 1.5배를 넘으면 벨트를 사용해도 부상 위험을 높이지 않고 추가적인 하중을 견딜 수 있습니다. 처음부터 벨트를 사용하면 벨트 없이 코어 근육을 단단히 조이는 기술을 익히는 데 방해가 됩니다.
스쿼트는 얼마나 자주 해야 할까요? 초보자는 주 2~3회 스쿼트를 하는 것이 좋습니다. 중급자는 보통 주 2회, 고급자는 주 1회 고강도 스쿼트 또는 주 3회 이상 신중하게 볼륨을 조절하며 스쿼트를 할 수 있습니다. 많이 한다고 항상 좋은 것은 아니며, 회복이 다른 어떤 요소보다 효과적인 훈련 빈도를 결정하는 중요한 요소입니다.
스쿼트할 때 무릎이 아파요. 어떻게 해야 할까요? 먼저 통증이 날카로운지 (날카로운 통증이라면 즉시 운동을 중단하고 병원에 가세요) 아니면 둔한 통증인지 (둔한 통증이라면 자세 문제일 가능성이 높습니다) 확인하세요. 운동 중 날카로운 통증이 느껴진다면 운동을 계속하기 전에 반드시 의사의 진찰을 받아야 합니다. 스쿼트 중 무릎에 둔한 통증이 느껴진다면, 무릎 정렬을 개선하고, 스쿼트 깊이를 일시적으로 줄이며, 둔근과 내측광근(VMO)을 강화하는 것이 가장 효과적입니다. 자세 교정 후에도 2~3주 동안 통증이 지속된다면 물리치료를 받으세요.
하이바 스쿼트와 로우바 스쿼트의 차이점은 무엇일까요? 하이바 스쿼트는 승모근 상부에 바가 놓여 상체를 곧게 유지하며 대퇴사두근을 강조합니다. 로우바 스쿼트는 삼각근 후면에 바가 놓여 상체를 앞으로 기울이게 하고 후면 사슬 근육을 강조합니다. 대부분의 초보자는 하이바 스쿼트로 시작하는 것이 좋습니다. 파워리프터는 일반적으로 더 무거운 중량을 들 때 로우바 스쿼트를 사용합니다. 두 가지 모두 유효한 운동 방법이므로 목표와 신체 조건에 맞춰 편안하게 할 수 있는 방법을 선택하세요.
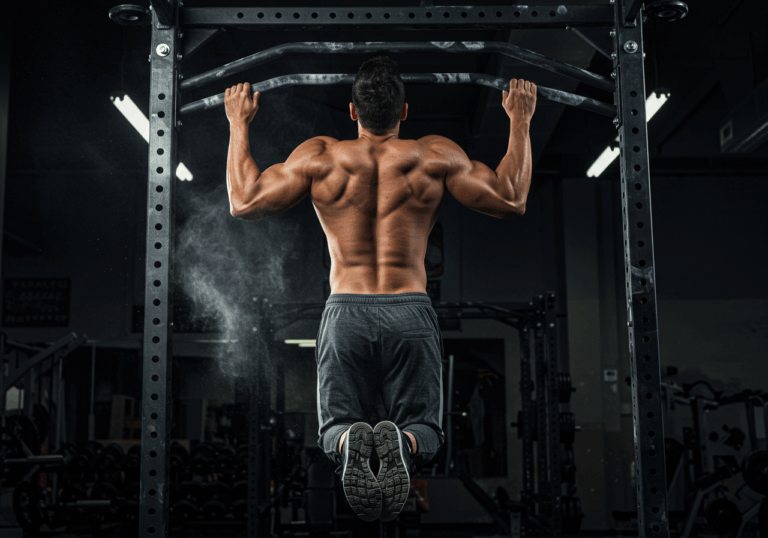
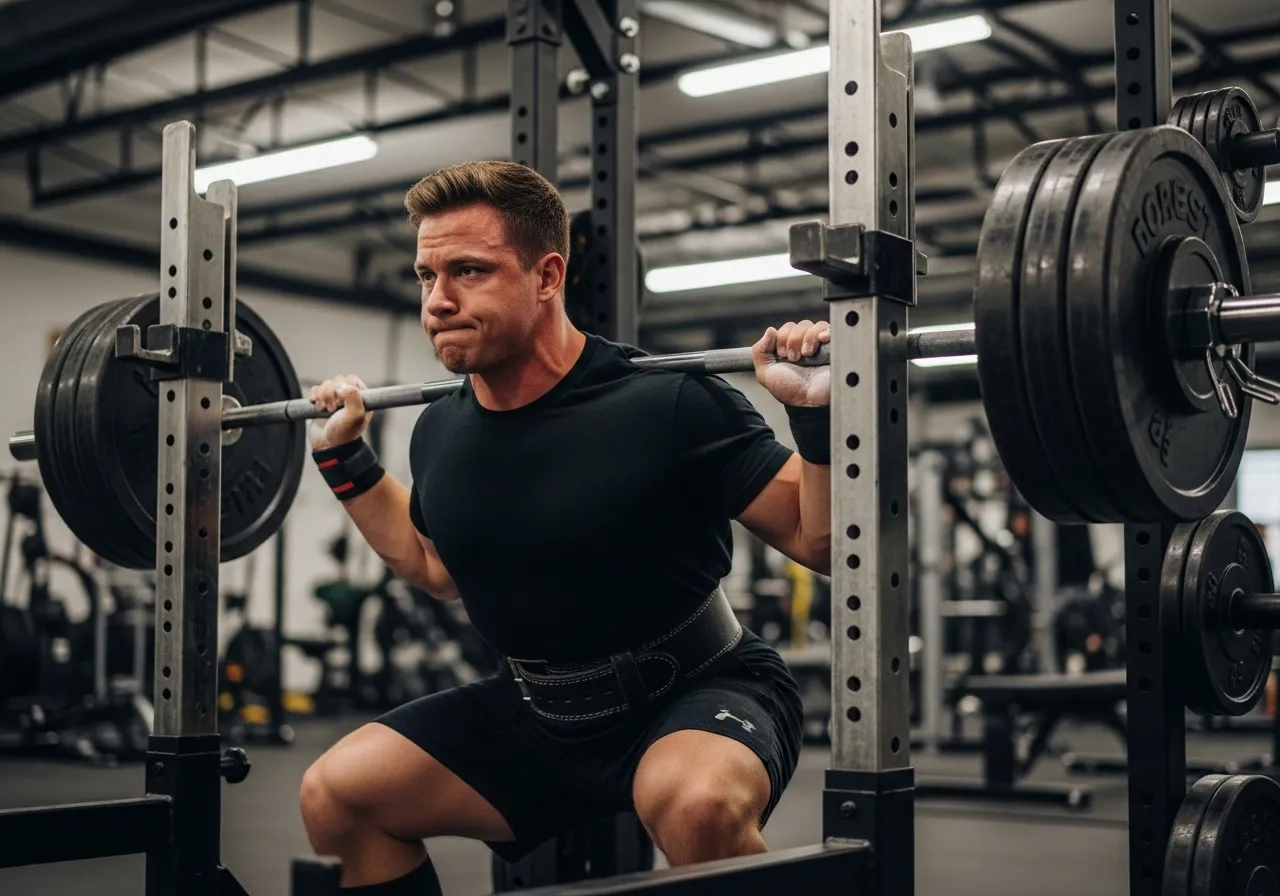
헬스장에서 바벨 백 스쿼트를 올바른 자세로 수행하는 사람