Hip Mobility Guide: Research-Backed Exercises, 7 Key Drills, and Daily Mobility Protocol

This article is for general educational purposes only and does not replace professional medical advice. If you have any hip, lower back, or groin conditions, please consult a qualified healthcare professional before beginning any daily hip mobility routine programme.
Hip mobility — the ability of the hip joint to move freely through its full range of motion — affects nearly every lower body movement pattern, from squatting and deadlifting to walking, running, and changing direction. (Related: deadlift guide)
Yet hip mobility is one of the most commonly neglected training qualities. Most trainees either skip it entirely or approach it with a few token stretches that produce little lasting change.
This guide covers the anatomy of the hip joint, what research says about improving hip mobility, the most effective exercises, and an 8-week programme.
Hip Joint Anatomy: Why Mobility Here Matters So Much
The Structure of the Hip Joint
The hip is a ball-and-socket joint (a joint where the rounded head of the femur fits into the cup-shaped acetabulum of the pelvis) — capable of movement in six directions: flexion, extension, abduction, adduction, internal rotation, and external rotation.
This multi-directional range makes the hip unique among the major joints of the lower body. The knee primarily moves in one plane (flexion and extension), while the hip must function across multiple planes simultaneously during most athletic movements.
Key Muscles Affecting Hip Mobility
| Muscle Group | Primary Action | Common Restriction Effect |
|---|---|---|
| Iliopsoas | Hip flexion, trunk stabilisation | Limits hip extension, anterior pelvic tilt |
| Rectus femoris | Hip flexion + knee extension | Limits hip extension when knee is bent |
| Hip external rotators (piriformis, gemelli) | External rotation, abduction | Limits internal rotation, deep squat depth |
| Adductors | Hip adduction | Limits hip abduction and lateral movement |
| Gluteus medius/minimus | Hip abduction, internal rotation | Weakness contributes to knee valgus |
Why Sedentary Behaviour Restricts Hip Mobility
Prolonged sitting places the hip in a sustained flexed position — typically around 90 degrees of hip flexion for hours at a time. Over weeks and months, this shortens the hip flexor mobility guide and reduces the range available in hip extension.
Research consistently identifies sedentary behaviour as a primary contributor to restricted hip extension flexibility, with desk workers and sedentary populations showing significantly less hip extension range than physically active groups.
Hip mobility restrictions are largely modifiable. Most limitations caused by sedentary posture and muscle tightness respond well to consistent stretching and mobility work — particularly when combined with strengthening the muscles that oppose the tight ones.
Hip Mobility vs Hip Flexibility: An Important Distinction
Hip flexibility refers to the passive range of motion available at the hip — how far the joint can be moved when an external force (gravity, a partner, or a strap) assists the movement.
Hip mobility refers to the active range — how much range the nervous system can access and control under muscular effort. Mobility is therefore a combination of flexibility and neuromuscular control.
Most passive stretching programmes develop flexibility but not necessarily mobility. True mobility improvement requires training the nervous system to actively control the new range — not just passively stretch into it. This distinction explains why someone can be very flexible in a passive pigeon stretch but still struggle to achieve depth in an active squat.
The programme in this guide addresses both: passive stretching to increase range, combined with active drills (CARs, 90/90 transitions, loaded holds) to develop usable mobility across the full range.

What Does Research Say About Hip mobility training guide?
Hip Flexor Stretching: Meta-Analysis Findings
A systematic review and meta-analysis on the effects of hip flexor stretching guide on performance found that isolated hip flexor stretching of up to 120 seconds had no negative effect on performance — and may even produce a positive impact on jump performance — indicating that moderate-duration hip flexor stretching before activity does not impair athletic output and may be beneficial for individuals with tight hip flexors.
Short hip flexor stretches (30–120 seconds) showed no performance impairment and potential positive effects on jump height.
Very long stretches (270–480 seconds) showed a trivial but significant performance decrease — suggesting shorter bouts are preferable before activity.
Hip Extension Stretch Technique Matters
A randomised crossover clinical trial comparing two hip flexor stretching techniques found that adding a posterior pelvic tilt (actively tucking the pelvis under) to the standard half-kneeling hip flexor stretch produced greater improvements in hip extension range of motion compared to the traditional stretch alone — suggesting that the pelvic position during the stretch significantly influences its effectiveness.
This has a practical implication: simply getting into a lunge position and reaching forward may not maximally stretch the hip flexors. Actively tucking the pelvis under during the stretch ensures the hip is in true extension rather than compensating with lumbar extension.
Mobility Training and Athletic Performance
An MDPI review comparing mobility training and core training in young basketball players found that the mobility training group demonstrated a 254.9% relative improvement in functional movement screening scores compared to 115.5% in the core training group — with improvements in hip and ankle mobility particularly associated with better dynamic balance and neuromuscular control during athletic tasks.
Hip mobility improvements are not just about flexibility — they directly translate to balance, movement quality, and athletic performance. Mobility training may be a more efficient intervention than core training alone for improving overall functional movement scores.
Hip Flexor Tightness and Gluteal Inhibition
Research indicates that individuals with restricted hip flexor length demonstrate decreased gluteus maximus activation during exercises like the bilateral squat — suggesting that tight hip flexors may suppress glute function through reciprocal inhibition (a neurological mechanism where activation of one muscle group reduces activation of the opposing group).
This has a significant practical implication: addressing hip flexor tightness may not only improve hip extension range but may also improve glute activation in squatting and hip hinge movements.
Hip Mobility for Specific Training Goals
Different training disciplines have different hip mobility priorities. Understanding which planes of hip mobility matter most for a given activity helps prioritise the relevant exercises:
| Activity | Primary Hip Mobility Need | Priority Exercise |
|---|---|---|
| Squatting (barbell) | Hip flexion + external rotation | Deep squat hold, 90/90 switch |
| Deadlifting | Hip flexion at bottom + hip extension | Hip flexor stretch, hip hinge prying |
| Running / sprinting | Hip extension range | Half-kneeling stretch, couch stretch |
| Martial arts / kicking sports | Hip flexion + abduction | Deep squat hold, figure-4 stretch |
| General fitness | Balanced all-round hip range | Full 7-exercise sequence |

How to Assess Your Hip Mobility
The Thomas Test: Hip Flexor Length
The Thomas test (a clinical assessment used to identify hip flexor tightness) can be performed at home to gauge hip extension range:
- Lie on the edge of a table or high bed, pulling both knees to the chest
- Lower one leg toward the floor while keeping the other knee held to the chest
- If the lowered thigh cannot reach horizontal (parallel to the floor), hip flexor tightness is likely present
- If the knee of the lowered leg extends significantly as the hip drops, rectus femoris (the superficial quad muscle that crosses both the hip and knee) tightness may also be contributing
The Deep Squat Screen: Multiple Joint Assessment
Stand with feet shoulder-width apart and attempt to squat to full depth with arms overhead. This screens not just hip mobility but also ankle dorsiflexion (the ability to flex the foot upward toward the shin) and thoracic spine extension simultaneously.
- Heels rise off the floor: ankle dorsiflexion limitation is likely the primary restriction
- Trunk folds forward excessively: hip flexion range or thoracic mobility may be limiting
- Knees cave inward: hip abductor weakness or internal rotation restriction may be contributing
- Unable to reach full depth: combination of hip flexion, hip external rotation, or ankle mobility limitations
The 90/90 Hip Rotation Screen
Sit on the floor with both legs bent to 90 degrees — front leg externally rotated, back leg internally rotated (the “90/90 position”). The ability to sit upright with both legs flat on the floor indicates adequate hip rotation range in both directions.
Difficulty maintaining the position — either falling backward or unable to flatten the back leg — indicates hip rotation restriction that may benefit from targeted mobility work.
The Role of the Hip Capsule in Mobility Restriction
Not all hip mobility restrictions originate from muscle tightness. The hip joint capsule (the fibrous tissue envelope surrounding the hip joint) can also restrict range of motion — particularly in hip internal rotation and deep hip flexion.
Capsular restrictions respond differently to stretching than muscle tightness:
- Muscle tightness — typically responds well to static stretching over several weeks
- Capsular restriction — more responsive to joint mobilisation techniques performed by a physiotherapist, or to dynamic mobility work such as CARs and loaded end-range holds
If hip mobility fails to improve after 6–8 weeks of consistent daily stretching, capsular restriction may be a contributing factor — in which case assessment by a physiotherapist who can perform manual joint mobilisation may be more effective than continuing to add stretching volume.
Hip Mobility and Lower Back Pain
A clinical study on static hip stretching and lower back pain found significant improvements in hip range of motion and reductions in pain scores in patients with non-specific lower back pain following a 4-week hip stretching protocol.
The proposed mechanism is that limited hip extension increases compensatory lumbar extension during gait and exercise — creating repetitive micro-stress at the lumbar facet joints. Restoring hip extension range reduces the demand for lumbar compensation and may reduce the resulting discomfort.

The Seven Most Effective Hip Mobility Exercises
Hip Flexor Stretches
🦵 Half-Kneeling Hip Flexor Stretch (with Posterior Pelvic Tilt)
Target: Iliopsoas, rectus femoris
How: Kneel on one knee (back knee down, front foot forward). Actively tuck the pelvis under (posterior pelvic tilt) before shifting weight forward. Hold 30–45 seconds per side.
Key point: The pelvic tuck is the most important part — without it, the stretch often comes from lumbar extension rather than true hip extension. Research confirms this technique produces greater hip extension gains than the traditional stretch.
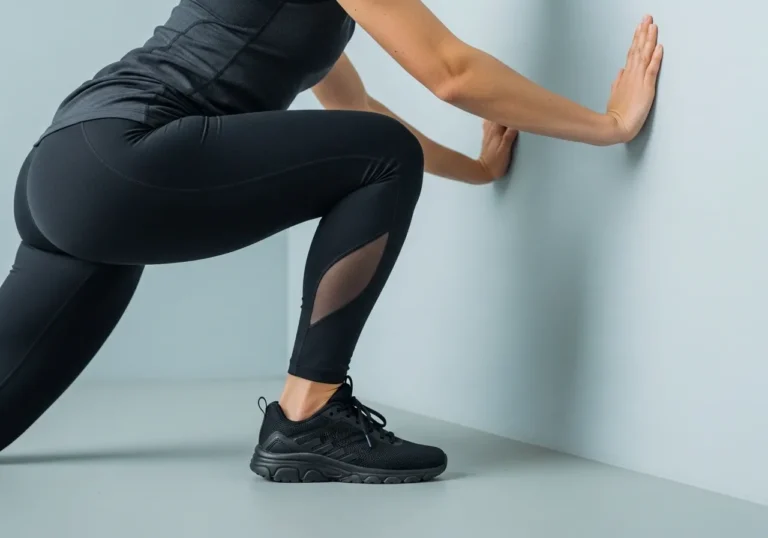
🦵 Couch Stretch
Target: Hip flexors, rectus femoris (knee-bent position)
How: Place the back shin against a wall or couch, front foot forward on the floor. Drive the hip forward while keeping the torso upright. Hold 45–60 seconds per side.
Key point: The bent-knee position specifically targets the rectus femoris — a biarticular muscle that crosses both the hip and knee. This muscle is often missed by straight-leg hip flexor stretches.
Hip Rotation Exercises
🦵 90/90 Hip Switch
Target: Hip internal and external rotators, hip capsule
How: Begin in the 90/90 position. Rotate both legs side to side, transitioning through the centre. Perform 8–10 rotations per direction, holding each end position for 2–3 seconds.
Key point: Control the rotation rather than letting the hips flop — slow, deliberate movement develops active range of motion (usable range under muscular control), not just passive flexibility.
🦵 Pigeon Pose / Figure-4 Stretch
Target: Piriformis, deep external rotators (posterior hip)
How: From a seated or lying position, cross one ankle over the opposite knee in a figure-4 shape. Gently pull the bottom knee toward the chest until a stretch is felt in the back of the hip. Hold 30–60 seconds per side.
Key point: For those with anterior hip pain in the standard pigeon pose, the supine figure-4 version (lying on the back) places less stress on the anterior hip joint while achieving a similar stretch of the external rotators.
Dynamic Hip Mobility Drills
🦵 Hip CARs (Controlled Articular Rotations)
Target: Full hip joint range — all planes simultaneously
How: Stand on one leg. Slowly move the free hip through its maximum range in a circular motion — forward, out to the side, behind, and back. Perform 3–5 rotations per direction per side.
Key point: CARs (Controlled Articular Rotations) train the nervous system to access the hip’s full range under muscular control. This is distinct from passive stretching — you are actively driving the joint through its range rather than being passively moved into it.
🦵 Deep Squat Hold
Target: Hip flexion, external rotation, ankle dorsiflexion
How: Stand with feet shoulder-width apart, toes slightly out. Squat to full depth and hold the bottom position. Use hands on the floor or a post for support if needed. Hold 30–60 seconds and repeat 3–5 times.
Key point: The deep squat hold is one of the most efficient hip mobility exercises — it stretches the hip flexors, external rotators, and adductors simultaneously while also loading the ankle and thoracic spine in their end ranges.
🦵 Hip Hinge Prying
Target: Hip adductors, hip flexion depth
How: In the bottom of a deep squat, place elbows on the inside of the knees and use the elbows to gently push the knees outward. Rock slightly forward and back. Perform 10–15 slow repetitions.
Key point: Hip hinge prying combines passive adductor stretching with active hip rotation — addressing two common restrictions in a single movement. The rocking motion also gently mobilises the hip capsule.
Contract-Relax Technique for Deeper Hip Stretches
Contract-relax (CR) stretching — also known as PNF stretching (proprioceptive neuromuscular facilitation, a technique using alternating muscle contraction and relaxation to increase range) — may produce greater short-term range of motion improvements than passive static stretching alone.
The technique applied to the hip flexor stretch:
- Move into the half-kneeling hip flexor stretch position
- Actively contract the hip flexors of the back leg (press the back knee into the floor) for 5–8 seconds
- Relax and breathe out for 2–3 seconds
- Gently move deeper into the stretch — the muscle should yield further than the previous end range
- Repeat 3 times per side per session
This technique works by using the post-contraction inhibition (the brief period of reduced neural tension in a muscle immediately after it has contracted) to temporarily reduce the stretch reflex that limits range.
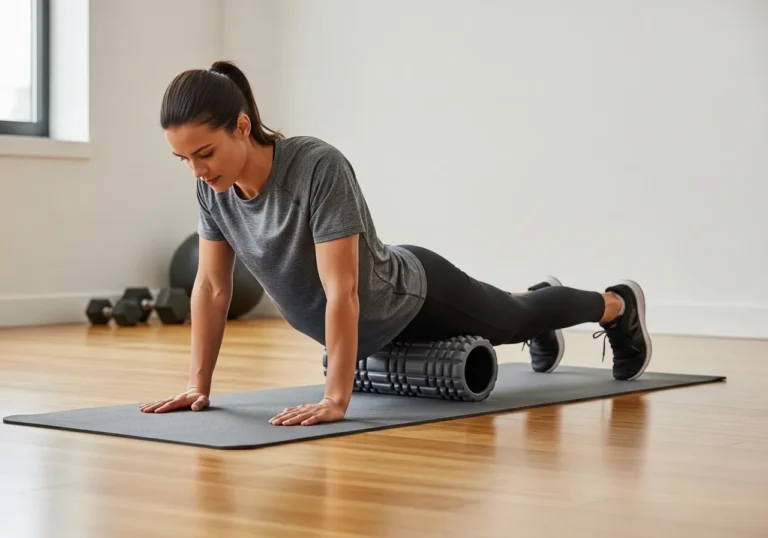
Foam Rolling as a Hip Mobility Supplement
Foam rolling (self-myofascial release using a dense foam cylinder) of the hip flexors, IT band, and external rotators may help reduce myofascial tension (restriction in the fascial connective tissue layer surrounding muscles) before stretching.
While research on the long-term hypertrophy or flexibility effects of foam rolling is mixed, its short-term effects on reducing tissue stiffness and improving range of motion for the subsequent 10–20 minutes appear reasonably well-supported. Using foam rolling as a pre-stretch preparation rather than a standalone mobility solution may be its most effective application.

Does Hip Mobility Actually Improve Squat Depth and Athletic Performance?
Hip Mobility and Squat Mechanics
Hip mobility — specifically hip flexion range and hip external rotation — is one of the primary determinants of squat depth. Insufficient hip flexion range causes the pelvis to posteriorly tilt (the “butt wink”) at the bottom of the squat, which increases lumbar flexion under load.
While ankle dorsiflexion is also a major limiter for many trainees, hip rotation restriction specifically contributes to:
- Inability to achieve full squat depth without forward trunk lean
- Knee caving (valgus collapse) — the knee tracks inward when internal rotation of the hip is restricted
- Uneven depth or asymmetry between sides when hip mobility differs between the left and right hip
Hip Mobility and Sprint Performance
Biomechanical research on sprinting indicates that adequate hip extension range is important for maximising stride length and speed. The hip must move through full extension during the push-off phase of running — and restricted hip flexors limit this extension, shortening the stride and reducing propulsive force.
Research on softball and field sport athletes found that those who failed to maintain hip mobility during competitive seasons experienced measurable decreases in relative stride length — directly impacting sprinting economy and speed.
Hip Mobility and Injury Risk
Restricted hip mobility has been associated with increased risk of several common injuries in active populations:
- Lower back pain: Limited hip extension causes compensatory lumbar extension during walking and running, increasing stress on the lumbar spine
- Hamstring strains: Anterior pelvic tilt from tight hip flexors places the hamstrings in a chronically lengthened position, increasing their vulnerability during high-speed movements
- Knee pain: Hip abductor weakness and restricted hip internal rotation are associated with patellofemoral pain syndrome (a condition involving pain around the kneecap) and IT band syndrome
- Groin strains: Limited hip adductor flexibility increases strain risk during lateral movements and kicking actions
How do I know if my hip restriction is muscular or structural?
Distinguishing between muscular tightness and structural (bony) limitations is important for setting realistic expectations:
- Muscular restriction typically feels like a pulling or stretching sensation at the muscle belly or tendon attachment, improves with consistent stretching over weeks, and is often asymmetrical between sides
- Structural limitation typically feels like a hard block or bone-on-bone sensation at the front of the hip joint at end range, does not improve meaningfully with stretching regardless of duration or consistency, and is usually symmetrical between sides
A physiotherapist or sports medicine physician can assess hip mobility through clinical tests to differentiate soft tissue from structural restrictions — guiding whether a stretching programme or exercise modification is the more appropriate intervention.
What is the best time of day to do hip mobility work?
The most effective time is the time that can be done most consistently. Morning mobility work may feel stiffer initially but many trainees find it improves energy and reduces morning lower back discomfort. Evening sessions often feel more productive due to accumulated tissue warmth from daily activity.
Performing hip mobility work after any light activity (a short walk, gentle cycling) when tissue temperature is slightly elevated may allow deeper range with less discomfort than performing it completely cold first thing in the morning.

8-Week Hip Mobility Programme
Programme Overview
This programme is designed to be performed daily — 10–20 minutes per session — as either a warm-up before training or a standalone mobility session. Consistency is more important than duration: daily practice of shorter sessions generally produces faster improvements in range of motion than infrequent longer sessions.
Each phase progressively increases exercise difficulty and introduces more active range of motion work as passive flexibility improves.
📅 Phase 1 — Weeks 1–2: Foundation (Daily, 10–12 min)
- Half-kneeling hip flexor stretch (with pelvic tilt): 3 × 45 sec per side
- Figure-4 / supine pigeon stretch: 3 × 45 sec per side
- Deep squat hold: 3 × 30 sec
- Hip CARs: 3 rotations per direction per side
Focus: Establish daily habit, develop passive range, learn pelvic tilt technique.
📅 Phase 2 — Weeks 3–4: Volume Build (Daily, 12–15 min)
- Couch stretch: 3 × 60 sec per side — add to Phase 1 stretches
- 90/90 hip switch: 2 × 10 rotations — hold each end 3 sec
- Hip hinge prying: 2 × 15 slow repetitions
- Deep squat hold: 4 × 40 sec — increase hold duration
Focus: Add rotation work, deepen squat hold, introduce dynamic elements.
📅 Phase 3 — Weeks 5–6: Active Range Development (Daily, 15–18 min)
- Hip CARs: 5 rotations per direction per side — increase speed control
- 90/90 active transitions: 3 × 8 per side with 2-sec hold at end range
- Couch stretch + active contraction: contract the glute of the stretched leg for 5 sec, relax, deepen
- Half-kneeling reach: add an overhead arm reach to the hip flexor stretch position — 3 × 5 per side
Focus: Transition from passive to active range; use contract-relax technique to deepen stretches.
📅 Phase 4 — Weeks 7–8: Integration and Loading (Daily, 18–20 min)
- Full routine from Phases 1–3 as a flowing sequence
- Loaded deep squat (goblet squat hold): 3 × 45 sec with light dumbbell — loads hip at end range
- Banded hip flexion: standing with a resistance band around the thigh, actively drive the knee up to 90 degrees — 3 × 10 per side
- Reassessment: repeat Thomas test and 90/90 screen to compare with Week 1
Focus: Load the new range to build strength through mobility. Integration of all previous work.
The Importance of Strengthening the New Range
A common mistake in mobility training is developing passive flexibility without building the strength to use the new range under load. Passive range without active control is sometimes called “passive insufficiency” — the muscles can be stretched into a position but cannot generate force there.
Phase 4 of this programme begins to load the hip at its end ranges — using goblet squat holds and banded hip flexion to build active strength at the limits of newly acquired mobility.
Mobility gains that are not reinforced with strength tend to regress within days to weeks. Pairing each new range of motion with a strengthening exercise that uses that range is the most durable approach to lasting hip mobility improvement.
How to Integrate Hip Mobility into Your Training Week
For trainees who already follow a structured strength or conditioning programme, the following integration approaches may work well:
- Pre-training warm-up (5–8 min): Hip CARs (3 rotations per side), 90/90 transitions (8 per side), deep squat hold (2 × 30 sec) — dynamic mobility only, no long static holds before heavy lifting
- Post-training cool-down (8–10 min): Half-kneeling hip flexor stretch (2 × 60 sec per side), pigeon stretch (2 × 60 sec per side), couch stretch (1 × 90 sec per side)
- Standalone mobility day (15–20 min): Full 7-exercise sequence from the programme, using longer hold times and the contract-relax technique
On rest days from resistance training, performing a short standalone hip mobility session (10–15 min) may accelerate range improvements more rapidly than limiting mobility work to training days only.
Frequently Asked Questions About Hip Mobility
How long does it take to see real improvement in hip mobility?
Most trainees notice initial improvements within 2–3 weeks of consistent daily practice — particularly in passive hip flexor length and external rotation range.
Significant, lasting improvements in complex restrictions (such as hip capsule tightness or deep external rotator shortening) typically require 6–12 weeks of consistent work. The key variable is frequency: daily practice is markedly more effective than two or three sessions per week for developing range of motion.
Should I stretch before or after training?
The answer depends on the type of stretching:
- Dynamic hip mobility drills (CARs, 90/90 transitions, leg swings) — appropriate before training as part of a warm-up
- Static hip flexor stretches held 30–60 seconds — research indicates this duration is unlikely to impair performance when performed before training, particularly if hip flexor tightness is present
- Long-duration static stretches (2–5 minutes per position) — better suited to post-training or dedicated mobility sessions when no performance activities follow
Why does my lower back feel better when I do hip mobility work?
Hip flexor tightness is one of the most common contributors to lower back discomfort in sedentary populations. When the hip flexors are tight, they pull the lumbar spine into extension and increase compressive loading on the lumbar facet joints during standing and walking.
Releasing hip flexor tension through stretching and mobility work reduces this compressive pull, which many trainees experience as a reduction in lower back tightness and discomfort. This is not a treatment for lower back pathology — but it is a meaningful improvement in the postural mechanics that contribute to non-specific lower back pain.
Can I do hip mobility work every day?
Yes — daily hip mobility work is not only safe but generally recommended for individuals with significant restrictions. Unlike resistance training, which requires recovery time between sessions for muscle adaptation, mobility work typically does not create the same tissue damage that necessitates rest days.
The main contraindication is hip pain that worsens during or after mobility exercises. If any exercise consistently reproduces hip pain, stop that specific exercise and consult a physiotherapist before continuing.
Does body type affect hip mobility potential?
Yes — hip socket depth and orientation vary significantly between individuals and are determined by genetics. Deeper hip sockets (higher acetabular depth) physically limit how much hip flexion and rotation range is possible, regardless of soft tissue flexibility.
This means some trainees may achieve full deep squat depth with minimal mobility work, while others may never achieve the same position despite months of consistent training — due to bony anatomy rather than muscle tightness. Working with a physiotherapist or functional movement specialist may help distinguish between soft tissue restrictions (addressable with mobility work) and structural limitations (requiring exercise modifications rather than forcing range).
Is hip mobility training safe during pregnancy?
Many hip mobility exercises are appropriate during pregnancy, but some positions — particularly those involving lying flat on the back for extended periods after the first trimester, or deep supine hip stretches — may need modification as pregnancy progresses.
Gentle dynamic hip mobility work and supported deep squat holds are generally well-tolerated and may help maintain hip function during pregnancy. However, pregnancy-specific exercise guidance from a qualified physiotherapist or obstetric physiotherapist is recommended before beginning or continuing a mobility programme during pregnancy.
Why does my hip click or pop during mobility exercises?
Hip clicking or popping during mobility exercises is common and in most cases not a cause for concern. The most frequent causes include:
- Tendon snapping: A tendon (most commonly the iliopsoas tendon) moving over a bony prominence — typically felt at the front of the hip and painless
- Gas bubble release: Nitrogen gas release within the joint capsule — the same mechanism as knuckle cracking, completely harmless
- Labral irritation: If clicking is accompanied by pain, catching, or a feeling of instability, labral pathology (a tear or irritation of the cartilage rim surrounding the hip socket) should be assessed by a sports medicine professional
Painless clicking during hip mobility exercises is generally not a reason to stop the exercise. Clicking accompanied by pain — particularly groin pain — warrants professional assessment before continuing.