The Barbell Back Squat: What the Research Says About Depth, Bar Position, and Lower Body Development
This article is for general educational and informational purposes only.
It does not replace professional medical or fitness advice.
If you have any pre-existing condition, knee, hip, or lower back concern — please consult a qualified healthcare professional or certified personal trainer before starting or modifying any exercise program.
The barbell back squat is one of the most studied, debated, and misunderstood exercises in resistance training.
Debates about squat depth, bar position, stance width, and knee safety have persisted for decades — often generating more heat than clarity.
This guide cuts through the noise with a research-grounded approach: explaining what EMG studies actually show about squat variations, how to apply proper technique, and how to build a progressive program around this foundational lower body movement.
Squat Anatomy: Which Muscles Does the Back Squat Train?
Primary Muscles
The back squat is a multi-joint, compound exercise that loads the lower body through simultaneous knee and hip flexion and extension.
Understanding which muscles are primarily trained — and how variables like depth and stance width shift emphasis — is essential for intelligent programming.
| Muscle | Role in the Squat | Activation Level |
|---|---|---|
| Quadriceps (vastus lateralis, vastus medialis, rectus femoris) | Knee extension during the ascent — the primary driver in the squat | Very High |
| Gluteus Maximus | Hip extension — increasingly involved at greater squat depths | High (depth-dependent) |
| Hamstrings | Hip extension assist and knee stabilization | Moderate |
| Adductor Magnus | Hip extension, particularly in wider stance variations | Moderate |
| Erector Spinae | Isometric spinal stabilization throughout the movement | Moderate |
| Core (transverse abdominis, obliques) | Intra-abdominal pressure and trunk stability | Moderate |
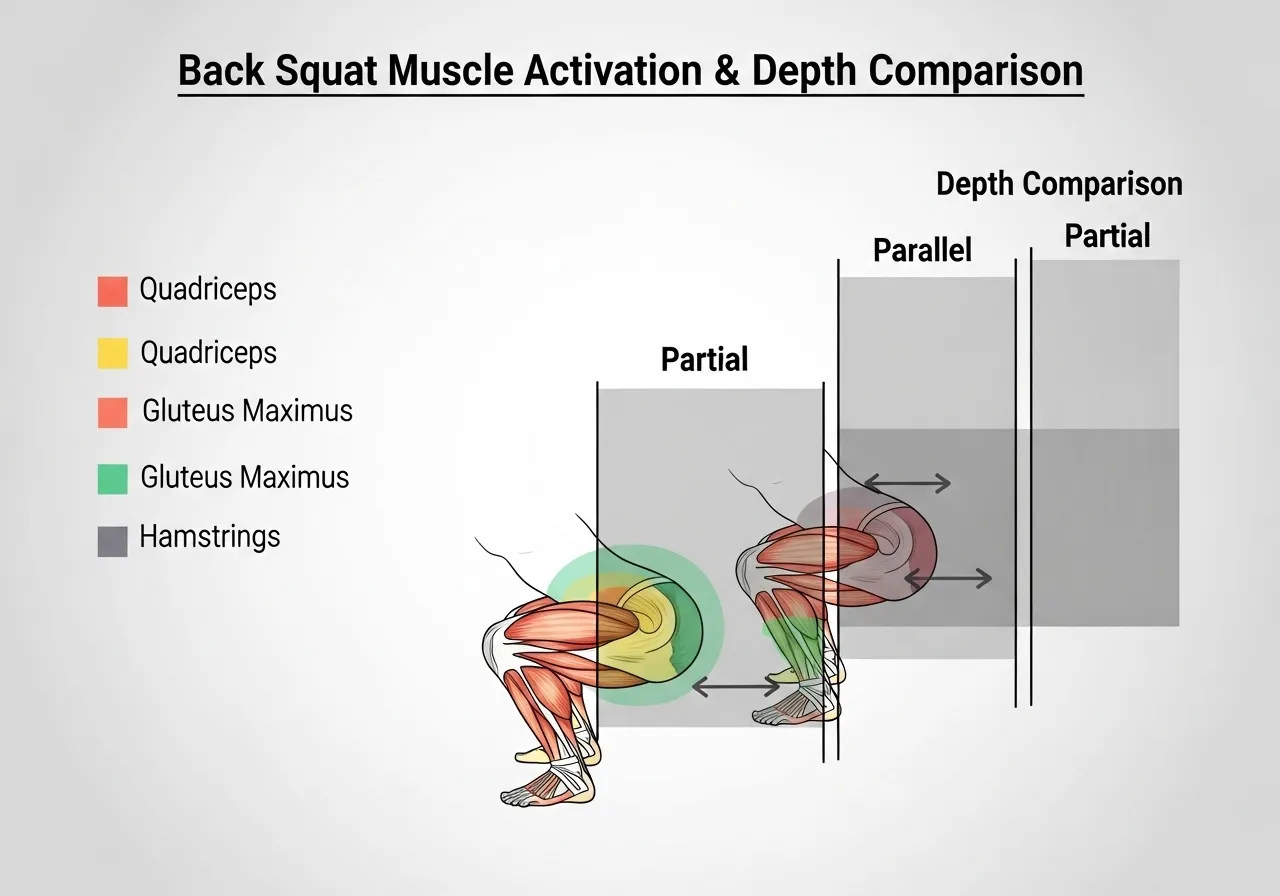
How Squat Depth Changes Muscle Emphasis
Squat depth is one of the most impactful variables for determining which muscles are most strongly stimulated.
A study published in PubMed measuring EMG activity at three squat depths found that gluteus maximus contribution increased significantly from partial depth (16.9% relative contribution) to parallel depth (28.0%) to full depth (35.4%) — while quadriceps activation remained similar across depths.
The practical implication: deeper squats are not primarily about quad work — they are about significantly greater glute involvement.
For trainees whose primary goal is glute development, training to full depth (hip crease below the knee) may produce substantially greater glute stimulus than stopping at parallel.
What Squat Variations Change About Muscle Activation
A 2021 study in PubMed comparing five squat variations in competitive bodybuilders found that the front squat elicited greater gluteus maximus and gluteus medius activation during the descent phase compared to all back squat variations, while sumo stance back squats altered adductor longus activation patterns — providing evidence that different squat variations produce meaningfully different muscle activation profiles despite superficially similar movement patterns.
High-Bar vs. Low-Bar: The Key Mechanical Difference
A PubMed study comparing high-bar and low-bar back squat at matched loads found that the high-bar back squat produced greater rectus femoris, vastus medialis, and lower erector spinae activation compared to low-bar, while both variations produced significant overall muscle activation across all tested muscles.
The mechanical reason: the lower bar position in low-bar squats creates a more forward torso lean and a greater hip-dominant movement pattern — shifting relative emphasis toward the posterior chain.
The higher bar position in high-bar squats allows a more upright torso, creating a more knee-dominant pattern with greater quadriceps demand.
| Factor | High-Bar Squat | Low-Bar Squat |
|---|---|---|
| Bar position | On upper trapezius (traps) | Across rear deltoids, below spine of scapula |
| Torso angle | More upright | More forward lean |
| Primary emphasis | Quadriceps dominant | Posterior chain dominant |
| Typical use | Bodybuilding, Olympic weightlifting | Powerlifting |
Why the Squat Is Called a “Compound King”
The back squat is often referred to as the most important lower body exercise in resistance training programs — a description grounded in its unique combination of mechanical properties:
- Maximum loading capacity: The back squat allows heavier absolute loads than virtually any other lower body exercise — creating the greatest total mechanical tension on the leg musculature
- Multi-joint recruitment: The simultaneous hip, knee, and ankle flexion and extension engages the full lower body kinetic chain in a way that single-joint exercises cannot replicate
- Hormonal response: Heavy compound exercises involving large muscle masses produce acute elevations in anabolic hormones (testosterone, growth hormone) — the squat is among the most effective stimuli for this response
- Functional carryover: The bilateral loaded squat pattern is one of the most sport-transferable movement patterns available — directly relevant to jumping, sprinting, change of direction, and lifting from the ground
None of these properties makes the squat mandatory for every training program — alternatives exist for those who cannot squat safely or comfortably.
But understanding why the squat occupies such a central role in strength programming explains why alternatives often produce comparable but rarely identical training outcomes.
The Ankle Mobility Factor
Ankle dorsiflexion (the ability to bring the toes toward the shin) is one of the most commonly overlooked mobility requirements for a full, upright squat.
Insufficient ankle mobility causes the heel to rise at the bottom, forces excessive forward lean, or prevents full depth — all of which compromise squat mechanics and reduce training stimulus quality.
A simple self-assessment: kneel with one knee down, place the front foot approximately 10–12 cm from a wall, and drive the knee toward the wall while keeping the heel flat.
If the knee cannot reach the wall without heel rise, ankle dorsiflexion mobility may be limiting squat technique.
Daily ankle dorsiflexion stretching — 2 × 30 seconds per side — consistently over 4–8 weeks typically produces meaningful improvement in ankle mobility that translates directly to squat depth and torso position.
Stance Width Effects on Muscle Activation
The effect of stance width on muscle activation follows a predictable pattern based on the mechanics of hip abduction (moving the thigh outward from the midline):
- Narrower stance: Greater quadriceps isolation — the more vertical descent with less hip abduction places more demand on the knee extensors relative to the hip extensors
- Wider stance (sumo variation): Greater adductor magnus and gluteus medius activation — the wider foot placement increases the hip abduction angle and shifts some load toward the inner thigh musculature
- Toe angle: Greater external rotation of the feet (turning toes outward) generally allows deeper hip flexion at the same squat depth — useful for individuals with limited hip internal rotation mobility
Experimenting with stance width and foot angle within a comfortable mobility range — rather than adhering to a single prescribed position — is recommended for most trainees to identify the stance that allows the deepest, most comfortable squat with neutral spine.
Understanding the “Sticking Point” in the Squat
The sticking point (the portion of the squat ascent where the mechanical disadvantage is greatest and the most lifters fail) typically occurs just above parallel — approximately 20–30° into the ascent from the bottom position.
This is where the transition from quad-dominant to hip-extensor-dominant muscle recruitment occurs, and where muscle mechanical advantage is temporarily reduced.
Training specifically at and just above this zone — through pause squats at the bottom, pin squats from the sticking point height, or slow eccentric descents — is a commonly used approach for breaking through strength plateaus in the squat.
Developing this awareness of the sticking point and targeted strategies to address it is one of the hallmarks of intermediate and advanced squat programming.
Back Squat Technique: Step-by-Step Guide
Setup: Bar Position and Grip
- High-bar position: Bar rests on the upper trapezius muscle, just above the spine of the scapula — hands wider than shoulder-width, elbows angled slightly downward to create a stable shelf
- Low-bar position: Bar sits across the rear deltoids and lower trapezius — hands and elbows positioned differently to support this lower position; requires more shoulder flexibility
- Grip width: Narrow enough to engage the upper back (creating lat tension that stabilizes the bar) but wide enough to avoid shoulder impingement — experimentation within a comfortable range is appropriate
Stance Width and Foot Angle
Stance and foot angle significantly affect comfort, depth, and the squat’s muscle emphasis:
- Shoulder-width stance, feet slightly turned out (15–30°): Standard starting position — appropriate for most individuals as a beginning point
- Wider stance: May allow greater depth for individuals with limited hip mobility; increases adductor and glute medius involvement
- Narrower stance: Creates a more quad-focused movement; may be more natural for individuals with greater hip flexibility
The optimal stance is individual — hip socket depth, femur length, and ankle mobility all influence what “natural” looks like for a specific person.
A qualified strength coach or physiotherapist can perform a hip mobility and movement screen to identify the stance that best matches an individual’s anatomy.
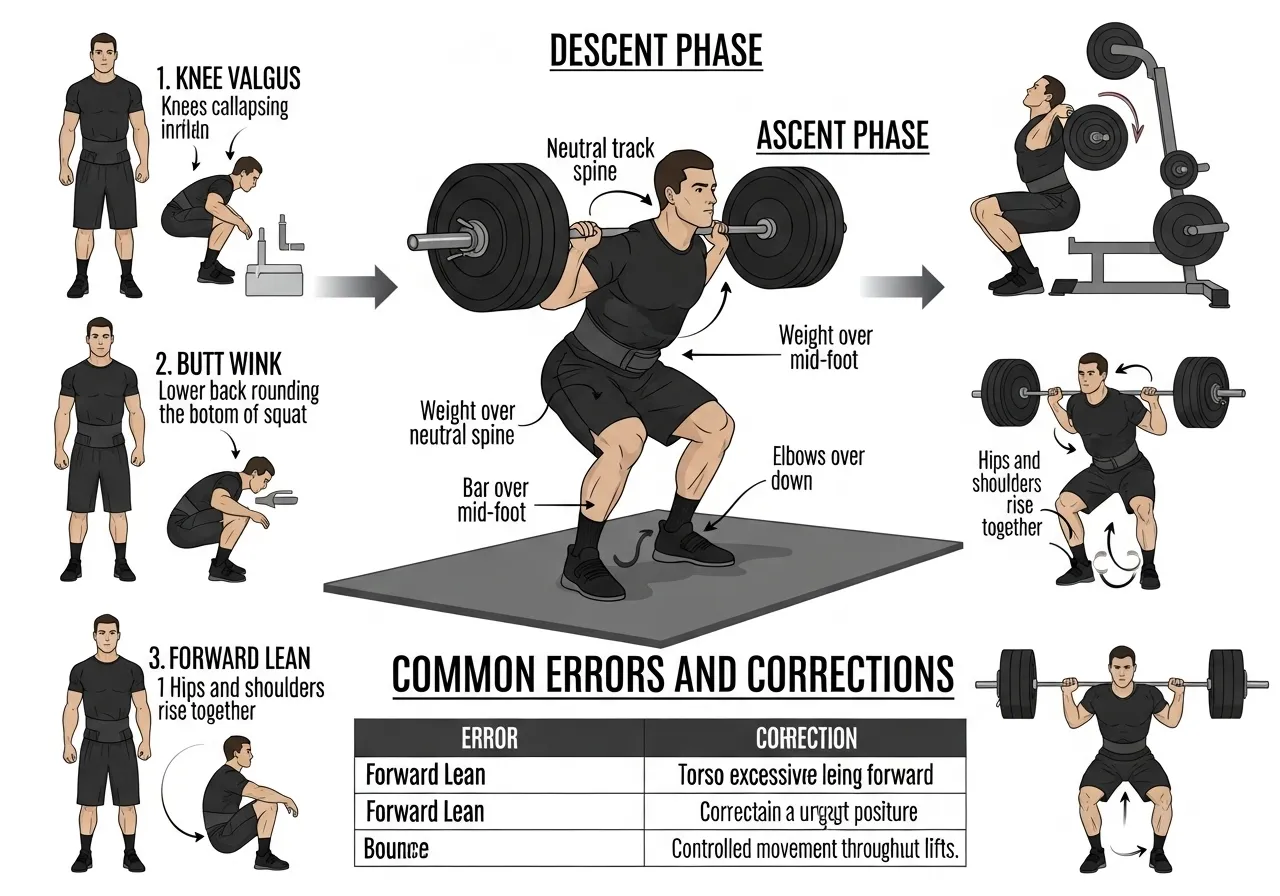
The Descent
Step 2: Initiate the movement by pushing the knees out in the direction of the toes — simultaneously pushing hips back and down.
Step 3: Maintain the knees tracking over the toes throughout the descent — avoid knees collapsing inward (valgus collapse).
Step 4: Descend to the target depth — aiming for at least parallel (hip crease at knee height) if mobility allows, with full depth as a longer-term goal for most trainees.
Step 5: Keep the chest up and spine neutral — some forward torso lean is normal and expected (especially at heavier loads), but excessive forward lean indicates mobility or strength limitation.
The Ascent
Step 7: Keep the knees tracking over toes throughout the ascent — the same alignment used during the descent.
Step 8: Fully extend the hips and knees at the top — stand tall without hyperextending the lower back.
Step 9: Exhale at or after the most challenging portion of the ascent (the “sticking point”).
Common Technique Errors and Corrections
| Error | What It Looks Like | Common Cause | Correction |
|---|---|---|---|
| Knee valgus collapse | Knees cave inward during descent or ascent | Weak glute medius; foot pronation | “Push knees out” cue; reduce load; add glute medius activation work |
| Butt wink | Pelvis posteriorly tilts (tucks under) at bottom | Limited hip or ankle mobility | Reduce depth to above wink; work ankle and hip mobility |
| Excessive forward lean | Torso more than 45° forward at depth | Limited ankle dorsiflexion; weak quads | Heel elevation; ankle mobility work; front squat as accessory |
| Bar bounce at bottom | Using momentum rather than muscle to ascend | Load too heavy; technique breakdown | Reduce load; pause squat variation to eliminate bounce |
Learning the Squat Pattern: The Goblet Squat as Entry Point
For trainees with limited squatting experience, the goblet squat offers a lower-risk entry point that builds the fundamental movement pattern before introducing a barbell:
Week 1–2: Bodyweight squat × 15–20 reps | Focus: depth and knee tracking
Week 3–4: Goblet squat with light dumbbell × 3 × 12 | Focus: upright torso, full depth
Week 5–6: Goblet squat with heavier load × 3 × 8 | Technique consolidation
Week 7+: Transition to barbell squat at light load
The goblet squat’s counterbalanced design (weight held at chest level) naturally encourages the upright torso and deep hip fold that translate directly to high-bar barbell squat mechanics.
Many experienced coaches recommend spending 2–4 weeks on goblet squats before introducing a barbell to beginners — a modest time investment that reduces the technique errors that frequently appear when barbell loading is introduced too early.
Tempo and the Eccentric Phase of the Squat
The descent phase of the squat is an eccentric contraction — the muscles lengthen under load — which is a potent stimulus for both muscle growth and connective tissue development.
Controlling the descent to 2–3 seconds rather than dropping quickly increases time under tension (total duration the muscle is under load per set) and may enhance hypertrophy outcomes without requiring heavier weights.
Tempo squats — deliberately using a 3–4 second descent — are a useful variation for technique reinforcement, as the slower movement exposes any positional problems that a faster descent can mask.
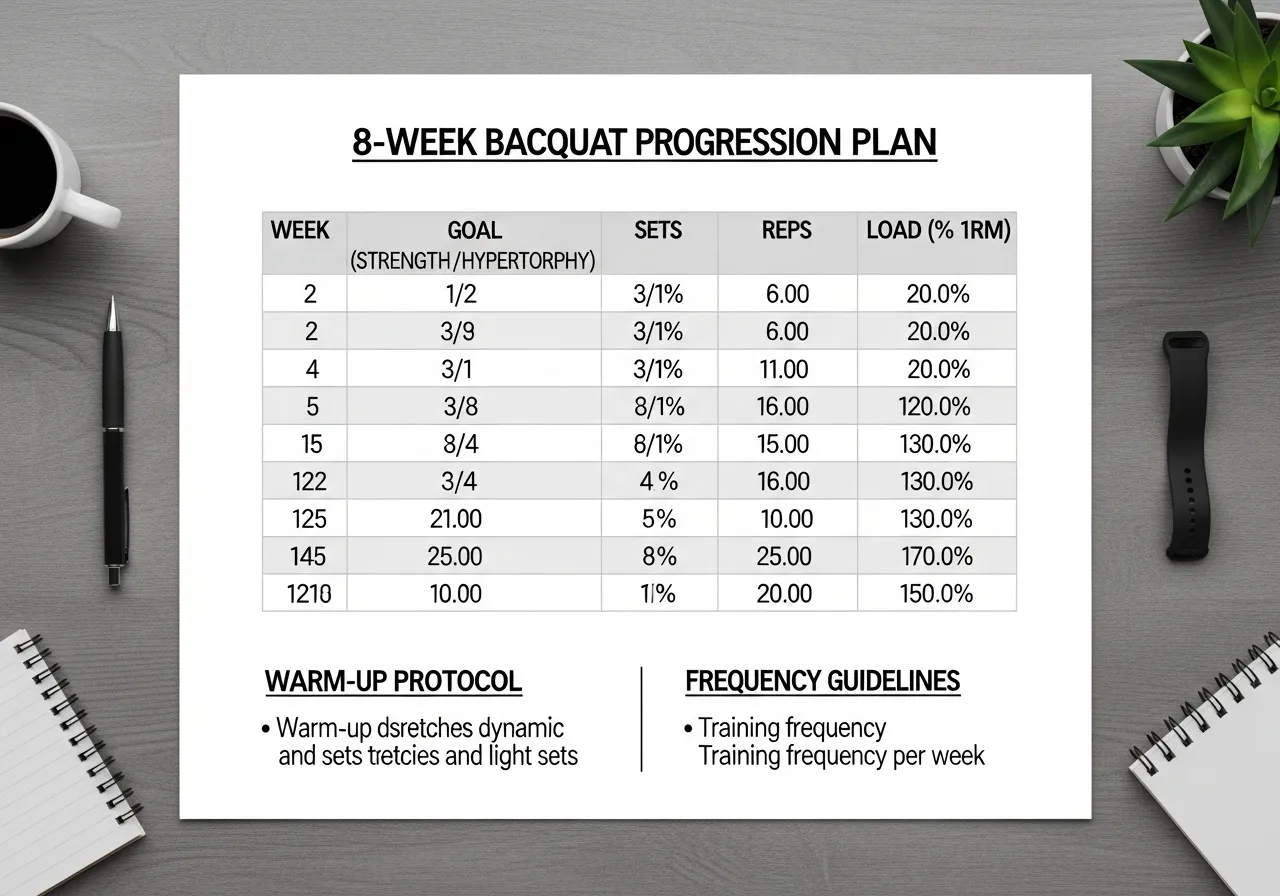
Back Squat Programming: Load, Sets, Reps, and 8-Week Progression
Sets and Reps by Training Goal
| Goal | Sets × Reps | Load (%1RM) | Rest |
|---|---|---|---|
| Technique learning | 3–4 × 5 | 50–65% | 2 min |
| Hypertrophy | 3–5 × 8–12 | 65–75% | 90–120 sec |
| Strength | 4–6 × 2–5 | 80–90% | 3–5 min |
| Power development | 4–6 × 2–3 | 55–70% | 2–3 min |
8-Week Beginner to Intermediate Progression
3 × 5 @ 50–60% | Focus: depth, knee tracking, neutral spine
Weeks 3–4 — Volume Introduction:
4 × 5 @ 65% | Add 2.5–5 kg per session when all reps are clean
Weeks 5–6 — Load Development:
4 × 4 @ 70–75% | Prioritize full depth over maximum load
Weeks 7–8 — Strength Emphasis:
5 × 3 @ 80–85% | Maintain technique; reduce frequency if recovery is insufficient
Week 9 — Deload:
3 × 5 @ 60% | Technique reset; connective tissue recovery
Frequency Guidelines
- Beginners (first 6 months): 2–3× per week — frequent practice accelerates technique learning and neuromuscular adaptation
- Intermediate (6 months–2 years): 2× per week is a common starting recommendation — once at heavier load, once at moderate load
- Advanced: 1–3× per week depending on program structure and total lower body volume
- 72 hours minimum between heavy squat sessions — quadriceps and systemic recovery require adequate time before reloading
Squat Warm-Up Protocol
✅ Hip 90/90 mobility — 5 positions each side (opens the hip joint)
✅ Ankle dorsiflexion stretch — 10 reps each (calf against wall)
✅ Bodyweight squat × 15 (movement rehearsal)
✅ Goblet squat or box squat × 10 @ very light (loaded movement rehearsal)
✅ Barbell squat warm-up sets: 40% × 8, 55% × 5, 70% × 3 (before working sets)
Programming the Squat Within a Weekly Training Structure
Lower A: Back Squat (primary) + Romanian Deadlift (secondary) + Leg Curl + Core
Upper A: Horizontal press + Horizontal row + Vertical pull
Lower B: Back Squat (moderate) + Hip Thrust + Bulgarian Split Squat
Upper B: Vertical press + Horizontal row + Biceps/Triceps
Example 3-Day Full-Body:
Day 1: Back Squat (heavy, 4 × 5) + Upper Push + Upper Pull
Day 2: Romanian Deadlift + Goblet Squat (moderate) + Upper Push + Upper Pull
Day 3: Back Squat (moderate volume, 3 × 8) + Hip Thrust + Upper work
In both structures, the squat appears twice per week with different intensities and volumes — allowing both strength and hypertrophy stimulus across the training week while managing recovery demand.
Deloads and Managing Fatigue in Squat Programs
The back squat generates significant systemic fatigue — the combination of heavy loading and large muscle mass involvement means that fatigue accumulates faster than with most other exercises.
Planning a deload week every 4–8 weeks — reducing volume by 40–50% and load by 20–30% — allows the central nervous system, connective tissue around the knee and hip, and the lower back erectors to recover from the accumulated demands of progressive loading.
Signs a deload may be needed before the scheduled week:
- Squat performance declining for two or more consecutive sessions at the same weight
- Persistent knee or hip discomfort that does not resolve with 48–72 hours of rest
- Noticeable decline in technique quality — knees caving or forward lean increasing despite the same load
The Squat and Knee Safety: Separating Evidence From Myth
The “Knees Over Toes” Myth
One of the most persistent myths in fitness is that the knees should never travel past the toes during a squat — based on a widely misunderstood study from 1978 that tested knee compressive forces in an artificially restricted squat position.
Subsequent research has consistently shown that in healthy individuals, allowing the knees to travel naturally forward during a squat is biomechanically normal and does not inherently increase injury risk.
In fact, preventing the knees from moving forward naturally forces an excessive forward torso lean that increases spinal compression — potentially a worse trade-off for many individuals.
The relevant concern is not whether the knees pass the toes but whether the knees track in line with the toes throughout the movement.
Knee Valgus: The Actual Risk Factor
Knee valgus (knees collapsing inward during the squat) is associated with increased ACL (anterior cruciate ligament) stress and is a more clinically relevant concern than absolute knee position.
Causes of knee valgus during squats typically include:
- Weak or inhibited gluteus medius (the hip abductor that prevents the femur from internally rotating)
- Foot pronation (excessive inward rolling of the foot) that shifts knee alignment
- Load that exceeds current movement control capacity
Addressing valgus collapse requires targeted glute medius activation work, potential footwear assessment, and load reduction until movement quality is restored.
If knee valgus persists despite technique cues and load reduction, a physiotherapist can assess the underlying cause and prescribe specific corrective exercises.
Squat Depth and Knee Health
Research on squat depth and knee health is reassuring for trainees with healthy knees:
In individuals without existing knee pathology, deep squats performed with proper form do not appear to be inherently damaging to the knee joint — and long-term squatters often demonstrate superior cartilage thickness compared to non-squatters in some studies.
However, individuals with existing knee conditions — meniscus issues, patellar tendinopathy, or osteoarthritis — should work with a physiotherapist to determine appropriate squat depth and loading parameters for their specific condition.
Approaching squat depth progressively — working toward parallel and then full depth over months as mobility and strength allow — is generally preferable to immediately attempting maximum depth under load.
Lower Back Considerations
The back squat places significant compressive and shear load on the lumbar spine — particularly at heavier loads and during forward torso lean.
This is not inherently dangerous for healthy spines — progressive loading over time builds spinal resilience.
However, certain presentations warrant extra caution or professional guidance:
⚠️ Radiating leg pain (sciatica-type symptoms) during squats — requires medical evaluation before loading
⚠️ History of lumbar disc herniation — squat technique and loading should be individually assessed by a sports medicine physician or physiotherapist
⚠️ Excessive butt wink (posterior pelvic tilt at depth) under load — can increase lumbar disc stress; reducing depth is appropriate until mobility improves
Common Questions About the Barbell Back Squat
What is the difference between high-bar and low-bar squats?
High-bar squats (bar on upper trapezius) produce a more upright torso and are more quadriceps-dominant — commonly used in bodybuilding and Olympic weightlifting programs.
Low-bar squats (bar on rear deltoids) produce a more forward torso lean and are more posterior chain-dominant — the standard technique in powerlifting.
For general fitness training, starting with high-bar technique is typically more accessible and lower-risk for most beginners, as it requires less shoulder flexibility and is more forgiving of mobility limitations.
How deep should I squat?
Training to at least parallel (hip crease at knee height) is commonly recommended as a minimum functional squat depth — it provides meaningful lower body stimulus and reflects adequate hip and ankle mobility for most activities.
Full depth (hip crease below knee) is the long-term goal for most trainees — it significantly increases glute involvement and reflects excellent lower body mobility.
Depth should be limited by mobility and technique (neutral spine, no butt wink), not by arbitrary preference for stopping above parallel when full depth is achievable.
When should I add a weightlifting belt?
A weightlifting belt is a tool that increases intra-abdominal pressure (internal bracing force that supports the spine under load) when used correctly.
Most strength coaches recommend learning to squat without a belt first — developing core bracing capacity before relying on external support.
A belt may be appropriate when loads approach or exceed 85% of 1RM for trainees who have already developed solid unbelted technique and bracing ability.
- Squat depth significantly affects glute activation — deeper squats produce substantially greater gluteus maximus involvement than partial depth
- High-bar squats favor quadriceps; low-bar squats favor the posterior chain — both are valid choices depending on training goals
- Knee valgus (inward collapse) is a meaningful concern; knees traveling past the toes is not inherently harmful in healthy individuals
- 2× per week at moderate-to-heavy loads, progressing systematically, is a practical starting frequency for most trainees
- Knee or lower back pain during squats warrants professional evaluation before continuing to load the movement
Squat Variations, Long-Term Development, and Program Design
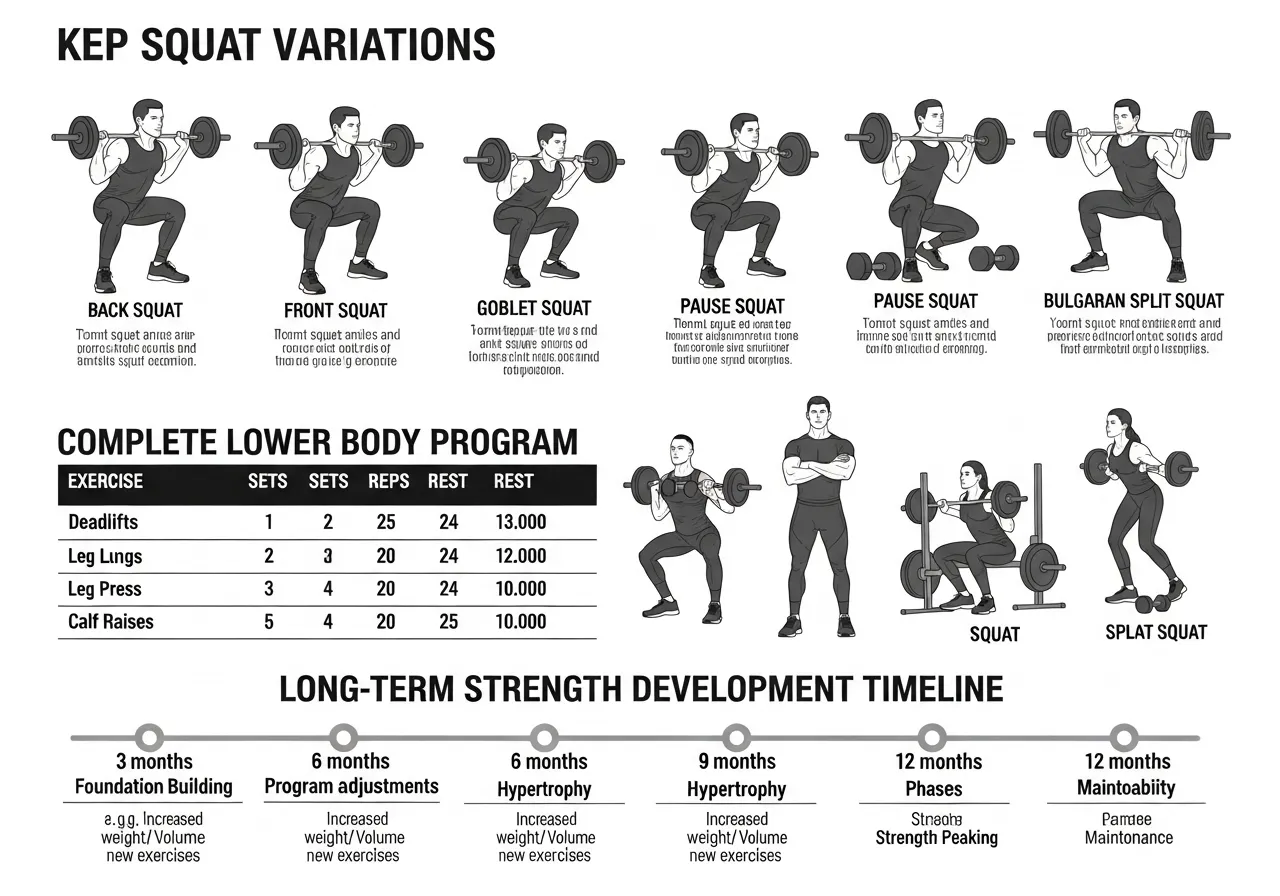
Key Squat Variations Worth Including
Front Squat: Bar rests on the front of the shoulders (front rack or cross-arm position), creating a more upright torso and greater anterior core and quadriceps demand than high-bar back squats.
Particularly useful for individuals whose back squats are limited by forward torso lean — the front squat’s mechanics make excessive lean impossible without losing the bar.
Goblet Squat: A dumbbell or kettlebell held at the chest, with a counterbalancing effect that encourages an upright torso.
An excellent technique-building variation for beginners and a productive high-rep hypertrophy option for intermediate trainees — the counterbalance naturally teaches the “chest up, sit between the heels” positioning.
Box Squat: Squatting to a box or bench, pausing briefly at the bottom position before ascending.
Removes the elastic rebound typically used at the bottom of a free squat — increasing the strength requirement from a dead stop and eliminating the ability to “bounce” out of the hole.
Pause Squat: Holding the bottom position for 2–3 seconds before ascending.
Develops positional strength and body awareness at the most demanding portion of the range — a highly effective variation for correcting technique issues at depth.
Bulgarian Split Squat: A rear-foot-elevated unilateral variation that isolates each leg individually.
Research consistently identifies it among the highest quadriceps EMG activation exercises across all lower body movements — extremely effective for addressing left-right strength asymmetries and for trainees whose bilateral squat is limited by mobility.
Building a Complete Lower Body Program Around the Squat
| Movement Category | Exercise Example | What It Adds Beyond Squat |
|---|---|---|
| Hip hinge (posterior chain) | Romanian Deadlift | Hamstring eccentric loading the squat undertrains |
| Hip extension (shortened) | Hip Thrust or Glute Bridge | Peak glute activation at full extension |
| Unilateral squat pattern | Bulgarian Split Squat or Lunge | Single-leg stability, asymmetry correction |
| Knee flexion | Leg Curl | Hamstring knee flexion function |
Including a hip hinge alongside the squat in every lower body week may produce more complete lower body development than squatting alone — the squat’s relative weakness in hamstring and glute stimulation (compared to its quad demand) is directly addressed by RDL or deadlift work.
Progressive Overload Over Time
Progressive overload methods beyond simply adding weight:
- Depth progression: Working toward full depth over months as mobility develops — this is a form of progressive overload even without adding external load
- Volume progression: Adding sets (from 3 to 4 to 5) at the same weight before pursuing load increases
- Tempo manipulation: Slowing the descent to 3–4 seconds increases time under tension without requiring heavier loads
- Pause squats: Introducing a 2-second pause at the bottom as a technique and strength developer
Long-Term Squat Development: Realistic Expectations
| Training Level | Typical 1RM (× bodyweight) | Expected Progress Rate |
|---|---|---|
| Beginner (6 months) | 0.8–1.25× BW | 2.5–5 kg per session (initial phase) |
| Intermediate (1–2 years) | 1.25–1.75× BW | 2.5–5 kg per week |
| Advanced (3+ years) | 1.75–2.5× BW | 2.5 kg per month or less |
These are general population estimates — individual variation based on genetics, body proportions, training history, and sex is significant.
Using them as general orientation rather than fixed targets prevents unnecessary frustration and promotes realistic expectation-setting.
Nutrition and Recovery for Squat Training
The metabolic and mechanical demands of heavy back squats make nutrition timing particularly relevant for performance and recovery:
- Pre-session (1–3 hours before): A balanced meal with carbohydrates and protein supports the glycolytic and phosphocreatine energy demands of heavy squatting — training fasted for heavy squat sessions may reduce peak performance
- Post-session (within 1–3 hours): 25–40 g of protein provides substrate for the substantial muscle protein synthesis that heavy squat training stimulates — particularly important for trainees in a muscle-building phase
- Sleep: Heavy compound training like squatting produces significant neuromuscular fatigue that requires adequate sleep (7–9 hours) for optimal recovery and adaptation
Seeking Professional Guidance for Squat Development
The back squat is technically demanding enough that even a single session with a qualified strength coach may produce technique improvements that months of self-guided training cannot.
Common barriers that benefit from in-person assessment include persistent knee valgus, difficulty reaching depth, chronic lower back discomfort after sessions, and shoulder positioning problems with bar placement.
A certified strength and conditioning specialist (CSCS), powerlifting coach, or Olympic weightlifting coach can provide technique assessment and corrective cues that video-based self-coaching cannot reliably replicate for many trainees.
The Squat as a Long-Term Athletic Investment
Beyond the direct training benefits, consistent squat practice over years produces adaptations in connective tissue — tendons, ligaments, and bone density — that require long time horizons to fully develop.
These structural adaptations may be the most durable and health-relevant outcomes of long-term squat training:
- Increased patellar tendon (the tendon connecting the kneecap to the shin bone) cross-sectional area and tensile strength
- Greater hip and knee cartilage thickness in long-term squatters compared to non-squatters in some research
- Improved bone mineral density in the femur and lumbar spine — relevant for osteoporosis prevention across the lifespan
These adaptations take months to years to develop — they cannot be accelerated through acute training intensity, but they can be accumulated through consistent, progressive practice that avoids overloading the connective tissue faster than it can adapt.


")