⚠️ Health & Fitness Disclaimer This article is for general educational and informational purposes only. It does not replace professional medical or fitness advice. If you have any pre-existing condition, injury, or health concern — consult a qualified healthcare professional or certified personal trainer before starting or modifying any exercise program.
The Romanian deadlift (RDL) is one of the most effective exercises for developing the hamstrings and glutes — and one of the most consistently performed incorrectly in gyms worldwide.
Two technical errors account for the vast majority of problems: bending the knees too much (which converts the hip hinge into a modified squat), and forcing depth beyond what hamstring flexibility allows (which rounds the lower back under load). Both are entirely correctable once the underlying mechanics are understood.
This guide covers the biomechanical rationale for the RDL, the research supporting its use, step-by-step technique, and practical programming from beginner to intermediate level.
The Hip Hinge: Understanding What Makes the RDL Different
The Movement Pattern Defined
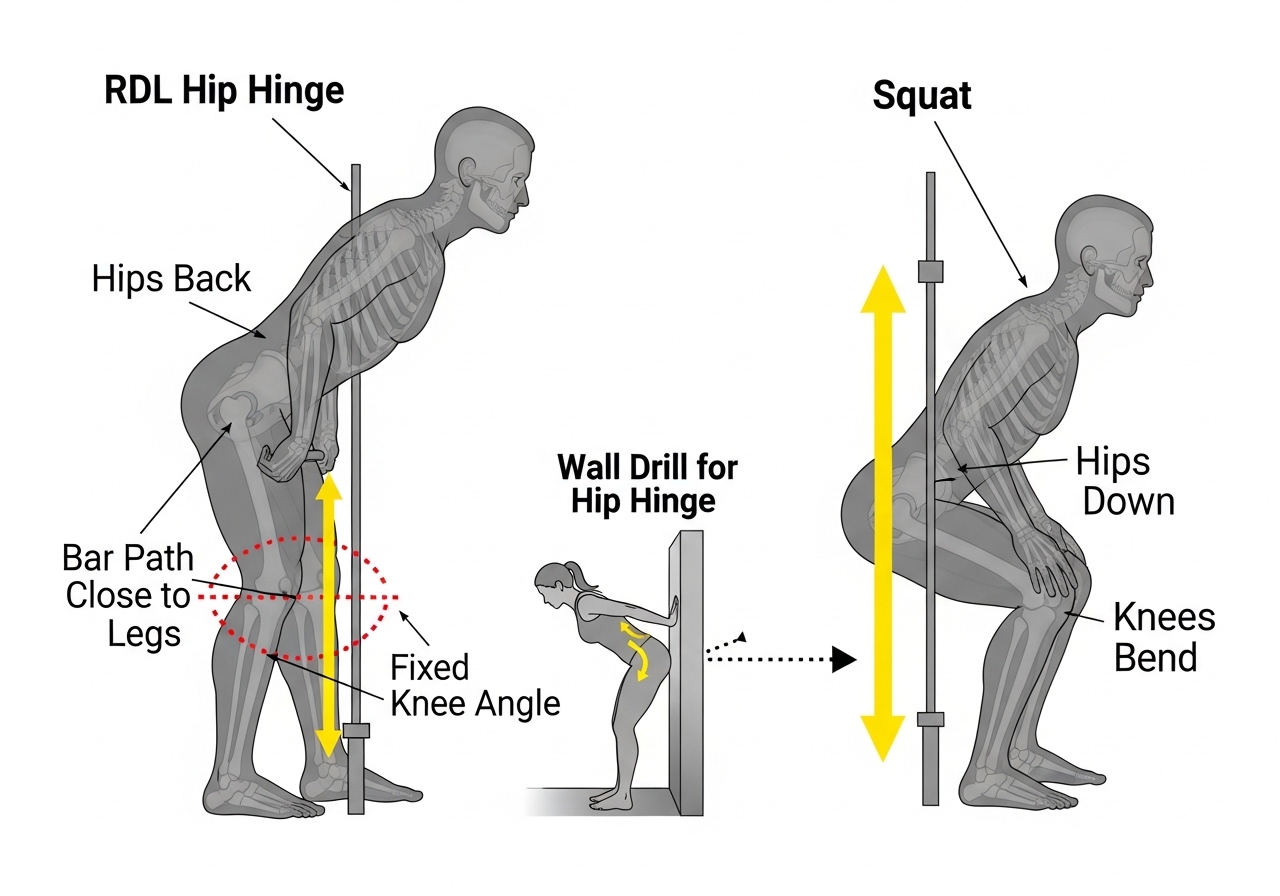
The RDL is a hip hinge — a movement defined by three characteristics:
The hips move backward as the primary motion (not downward)
The spine maintains a neutral position throughout — not flexed, not hyperextended
The knee angle is fixed at a soft 15–20° bend that does not change significantly during the movement
This is fundamentally different from a squat, where the hips move primarily downward and the knees bend significantly. It is also different from the conventional deadlift, which begins from the floor with a more upright torso and greater knee involvement.
Why the Hamstrings Are the Primary Target
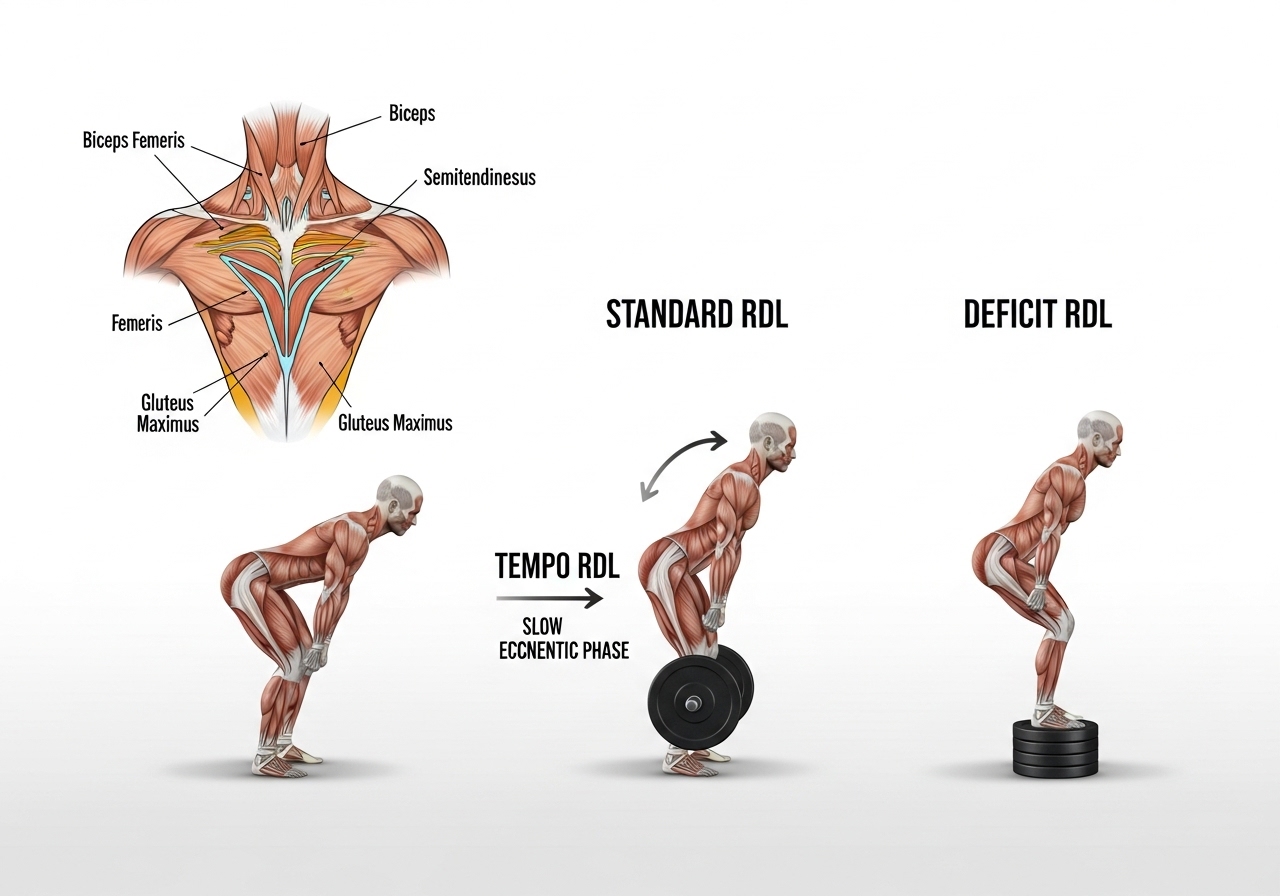
The hamstrings perform two functions: knee flexion (bending the knee) and hip extension (driving the hip backward to a standing position). The RDL trains the hip extension function with the knee in a fixed, slightly-bent position — placing the full hip extension demand on the hamstrings rather than distributing it across the quadriceps as well.
Additionally, as the hips push back and the torso tips forward, the hamstrings lengthen under load — an eccentric contraction (muscle actively generating force while lengthening) that is a particularly potent stimulus for muscle growth and injury resilience.
Injury Prevention: The Eccentric Loading Advantage
Hamstring strains are among the most common injuries in running and field sports. The two factors most consistently associated with injury risk are low eccentric hamstring strength and short hamstring muscle fascicle length (the length of individual contractile units within the muscle).
The RDL directly addresses both: eccentric loading increases eccentric strength, and stretch-loaded training over time may increase fascicle length — making the hamstring more resistant to the rapid lengthening forces that cause strains during sprinting and jumping.
The Wall Drill: Learning the Hip Hinge Before Loading
Before adding any weight, practicing the hip hinge against a wall builds the movement pattern that makes the RDL safe and effective:
Wall Drill:
✅ Stand 15–20 cm from a wall, feet hip-width, establish a soft knee bend
✅ Push hips backward until they touch the wall behind you
✅ Feel the hamstrings load as the torso tilts naturally forward
✅ Drive hips forward to return to standing
✅ Repeat 10–15 times — hips move back, not down
This drill encodes the single most important characteristic of the hip hinge: the hips travel toward the wall behind you, not toward the floor. Most knee-bending errors in the RDL disappear once this pattern is practiced for 2–3 sessions.
RDL vs. Conventional Deadlift vs. Stiff-Leg Deadlift
Exercise
Starting Position
Knee Bend
Primary Emphasis
RDL
Standing
Fixed 15–20° soft bend
Hamstrings (eccentric), glutes
Conventional Deadlift
Floor
Significant bend, quad involvement
Full posterior chain + quads
Stiff-Leg Deadlift
Floor
Near-straight throughout
Hamstrings, higher lumbar demand
The RDL’s soft knee bend and range stop at hamstring flexibility limit make it more accessible and lower-risk than the stiff-leg variation — without meaningfully reducing the hamstring stimulus for most training purposes.
Why Most People Default to Squatting — and How to Break the Pattern
The reason so many people perform the RDL incorrectly is not a lack of effort or attention. It is that most gym-based strength training programs begin with the squat — which trains the nervous system to associate “lower body loading” with knee bending.
When these same trainees attempt an RDL without prior instruction, the deeply ingrained squat pattern activates automatically — the knees bend as the bar descends, effectively turning the exercise into a modified front squat with a forward-leaning torso. The hamstrings never reach an adequate stretch because the knees changing angle continually shifts the load toward the quads.
The wall drill described above interrupts this pattern by giving the body concrete physical feedback: the wall prevents the hips from moving downward and forces them to move backward instead. Most trainees need 2–4 sessions of wall drill practice before the hip-back pattern feels natural enough to add external load productively.
Filming a light warm-up set from the side every few weeks catches technique drift before it becomes ingrained under heavier loads — a few minutes of self-review prevents months of training a suboptimal movement pattern.
RDL and Lower Body Balance in Training Programs
A balanced lower body program addresses both the anterior chain (front of body — quadriceps, hip flexors) and the posterior chain (back of body — hamstrings, glutes, lower back erectors). Most beginner training programs default toward squat-dominant patterns, which develop the anterior chain significantly more than the posterior chain in most individuals.
Adding the RDL as a consistent secondary lower body exercise directly addresses this imbalance — and may reduce injury risk at the knee and hip over time by maintaining adequate hamstring-to-quadriceps strength ratios.
Deload Strategy for the RDL
Plan a deload week every 4–8 weeks of consistent RDL training — reducing both volume (fewer sets) and load (60% of working weight). This allows connective tissue and neurological systems to recover in ways that are not possible during continuous high-load training. After a properly executed deload, most trainees return to previous weights feeling noticeably fresher and often exceed their pre-deload performance within 1–2 sessions.
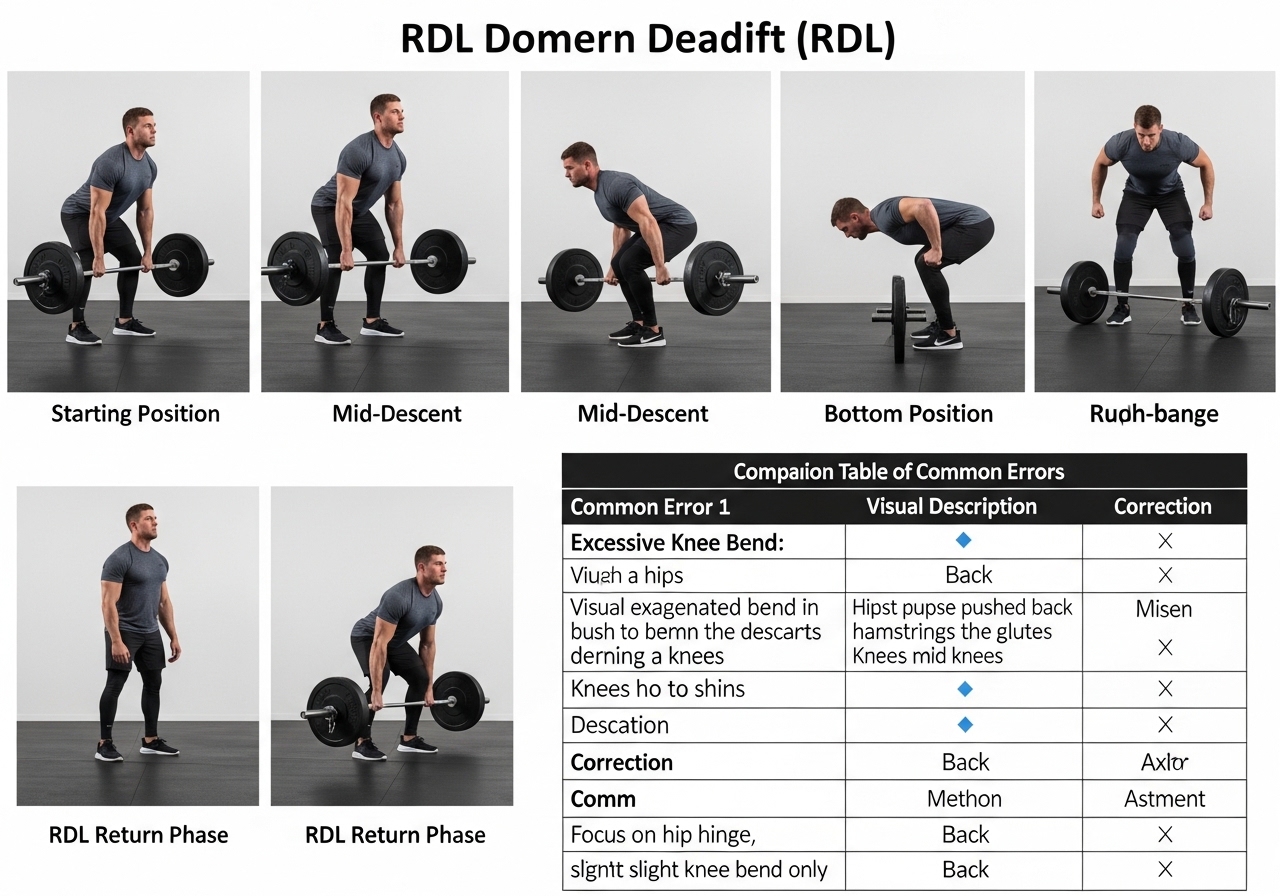
Step-by-Step RDL Technique: Setup, Descent, and Return
Starting Position
Feet hip-width apart, barbell resting against the front of the thighs
Overhand grip, hands just outside hip-width
Shoulders back and down (scapular retraction and depression — shoulder blades together and low)
Neutral lower back — not arched, not rounded
Soft knee bend of 15–20° established before the movement begins — this angle stays fixed throughout the entire set
The Descent
Step 1: Push hips backward — think “hips toward the wall behind me.” This initiates the hinge correctly. Step 2: Let the bar travel directly down the front of the legs — it should graze the shins or thighs throughout the descent. Step 3: Keep the knee angle fixed — if the knees bend further as the bar descends, this is the most common error and indicates the body is defaulting to a squat pattern. Step 4: Stop when you feel a strong hamstring stretch — typically mid-shin to just below the knee for most people. This is determined by hamstring flexibility, not by the floor.
The Return
Step 5: Drive the hips forward — the hips lead the return to standing, not the chest lifting. Step 6: Squeeze the glutes at the top and stand fully upright — hips directly under shoulders. Do not hyperextend the lower back at lockout.
Breathing and Bracing
🔵 Before initiating descent: Inhale into the belly, then brace the core as if expecting light contact to the stomach — this is the Valsalva maneuver (creating intra-abdominal pressure to stabilize the spine)
🔵 Throughout the movement: Maintain the brace — do not exhale mid-rep
🔵 At the top: Exhale, reset the brace, then begin the next rep
For heavier loads — particularly anything above 75–80% of maximum — strict bracing before each rep meaningfully reduces spinal shear forces during the loaded hinge. For lighter technique work, breathing can be more relaxed.
The 5 Most Common RDL Technique Errors
Error
What Causes It
How to Correct
Knees bending further during descent
Defaulting to ingrained squat pattern
“Hips back, not down” — practice wall drill first
Lower back rounds at bottom
Descending past hamstring flexibility limit
Stop where the back rounds — not at the floor
Bar drifts away from body
Insufficient lat engagement
“Protect your armpits” — engages lats, bar stays close
Hyperextending at lockout
Over-squeezing glutes or leaning backward
“Stand tall” — neutral, not leaning back
Lower back fatigue dominant over hamstrings
Bar too far forward, or rounding lower back
Reduce load, keep bar close, stop before rounding
Grip Options
Double overhand: Standard starting grip — appropriate for most loads and also develops grip strength. Lifting straps: Appropriate when grip fatigue limits the set before hamstrings are adequately trained — use selectively for heavier sets, not as a default from the beginning of training.
Implement Options
🔵 Barbell RDL: Highest load potential — best for strength and hypertrophy goals
🔵 Dumbbell RDL: Slightly greater range of motion (dumbbells travel beside the feet) — good for learning the pattern
🔵 Single-Leg RDL (SLRDL): Adds balance and hip stability challenge — excellent for injury prevention and asymmetry correction
Mind-Muscle Connection in the RDL
Unlike compound pressing movements where moving the weight is the primary performance feedback, the RDL rewards deliberate attention to the hamstring stretch sensation during the descent.
A useful mental approach for each rep:
Initiating the descent: “I am pushing my hips back toward the wall” — this focuses attention on the correct movement driver
During the descent: “I can feel my hamstrings lengthening” — this shifts focus from the weight to the target muscle
At the bottom: “The stretch tells me where to stop” — this prevents forcing depth beyond flexibility
Returning to standing: “My hips drive forward to standing” — not “my chest comes up” or “my knees straighten”
Trainees who develop this focused awareness consistently report that the hamstrings fatigue more clearly during sets — which is the correct stimulus pattern. If the lower back fatigues more than the hamstrings during a set, this is the most reliable indicator that a technique issue is present and needs to be addressed before increasing load.
Building Range of Motion Over Time
Hamstring flexibility commonly limits RDL range in new trainees — most people can only reach mid-shin or knee-level initially. This is normal and expected. Consistent RDL training produces a reliable byproduct: progressive increase in hamstring length as the eccentric loading adaptations develop over weeks and months.
Many trainees find that after 8–16 weeks of twice-weekly RDL training, their comfortable stopping depth has increased substantially without any dedicated stretching practice — the training itself generates the flexibility adaptation. Adding 5–10 minutes of standing hamstring stretches on non-training days can accelerate this process if range is a priority.
Sample RDL Warm-Up Sequence
A focused warm-up before RDL sets reduces injury risk and improves the quality of working sets by activating the relevant muscles and increasing tissue temperature:
✅ Hip circles — 10 each direction (activates the hip joint through full range)
✅ Glute bridge — 2 × 10 (activates gluteus maximus before hip extension work)
✅ Bodyweight hip hinge (wall drill) — 10 reps (encodes the correct hinge pattern before loading)
✅ Light dumbbell RDL — 2 × 8 @ very light (movement-specific warm-up at minimal load)
✅ First working set at 60% of planned working weight — 1 × 5
This 8–10 minute sequence costs minimal training time but meaningfully reduces the chance of lower back strain during the first heavy working sets — when tissue temperature is lowest and the neuromuscular system has not yet fully activated for the specific movement demands of the RDL.
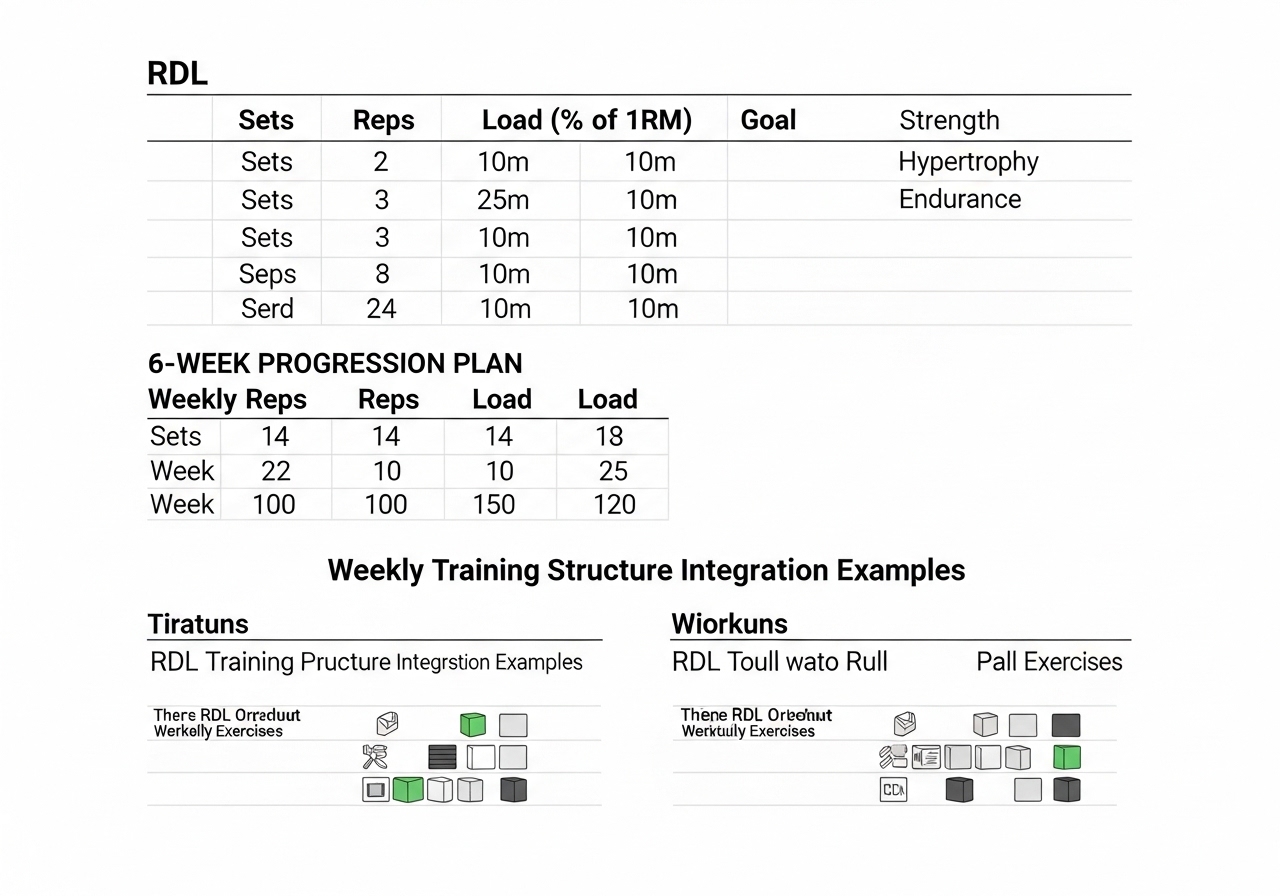
RDL Programming: Sets, Reps, Frequency, and 6-Week Progression
Sets and Reps by Training Goal
Goal
Sets × Reps
Load
Tempo
Rest
Technique (beginner)
3 × 8–10
Light — 50–60% est. max
3 sec descent
90 sec
Hypertrophy
3–4 × 8–12
Moderate — 65–75%
2–3 sec descent
90–120 sec
Strength
4 × 4–6
Heavy — 80–85%
Controlled
2–3 min
Injury prevention (SLRDL)
2–3 × 8–10 per leg
Light–moderate
3–4 sec descent
60–90 sec
Where to Place the RDL in a Training Session
Place the RDL as a primary or secondary compound exercise early in a lower body session — not as a finisher after significant leg fatigue. Heavy RDL technique degrades substantially under accumulated fatigue, increasing lumbar stress in ways that merit attention.
✅ Example posterior chain session sequence:
1. Hip mobility warm-up — 5 min
2. Romanian Deadlift — 4 × 6 (primary compound)
3. Hip Thrust or Glute Bridge — 3 × 10
4. Leg Curl — 3 × 12
5. Core work — 2–3 sets
Training Frequency
2× per week is the recommended starting frequency — once as a primary movement at higher sets and heavier load, once as accessory work at moderate sets and load
48 hours minimum between RDL sessions — both muscle protein synthesis and connective tissue recovery require this
If significant hamstring DOMS (delayed onset muscle soreness) persists into the next planned session, extend recovery before reloading the pattern
6-Week RDL Progression Plan
Weeks 1–2 — Technique Foundation: 3 × 8 @ moderate load | Strict 3-second descent on every rep | Focus on keeping bar close and stopping before rounding Weeks 3–4 — Load Development: 4 × 8 @ +5–10% weight | Maintain 2–3 second descent | Both sessions per week Weeks 5–6 — Strength Emphasis: 4 × 6 @ heavier load | Controlled descent | Continue 2× per week Week 7 — Deload: 3 × 8 @ 60% working weight | Technique reset | Allow connective tissue recovery
Load Selection: A Practical Guide
Since most trainees do not test a true 1RM for the RDL, percentage-based loading is estimated from feel:
💡 The right working weight: allows all prescribed reps with the last 2 feeling genuinely challenging, while the controlled 2–3 second descent is maintained throughout — including on the final rep.
→ If lower back rounds before the target reps are complete — weight is too heavy
→ If the final rep requires minimal effort — weight is too light
→ A useful starting estimate: 50–60% of your conventional deadlift working weight
Integration in a Weekly Training Structure
3-Day Full-Body:
Day 1: Squat (primary) + RDL (secondary, 3 × 8)
Day 2: Upper body push + pull
Day 3: RDL (primary, 4 × 6) + Hip Thrust + Leg Curl
4-Day Upper/Lower:
Lower A: Squat (primary) + RDL (secondary, 3 × 10)
Lower B: RDL (primary, 4 × 6–8) + Hip Thrust + Single-Leg RDL 3 × 8 per leg
Combining the RDL With a Complete Posterior Chain Program
Movement
Exercise Example
What It Adds Beyond RDL
Hip extension (shortened)
Hip Thrust
Peak glute activation at full hip extension
Knee flexion
Leg Curl
Hamstring’s secondary knee-bending function
Maximum eccentric overload
Nordic Hamstring Curl
Highest eccentric strength and fascicle length stimulus
Single-leg stability
SLRDL
Balance, hip stability, asymmetry correction
Including 2–3 of these categories alongside the bilateral RDL in a weekly training program may produce more complete hamstring and glute development than any single exercise can achieve. The NSCA’s resistance training guidelines consistently recommend this multi-modal approach to posterior chain development for both recreational fitness and athletic performance goals.
RDL as a Diagnostic Tool
Beyond its direct training value, a well-executed RDL simultaneously reveals hamstring flexibility, lumbar control quality, hip hinge pattern competence, and posterior chain activation balance. Periodic review of RDL technique — including video review from the side — functions as a full lower body movement screen that guides programming decisions for the subsequent training block.
Muscles Trained, Research Context, and RDL Variations
A complete posterior chain program typically includes multiple complementary exercises:
RDL — hip extension with eccentric stretch emphasis (the focus of this article)
Leg curl — knee flexion function of the hamstrings (not trained by the RDL)
Hip thrust — glute-dominant hip extension in the shortened position
Nordic hamstring curl — maximum eccentric overload for injury prevention
RDL Variations Worth Including
Single-Leg RDL: The non-working leg extends straight behind as a counterbalance, hips stay parallel to the floor throughout. Use a dumbbell in the opposite hand for beginners — it provides a counterbalance that simplifies balance management. Excellent for correcting left-right strength imbalances and for athletic injury prevention programs.
Tempo RDL: Extending the eccentric phase to 4–6 seconds is one of the most effective RDL variations for hamstring development without requiring heavier loads — particularly useful during periods of high overall training volume when reducing load while maintaining the training stimulus is beneficial.
Deficit RDL: Standing on a 5–10 cm platform allows the bar to travel lower, increasing the eccentric range for trainees whose hamstring flexibility has adapted to standard depth. Only appropriate once standard depth can be reached with neutral spine.
Lower Back Safety: The Two Critical Points
⚠️ Lower back rounding: Descending past hamstring flexibility forces lumbar flexion under load — increasing disc compressive and shear forces. Stop the descent when rounding begins, not when the bar reaches the floor.
⚠️ Bar drift: Every centimeter the bar drifts forward of the legs increases the moment arm (the leverage distance between the load and the lumbar spine), exponentially increasing lower back stress. Keep the bar close throughout.
Individuals with a history of lumbar disc issues should consult a sports medicine physician or physiotherapist before loading the RDL pattern. Many individuals with lower back conditions can perform RDLs safely with appropriate load and range modification — but this should be individually assessed.
Diagnosing Your RDL: A Self-Check Method
Place a long stick or PVC pipe along the spine, contacting three points: back of head, upper back, and tailbone. Perform the hinge movement. If all three contact points maintain contact throughout the descent, the spine is neutral and the hinge is occurring correctly at the hips. Any gap appearing at the lower contact point indicates lower back rounding — reduce range or load.
Filming from the side during a light warm-up set is equally reliable — look for the bar tracking close to the legs and the knee angle remaining fixed from start to finish of each rep.
Frequently Asked Questions About the Romanian Deadlift
How deep should the RDL go?
Exactly as far as hamstring flexibility allows before the lower back begins to round — for most people, this is mid-shin to just below the knee. Forcing depth beyond this point by rounding the lower back does not increase hamstring stimulus but does increase lumbar disc loading. Range naturally increases over weeks and months of consistent RDL training as the hamstrings lengthen.
Should I feel the RDL in my lower back?
The erector spinae work isometrically throughout the RDL — mild awareness of these muscles is normal. The hamstrings should be the primary fatigue site after a properly executed set. If the lower back fatigues more prominently than the hamstrings, this suggests bar drift, rounding, or insufficient hamstring flexibility — reduce load and evaluate technique. Sharp pain, localized ache at a specific spinal level, or any radiating sensation down the leg during or after RDLs warrants stopping and seeking professional evaluation.
What is the difference between the RDL and the conventional deadlift?
The conventional deadlift begins from the floor each rep, involves more knee bend and quad contribution, and is typically performed at higher absolute loads. The RDL begins from standing, uses a fixed soft knee bend, stops above the floor based on hamstring range, and specifically targets the hamstrings through a long eccentric range. Both exercises have distinct roles — the RDL is not a “lighter version” of the conventional deadlift but a different movement with a different primary purpose in training program design.
How do I know if the RDL is working?
Three reliable indicators: hamstrings are the primary fatigue site after each set (not the lower back), hamstring DOMS appears 24–48 hours after new training stimuli, and — over weeks and months — hamstring flexibility improves and carry-over to athletic movements like sprinting and jumping is noticeable. Progressive load increases over a 6-week block also confirm that the pattern is being executed correctly and adaptation is occurring.
✅ Key Takeaways
The RDL is a hip hinge — hips push backward, knee angle stays fixed, bar travels close to the legs
The descent stops when the hamstrings reach their stretch limit — before the lower back rounds, not at the floor
Eccentric loading makes the RDL valuable for both hamstring development and injury prevention
2× per week at moderate-to-heavy loads, placed early in the session, is a practical starting frequency
Persistent lower back pain during or after RDLs requires professional evaluation before continuing
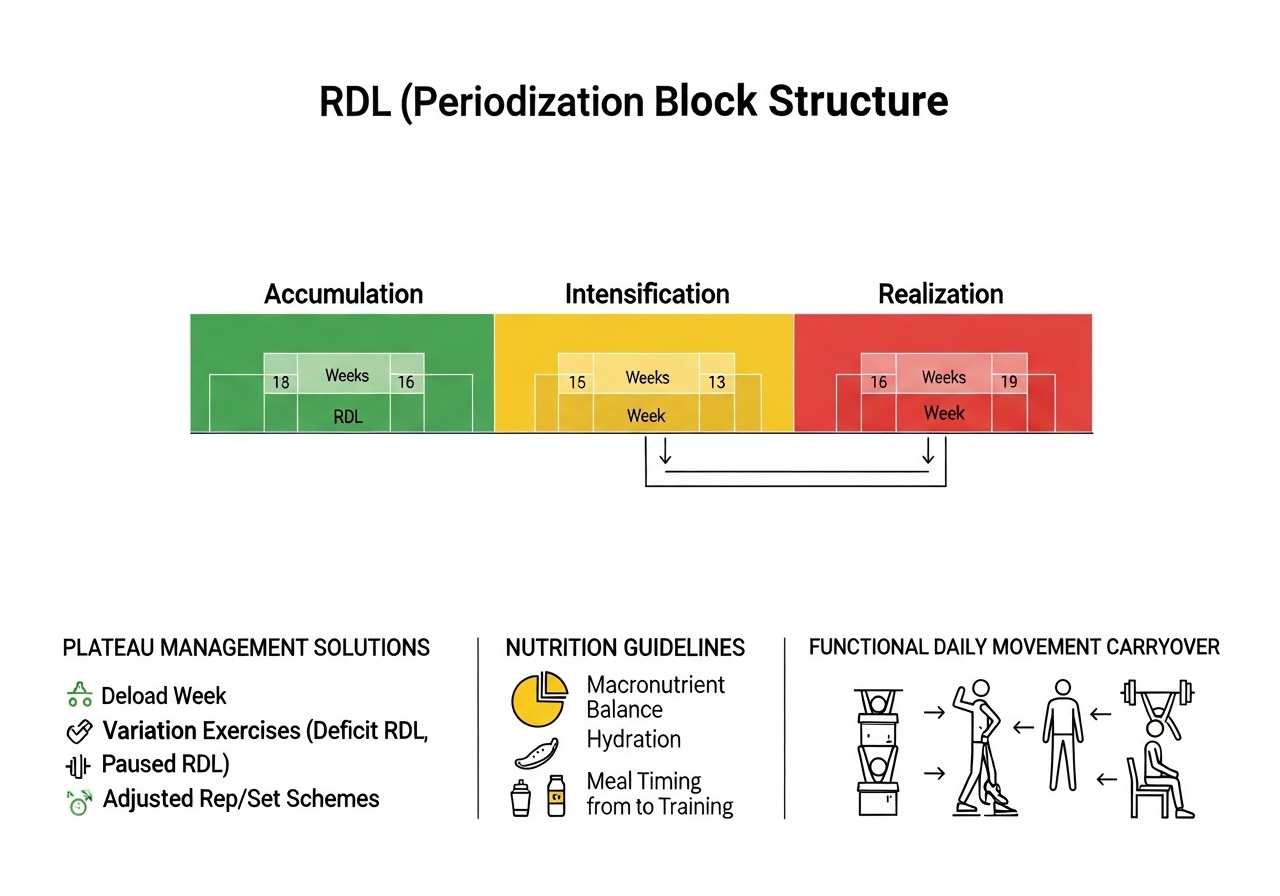
Long-Term RDL Development: Periodization and Sustainable Progress
Periodization Across Training Blocks
For intermediate trainees who have been performing the RDL consistently for 3+ months, structuring training across distinct blocks produces more reliable long-term progress than continuous linear progression alone:
Common causes of stalled RDL progress and their solutions:
Grip limiting the set: Use lifting straps for the heaviest sets — removing grip as the limiting variable allows the hamstrings to reach an adequate training stimulus
Hamstring flexibility limiting depth: Add 5–10 minutes of daily hamstring stretching — consistent practice over 6–12 weeks typically produces meaningful range increases that allow the RDL to be trained more productively
Accumulated neural fatigue: Temporarily reduce RDL frequency from 2× to 1× per week for 2–3 weeks before returning to twice-weekly training
Load increments too large: If 2.5 kg increments are producing technique breakdown, use microplates (0.5–1.25 kg) for more gradual progression
RDL Training Log: What to Track
A minimal training log entry after each RDL session:
Date, load, sets × reps completed
Descent tempo maintained (yes/no)
Primary fatigue site: hamstrings or lower back? (hamstrings should dominate)
Bar stayed close throughout (yes/no)
Any technique observations for the next session
Reviewing this log monthly reveals progressive load trends and technique patterns that individual sessions make difficult to perceive. When load is increasing and hamstrings are clearly the limiting fatigue point, the RDL is working as intended.
Nutrition and Recovery for Posterior Chain Training
The RDL generates significant mechanical stress on the hamstrings and posterior chain. General guidelines for sessions that include heavy RDL work:
Pre-session: A meal with carbohydrates and protein 1–2 hours before training supports performance — particularly for heavier sets in the 4–6 rep strength range
Post-session protein: 20–40 g within 1–3 hours provides amino acid substrate for the muscle protein synthesis that eccentric loading stimulates
Sleep: 7–9 hours per night supports the hormonal environment for posterior chain recovery and adaptation — inadequate sleep blunts training response over time
The RDL’s Role in Daily Movement
Beyond athletic performance, the RDL trains the hip hinge pattern that is fundamental to safe daily movement: picking up objects from the floor, lifting children, carrying bags, and maintaining lower back health through sitting-heavy work days.
People who develop a reliable hip hinge through consistent RDL training often find that everyday bending and lifting feels mechanically different — they default to using their hips and hamstrings rather than their lower back, which may reduce the cumulative spinal stress that contributes to chronic lower back discomfort over years.
This functional carryover is part of why the RDL earns its place as a foundational exercise recommendation across virtually all evidence-based fitness programs — from competitive strength sport preparation through to general health and longevity training for older adults.
When to Seek Professional Assessment
Professional guidance is particularly recommended in these situations:
Persistent lower back discomfort that does not resolve after technique correction and load reduction
Significant left-right hamstring strength asymmetry — a qualified coach or physiotherapist can prescribe specific SLRDL progressions to address the imbalance systematically
Any neurological symptoms — numbness, tingling, or weakness in the legs during or after RDL training — these require medical evaluation, not a technique adjustment
Return to loading after a hamstring strain or lower back injury — a sports medicine physician or physiotherapist should direct and monitor the return-to-training progression
For trainees who are also managing busy schedules, high-stress periods, or other lifestyle factors that impair recovery, reducing RDL intensity during these periods — maintaining frequency but reducing load by 20–30% — preserves the movement pattern and training habit without adding to accumulated fatigue. This approach tends to produce better long-term outcomes than maintaining full intensity until burnout forces a complete training break.
⚠️ Health & Fitness DisclaimerThis article is for general educational and informational purposes only. It does not replace professional medical or fitness advice. If you have any pre-existing condition, injury, or health concern — consult a qualified healthcare professional or certified personal trainer before starting or modifying any exercise program. Hip flexor tightness is one…
⚠️ Fitness Disclaimer: The information in this article is for general educational purposes only and does not constitute professional fitness or medical advice. Always consult a qualified healthcare professional before starting any new exercise program, especially if you have existing injuries or medical conditions. Why Two Straps Changed What I Thought Training Equipment Needed to…
Why Running Is the Most Accessible and Most Misstarted Fitness Activity Running has the lowest barrier to entry of any fitness activity — it requires no equipment beyond supportive shoes, no gym membership, and no specific skill level to begin. It is also the fitness activity most commonly attempted and abandoned within the first few…
⚠️ Fitness Disclaimer: The information in this article is for general educational purposes only and does not constitute professional fitness or medical advice. Always consult a qualified healthcare professional before starting any new exercise program. ⚠️ Cardiovascular Health Notice: If you have a history of heart disease, high blood pressure, or any cardiovascular condition, obtain…
⚠️ Fitness Disclaimer: The information in this article is for general educational purposes only and does not constitute professional fitness or medical advice. Always consult a qualified healthcare professional before starting any new exercise program. ⚠️ Cardiovascular Health Notice: If you have a history of heart disease, high blood pressure, or any cardiovascular condition, obtain…
⚠️ Fitness Disclaimer: The information in this article is for general educational purposes only and does not constitute professional fitness or medical advice. Always consult a qualified healthcare professional before starting any new exercise program. ⚠️ Cardiovascular Health Notice: If you have a history of heart disease, high blood pressure, or any cardiovascular condition, obtain…