Leg Press Machine: Foot Placement Science, Technique Breakdown, and Complete Programming Guide
This article is for general educational and informational purposes only.
It does not replace professional medical or fitness advice.
If you have any pre-existing knee, hip, or lower back condition — please consult a qualified healthcare professional or certified personal trainer before starting or modifying any resistance training program.
The leg press machine is one of the most common pieces of equipment in any gym — yet it may also be one of the most commonly misused.
Foot placement choices, range of motion, and load selection all significantly affect which muscles are targeted, how much stress is placed on the knee joint, and whether the exercise delivers its full potential.
This guide explains the EMG research on leg press muscle activation, breaks down how foot position and machine type change the stimulus, and provides a structured programming approach from beginner through intermediate levels.
Leg Press Anatomy: Which Muscles Are Trained and How
Primary Muscle Groups
The leg press is a closed-chain, multi-joint lower body exercise that loads the knee extensors and hip extensors simultaneously — the pushing motion against the footplate engages muscles across the entire lower limb.
| Muscle | Role During Leg Press | Activation Level |
|---|---|---|
| Vastus Lateralis (outer quad) | Primary knee extensor — dominant activator | Very High |
| Vastus Medialis Oblique (VMO) (inner quad, “teardrop”) | Knee extension, patellar stabilization | Very High |
| Rectus Femoris (central quad) | Knee extension and minor hip flexion | High |
| Gluteus Maximus | Hip extension — contribution varies with foot placement | Moderate (placement-dependent) |
| Biceps Femoris (hamstring) | Hip extension assist at higher foot positions | Low–Moderate |
| Gastrocnemius (calf) | Ankle stabilization and plantarflexion assist | Low–Moderate |
What the Research Shows About Quadriceps Activation
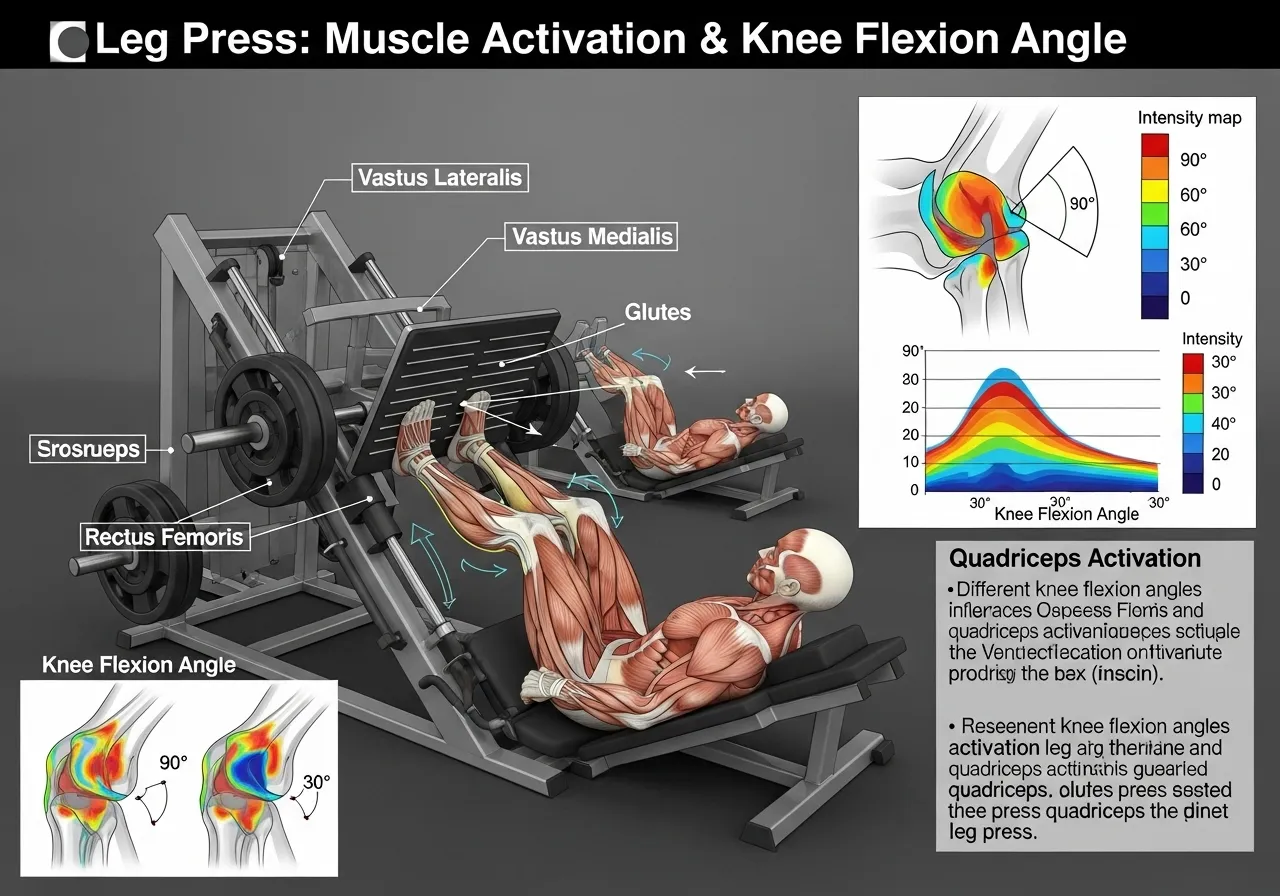
A systematic review published in PubMed analyzing EMG activity during leg press exercise and its variants found that the leg press elicited the greatest EMG activity from the quadriceps muscle complex — with vastus lateralis and vastus medialis showing the highest activation — and that activation was significantly greater as knee flexion angle increased.
The practical implication: a deeper range of motion (greater knee bend at the bottom of the press) produces more total quadriceps stimulus — not less, as many trainees assume when they limit depth to reduce weight on the stack.
The Knee Flexion Angle Effect
Knee flexion angle (how much the knee bends at the bottom position) is the single most impactful variable for quadriceps activation in the leg press:
| Knee Angle at Bottom | Relative Quad Activation | Note |
|---|---|---|
| 90° (parallel — standard) | High | Most common; appropriate for most trainees |
| Below 90° (deeper) | Higher — increases with depth | Only appropriate if back remains flat against the seat |
| Above 90° (partial range) | Reduced | Suitable for knee rehabilitation contexts only |
The “Danger of Deep Leg Press” Myth
A commonly repeated claim is that deep leg pressing “destroys the knees.”
The evidence behind this claim is limited, and largely derived from studies of extreme depth under very high loads.
For healthy knees, pressing to 90° or slightly below with proper form — back flat against the seat, controlled movement, appropriate load — is not inherently dangerous.
The genuinely dangerous technique is allowing the lower back to lift off the seat at the bottom position (called posterior pelvic tilt under load) — this shifts compressive force toward the lumbar spine and sacroiliac joint (the joint connecting the lower spine to the pelvis), not just the knee.
Individuals with existing knee conditions, history of knee surgery, or patellofemoral pain (aching pain around or behind the kneecap) should work with a physiotherapist or sports medicine physician to determine appropriate range of motion and loading parameters for their specific situation before beginning leg press training.
The Leg Press as an Entry Point for Lower Body Strength Training
For individuals new to resistance training, the leg press offers a significant practical advantage over the barbell squat: it removes the technical prerequisites of free-weight loading entirely.
No hip mobility, ankle dorsiflexion, or bar placement coordination is required to begin loading the quadriceps effectively — the machine provides external stability that allows focus on the push movement itself.
This accessibility makes the leg press a genuinely appropriate primary lower body exercise for beginners, those returning from injury, and older adults building lower body strength from a low base.
As strength and movement quality develop, introducing goblet squats, lunges, and eventually barbell squats alongside continued leg press work builds the full range of lower body motor patterns and structural adaptations that the machine alone cannot provide.
Unilateral Leg Press: Single-Leg Variation
Performing the leg press with one leg at a time — the single-leg (unilateral) leg press — provides additional benefits beyond the standard bilateral version:
- Asymmetry correction: If one leg is significantly weaker than the other (common after knee injury or periods of inactivity), the unilateral press allows each leg to work independently rather than allowing the stronger side to compensate
- Increased hip stabilizer demand: The pelvis must resist the rotational forces from single-leg loading, increasing gluteus medius activation
- Reduced spinal loading: The single-leg press at 50–60% of bilateral load reduces compressive load on the lumbar spine compared to heavy bilateral pressing
Use approximately 50–60% of the bilateral leg press load when beginning single-leg training — the stabilization demand of the exercise makes it significantly more challenging per leg than the per-leg contribution during bilateral pressing.
The 45° Inclined vs. Horizontal (Seated) Leg Press
Two main machine types exist in commercial gyms — and they produce somewhat different mechanical demands:
| Machine Type | Body Position | Load Feel | Primary Difference |
|---|---|---|---|
| 45° Inclined | Reclined at 45°, footplate above | Gravity assisted — stack feels heavy | Most common; highest absolute loads possible |
| Seated (Horizontal) | Upright seated, footplate in front | Horizontal push — lower absolute loads | Greater hip flexion range; more glute involvement |
Both machine types effectively train the quadriceps — the choice between them is largely based on availability and individual comfort.
The seated horizontal press may be preferred for individuals with limited lower back tolerance for the reclined position, as the more upright posture reduces lumbar compression during the exercise.
Strength and Hypertrophy: What the Leg Press Can and Cannot Deliver
The leg press is highly effective for producing quadriceps hypertrophy — the combination of high load capacity, controlled machine path, and full range of motion creates an excellent training stimulus for muscle growth.
However, the leg press produces less transfer to athletic performance metrics (vertical jump, sprint speed, change of direction) than free-weight squatting — the machine stabilization that makes it accessible also removes the neuromuscular coordination demand that drives sport-specific adaptations.
For general fitness and aesthetic goals, the leg press may be a primary lower body exercise without meaningful limitation.
For athletes with performance-specific goals, the leg press functions best as a supplementary volume-accumulation tool alongside free-weight squatting and unilateral strength exercises — not as a replacement for them.
This distinction is important for setting appropriate training expectations.
Foot Placement on the Leg Press: What Changes and What Doesn’t
The Research on Foot Position
Foot placement is the most commonly manipulated variable in leg press training — trainees are regularly advised that higher placement = more glutes and lower placement = more quads.
A PubMed study comparing three leg press variations (45° inclined, high platform, low platform) found that low foot placement produced greater rectus femoris and vastus lateralis activation for quadriceps emphasis, while high foot placement produced greater gluteus maximus activation — confirming that foot position meaningfully shifts the muscular emphasis of the leg press.
A 2021 PMC study on the inclined leg press confirmed that foot position affects muscle activation patterns during leg press, with low foot placement favoring quadriceps activation while high foot placement increases gluteal engagement — consistently supporting foot height as a practical tool for shifting lower body emphasis.
The 4 Standard Foot Positions and Their Effects
Low / Center (Standard Quad Position):
Primary emphasis: Vastus lateralis, vastus medialis, rectus femoris
Best for: Quadriceps development, VMO targeting
High (Glute and Hamstring Emphasis):
Primary emphasis: Gluteus maximus, biceps femoris (hamstring), adductor magnus
Best for: Posterior chain targeting, trainees with adequate quad development seeking more glute stimulus
Wide Stance (Sumo Position):
Primary emphasis: Adductor magnus and longus (inner thigh muscles), gluteus medius, VMO
Best for: Inner quad and adductor development, variety within a program
Narrow Stance:
Primary emphasis: Vastus lateralis (outer quad) emphasis
Best for: Outer quad sweep development in bodybuilding contexts
What Foot Width Does NOT Change
An important clarification from the research: while foot height meaningfully shifts muscle emphasis, foot width changes in the leg press produce less dramatic shifts in quadriceps activation than commonly claimed.
Total quadriceps work remains high across all foot width variations in the standard leg press — meaning the standard shoulder-width placement is a reasonable starting point for most trainees, with variations used to add variety rather than to target dramatically different muscles.
Foot Placement Summary Table
| Position | Quads | Glutes | Hamstrings | Adductors |
|---|---|---|---|---|
| Low/Center | ★★★★★ | ★★☆☆☆ | ★★☆☆☆ | ★★☆☆☆ |
| High | ★★★☆☆ | ★★★★☆ | ★★★☆☆ | ★★★☆☆ |
| Wide | ★★★★☆ | ★★★☆☆ | ★★☆☆☆ | ★★★★☆ |
| Narrow | ★★★★☆ | ★★☆☆☆ | ★★☆☆☆ | ★★☆☆☆ |
Foot Rotation: Does Toe Angle Matter?
Foot rotation (the degree of toe-out during the press) is a commonly discussed variable — though the evidence for dramatic effects is less compelling than for foot height:
- Toes slightly out (10–20°): Standard position — allows natural knee tracking and comfortable hip alignment for most individuals
- Toes significantly out (30–45°, sumo-style): Some research suggests greater VMO and adductor involvement — useful as a variation but not dramatically superior to standard placement for overall quad development
- Toes forward (0°): May increase vastus lateralis emphasis — some bodybuilders use this to target the outer quad sweep
The most important principle for toe angle is comfort and knee tracking — if knees consistently cave inward at a particular toe angle, adjust the angle until the knees comfortably track over the toes throughout the entire movement.
The Research Landscape: What Foot Position Studies Actually Conclude
It is important to contextualize the foot placement research accurately: while studies consistently show that foot height shifts the relative emphasis between quads and glutes, the absolute differences are often smaller than gym culture suggests.
No single foot placement “maximally activates” all lower body muscles simultaneously — different placements optimize different muscles at the cost of others.
The most practical application of the research is to use multiple foot placements across a training program rather than searching for one “optimal” position — this approach ensures more complete lower body development than any single fixed placement would achieve over a training block.
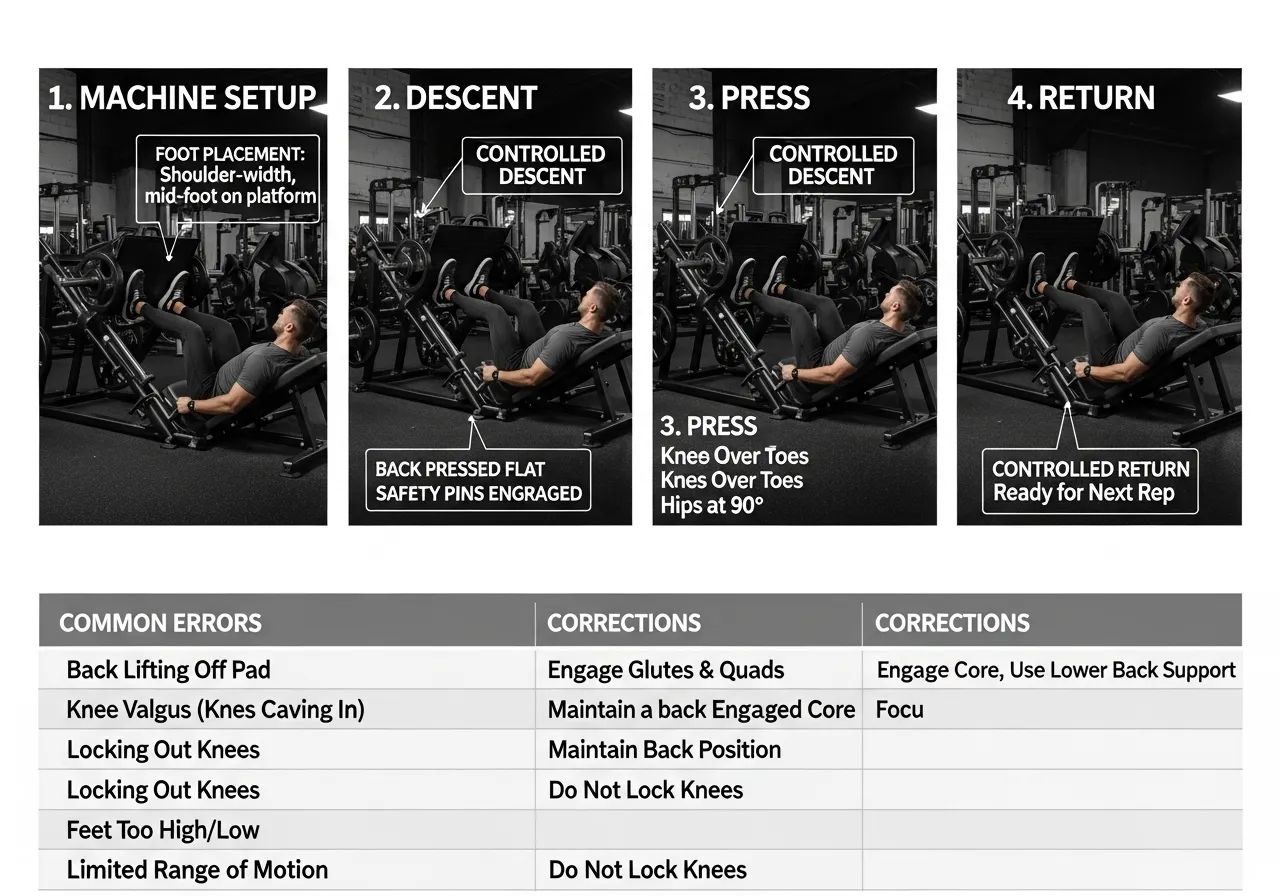
Leg Press Technique: Step-by-Step Setup and Execution
Machine Setup
- Seat position: Adjust so that at the bottom position (maximum knee bend), the knees do not travel excessively past the toes, and the lower back remains flat against the seat pad
- Back pad angle: Most machines offer 45° or 75° incline options — the 45° angle is standard; a more upright position increases the effective hip flexion demand at the bottom
- Safety catches: Always disengage safety catches only after the footplate is loaded; always re-engage before unloading the machine
The Press Phase (Concentric)
Step 2: Disengage safety catches. Brace the core — the lower back should maintain full contact with the seat pad throughout.
Step 3: Lower the footplate by bending the knees in a controlled manner — 2–3 seconds down. Knees should track in line with the toes — avoid letting them collapse inward (valgus) or outward beyond the toes.
Step 4: At the bottom position, briefly pause — resist the urge to bounce off the bottom using momentum.
Step 5: Press the footplate away by extending the knees — drive evenly through the entire foot. Do not fully lock out (hyperextend) the knees at the top.
The Return Phase (Eccentric)
Step 7: Maintain core bracing throughout — do not allow the seat to “push” the hips up as the weight descends.
5 Critical Technique Errors
| Error | What Happens | Risk | Correction |
|---|---|---|---|
| Lower back lifting off seat | Pelvis tilts posteriorly at bottom | Lumbar and SI joint stress | Reduce depth or move seat further back |
| Fully locking out knees | Hyperextension at top | Knee joint stress | Stop just short of full extension |
| Knee valgus collapse | Knees cave inward during press | Knee ligament stress | Actively push knees out during press |
| Bouncing at the bottom | Using momentum rather than muscle | Reduced stimulus; joint impact | Pause briefly at bottom; reduce load |
| Hands gripping thighs | Pushing on thighs to assist press | Reduces leg training stimulus | Hands on handles only — no thigh assist |
Breathing Pattern
- Inhale during the descent (eccentric) — allows intra-abdominal pressure to build
- Exhale during the press phase (concentric) — exhaling during exertion is standard practice
- For heavier sets, some trainees apply a brief Valsalva maneuver (holding breath during the exertion to increase spinal stability) — individuals with cardiovascular concerns should discuss this technique with their healthcare provider before applying it
How Load Selection Works Without a 1RM Test
Most trainees do not test a true 1RM on the leg press — nor should they without supervision at heavy loads.
A practical load selection method based on rep quality:
→ All target reps completed with controlled form → weight is appropriate or slightly light
→ Last 1–2 reps genuinely difficult but achievable with form intact → optimal working weight
→ Form breaks down before the target rep count → load is too heavy; reduce by 10–15%
→ Final rep feels easy with perfect form → increase load by 5–10 kg next session
This self-regulating approach avoids the common beginner error of loading too heavily too soon — which produces form breakdown, joint stress, and technique habits that are harder to correct later.
The Role of Eccentric Training in Leg Press Programming
The eccentric phase (the lowering/descent phase of the leg press where the quadriceps lengthen under load) is a potent stimulus for both muscle hypertrophy and connective tissue development.
Research on eccentric training suggests that slow, controlled descents may produce greater muscle damage and subsequent hypertrophic adaptation than fast, momentum-driven returns — making the 2–3 second controlled descent a meaningful aspect of leg press programming rather than just a technique safety measure.
Trainees specifically seeking hypertrophy benefits may experiment with 4-second eccentric (descent) tempo at moderate loads — producing significant time under tension without requiring the same heavy loads as a standard strength-focused protocol.
Leg Press as Knee Rehabilitation Tool
The leg press is commonly prescribed in physiotherapy for post-surgical knee rehabilitation — particularly after ACL (anterior cruciate ligament) reconstruction and total knee replacement — because its controlled path allows progressive quadriceps loading without the rotational and shear forces associated with free-weight squatting.
Rehabilitation protocols typically begin with very limited range of motion (0–60° of knee bend) at low loads, progressively increasing both range and resistance over weeks as healing allows.
Any leg press use in a rehabilitation context should be directly supervised and progressed by the treating physiotherapist — the specific parameters appropriate for rehabilitation differ significantly from those appropriate for general fitness training, and self-directed loading in the early recovery period may delay healing or cause setbacks.

Leg Press vs. Squat: Understanding the Key Differences
What the Leg Press Does Better Than the Squat
- Isolated quad loading: The machine stabilizes the body, allowing heavier loads to be placed on the quadriceps with less technique complexity than the back squat
- Accessibility: No balance, core stability, or mobility prerequisites are required — beginners can load the quads immediately
- Knee rehabilitation: Partial range leg press (stopping above 90° of knee bend) is commonly used in physical therapy to rebuild quad strength after knee surgery, as the machine controls the movement path and prevents unstable loading
- Volume accumulation: Lower systemic fatigue than the barbell squat — allows more total quad volume in a program without the same recovery cost
What the Squat Does Better Than the Leg Press
- Functional carryover: The free-standing squat trains balance, coordination, and proprioception (body position awareness) that the machine leg press cannot replicate
- Core and trunk demand: The back squat requires significant spinal stabilization from the erector spinae and core musculature — producing systemic adaptations the leg press does not
- Athletic transfer: Squat strength transfers more directly to jumping, sprinting, and change-of-direction performance than machine leg press
- Hormonal response: Heavier free-weight compound movements typically produce a greater acute anabolic hormone response than machine-isolated movements
How to Use Both Strategically
The leg press and squat complement each other effectively in a complete lower body program:
Back Squat: 4 × 5–6 (heavy, neural-dominant work)
Leg Press: 3 × 10–12 (moderate load, volume accumulation)
Best for: Strength athletes and general trainees who squat
Strategy 2 — Leg Press Primary (no squat):
Leg Press: 4 × 10–12 (primary quad stimulus)
Romanian Deadlift: 3 × 10 (posterior chain balance)
Best for: Beginners, trainees with squat mobility limitations, knee rehab contexts
Strategy 3 — Equal Partners:
Session A: Squat primary + Leg Press secondary (different foot positions)
Session B: Leg Press primary (higher volume) + Squat accessory
Best for: Bodybuilding emphasis on quad development
Leg Press for Older Adults and Special Populations
The leg press may be particularly valuable for older adults (60+) because:
- The machine’s stability removes the balance demand of free-weight squatting — reducing fall risk during exercise
- Load can be precisely controlled at sub-bodyweight levels — accessible for individuals who cannot yet perform a bodyweight squat with control
- Range of motion can be conservatively limited while still providing meaningful quad stimulus — important for individuals with arthritic knees
Any leg press program for individuals with knee osteoarthritis (joint surface degeneration causing pain and stiffness), total knee replacement, or significant knee instability should be designed and supervised by a physiotherapist or sports medicine physician — self-directed loading in these contexts carries meaningful risk of symptom aggravation.
Common Questions About the Leg Press
How much should I be able to leg press?
General strength benchmarks for the 45° inclined leg press at 10-repetition working weight are estimated at approximately 1.0–1.5× bodyweight for beginners, 1.5–2.5× for intermediates, and 2.5–4× for advanced trainees.
These figures are population estimates with significant individual variation — different machines, foot placements, and ranges of motion produce different absolute loads, making direct comparisons between individuals less meaningful than tracking personal progress over time.
Is the leg press enough for leg development without squats?
For quadriceps hypertrophy (muscle growth), the leg press can produce substantial development without squatting — the EMG evidence confirms that quad activation is high and consistent.
However, relying solely on the leg press produces relatively underdeveloped glutes and hamstrings compared to programs that include hip-hinge and compound lower body exercises.
Pairing leg press with Romanian deadlifts, hip thrusts, and leg curls produces significantly more complete lower body development than leg press alone.
Should I use a seat belt or handle during leg press?
Most commercial leg press machines provide handles beside the seat for grip during the movement.
These are for stability during initial weight bearing — not for pulling the legs down or pushing off the thighs during the press.
A seatbelt, if provided, should be used if loading at very heavy weights where the seat could potentially shift.
- The leg press primarily trains the quadriceps — activation increases with greater knee flexion depth, meaning fuller range of motion produces more stimulus
- Low foot placement favors quad activation; high foot placement shifts emphasis toward the glutes and hamstrings
- The lower back must remain against the seat throughout — any lifting of the back signals excessive depth or too much load
- The leg press and squat serve complementary roles — they are most effective when used together in a complete lower body program
- Knee pain during or after leg press requires professional evaluation — not simply a different foot placement
Addressing Knee Pain During the Leg Press
Knee discomfort during or after leg press training is one of the most common complaints associated with this exercise — and it typically has identifiable causes:
- Knee aching at the front (patellofemoral area): Often related to excessive depth, knee valgus, or rapid load increases — reducing depth to 90° and ensuring knee tracking over toes typically resolves this
- Knee aching on the inner side: May be associated with high-load wide-stance pressing or valgus collapse — reduce load and widen stance gradually
- General joint aching after sessions: May indicate load, volume, or frequency exceeding current connective tissue adaptation — reduce one variable and monitor response
Any sharp, locking, or swelling-associated knee pain during leg press training requires stopping the exercise and seeking evaluation from a sports medicine physician or physiotherapist before resuming.
Do not attempt to “train through” acute knee pain — the leg press is a machine exercise that can easily be modified or temporarily replaced with non-knee-loading alternatives while the cause is identified and addressed.
Leg Press Programming: Sets, Reps, and 8-Week Progress Plan
Sets and Reps by Training Goal
| Goal | Sets × Reps | Load | Tempo (descent) | Rest |
|---|---|---|---|---|
| Beginner technique | 3 × 12–15 | Light — 50–60% | 3 sec | 90 sec |
| Hypertrophy | 3–4 × 8–12 | Moderate — 65–75% | 2–3 sec | 60–90 sec |
| Strength | 4 × 5–6 | Heavy — 80–85% | Controlled | 2–3 min |
| Muscular endurance | 2–3 × 15–20 | Light — 40–55% | Moderate | 45–60 sec |
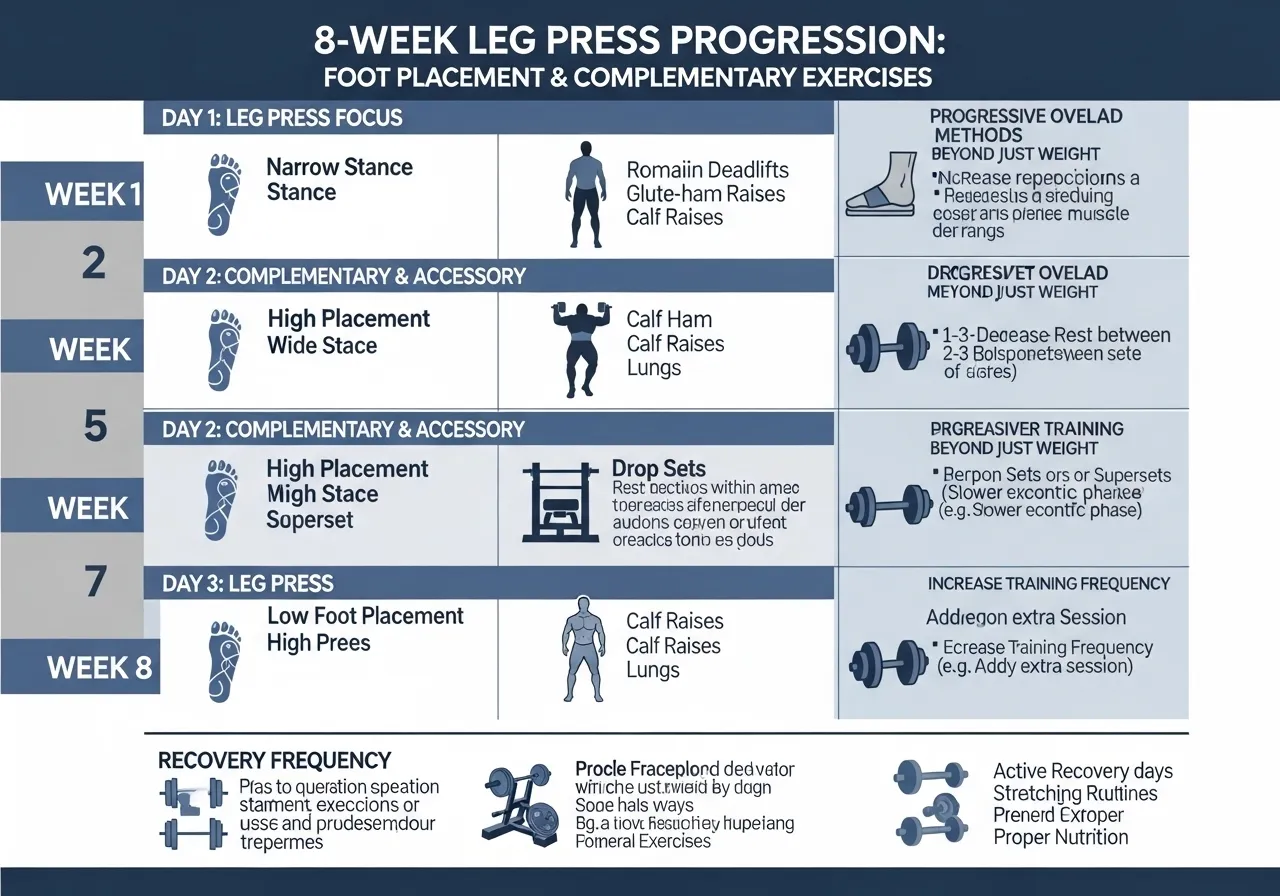
8-Week Beginner to Intermediate Progression
3 × 12 @ 50–60% | Standard foot placement | Focus: back stays on seat, controlled descent
Weeks 3–4 — Load Introduction:
3 × 10 @ 65% | Add 5–10 kg per session when all reps are clean
Weeks 5–6 — Volume Expansion:
4 × 10 @ 65–70% | Begin experimenting with foot placement variation
Weeks 7–8 — Strength Phase:
4 × 6–8 @ 75–80% | Maintain controlled tempo throughout
Week 9 — Deload:
3 × 12 @ 55% | Active recovery and technique reinforcement
Adding Foot Position Variation to a Program
Rotating foot placement across sessions or across weeks adds variety and may ensure more complete lower body development:
Lower A: Leg Press (standard/low placement, quad focus) 4 × 10 + RDL 3 × 10 + Leg Curl 3 × 12
Lower B: Leg Press (high placement, glute emphasis) 3 × 12 + Hip Thrust 4 × 10 + Bulgarian Split Squat 3 × 8 per side
Pairing Leg Press With Complementary Exercises
| Leg Press Variation | Ideal Complement | Why |
|---|---|---|
| Low foot (quad dominant) | Romanian Deadlift + Leg Curl | Balances posterior chain that LP underloads |
| High foot (glute emphasis) | Leg Extension + Leg Curl | Adds isolated quad and hamstring work |
| Wide stance | Narrow stance squat + Hip adduction | Ensures full quad and inner thigh development |
Progressive Overload Methods Beyond Adding Weight
- Range of motion progression: Gradually increasing depth over weeks as technique permits — each additional centimeter of depth increases the quadriceps stimulus without adding load to the stack
- Tempo progression: Extending the descent from 2 to 3 to 4 seconds increases time under tension at the same weight — a meaningful progressive overload without requiring heavier loads
- Volume progression: Adding a set (from 3 to 4 to 5 sets) before pursuing load increases — total work volume drives hypertrophy, not just load
- Foot placement complexity: Progressing from single standard placement to rotating across multiple placements — increasing the variety of stimulus across the lower body musculature
Recovery and Frequency
- 2× per week is a practical starting frequency — once as primary quad work and once as secondary volume
- 48–72 hours minimum between heavy leg press sessions — quadriceps and patellar tendon (the tendon connecting the kneecap to the shin bone) recovery require adequate time before reloading
- If significant knee aching persists beyond 72 hours after a leg press session, reducing depth, load, and volume before the next session is advisable — persistent joint soreness warrants professional assessment
Leg Press for Seniors: Building Functional Leg Strength
Research consistently links quadriceps strength to functional independence in older adults — the ability to rise from a chair, climb stairs, and maintain balance under perturbation (unexpected pushes or shifts of the center of gravity) depends directly on leg extension strength.
The leg press machine is particularly well-suited for older adult strength training because:
- The seated, stabilized position eliminates fall risk during loading
- Load can be set to a fraction of bodyweight — beginning the strength-building process even for those with very low current leg strength
- Progress in leg press strength directly reduces the functional effort required for everyday activities — sit-to-stand movements, stair climbing, and walking become easier as leg press strength increases
Older adults should begin with conservative loads (starting below bodyweight equivalent on the machine) and progress gradually over weeks — the quadriceps and connective tissue of older trainees require more time to adapt to new loading demands than younger trainees.
A certified personal trainer with experience working with older adult populations, or an exercise physiologist, can design a safe and progressive leg press program appropriate for an individual’s current strength level and any joint conditions present.