⚠️ Health & Fitness Disclaimer This article is for general educational and informational purposes only and does not replace professional medical or fitness advice. If you have any pre-existing shoulder, elbow, or wrist condition — please consult a qualified healthcare professional before beginning any pull-up program.
The pull-up is widely regarded as the gold standard of upper body pulling strength — a compound movement that simultaneously develops the latissimus dorsi, biceps, rear deltoids, and scapular stabilisers under genuine bodyweight resistance. (Related: seated row guide)
Yet it remains the exercise most beginners cannot perform even once, and the exercise most intermediate trainees program inadequately despite its extraordinary development potential.
This guide covers what the EMG research reveals about pull-up muscle activation, how grip variations change the training stimulus, the complete progression from zero to weighted pull-ups, and an 8-week program for all levels.
Pull-Up Muscle Activation: What the EMG Research Shows
These activation values — particularly the latissimus dorsi exceeding 100% MVIC — confirm the pull-up as one of the highest-stimulus back exercises available, surpassing most cable and machine pulling movements in neural demand.
The Sequential Muscle Activation Pattern
The same research identified a consistent sequence of muscle activation across all pull-up variations:
Initiation phase: The lower trapezius (the lower portion of the trapezius muscle responsible for downward depression and upward rotation of the scapula) and pectoralis major activate first — establishing the shoulder girdle position and initiating scapular depression before the arm pull begins
Mid-phase: The latissimus dorsi and infraspinatus (one of the four rotator cuff muscles responsible for shoulder external rotation and humeral head stability) take over as primary movers through the middle range
Completion phase: The biceps brachii completes elbow flexion in the final portion of the pull
This sequence has important practical implications: the pull-up is initiated by scapular retraction and depression — not by bending the elbows. Trainees who pull with the arms first, skipping the initial scapular movement, reduce latissimus dorsi activation and place disproportionate stress on the biceps and shoulder joint.
The lat pulldown remains a valuable exercise — particularly as a pull-up progression tool — but the bodyweight pull-up’s requirement to lift the entire bodyweight under gravitational load produces a fundamentally different stabilisation demand that machines cannot fully replicate.
Why the Pull-Up Is the Ultimate Relative Strength Test
Unlike absolute strength tests measured in total kilograms lifted, the pull-up measures relative strength — force output relative to bodyweight. A pull-up requires the trainee to lift their entire body mass, meaning lighter trainees have a mechanical advantage over heavier ones at equal absolute strength levels.
This relative strength quality has direct functional relevance: the pulling capacity required to climb, hang from a surface, or perform upper body gymnastic movements is entirely determined by the strength-to-weight ratio that pull-ups specifically develop.
Military and tactical fitness assessments worldwide use pull-up testing precisely because it measures the functional pulling capacity that field performance demands — not isolated machine strength.
Latissimus Dorsi Anatomy and Why It Responds to Pull-Ups
The latissimus dorsi (Latin for “broadest muscle of the back”) is the largest muscle of the upper body — originating from the lower thoracic spine, lumbar spine, iliac crest (the bony rim of the pelvis), and lower ribs, before converging to insert on the humerus (the upper arm bone) near the shoulder joint.
Its primary actions are shoulder extension (driving the upper arm downward and backward), adduction (drawing the arm toward the body from an elevated position), and internal rotation — precisely the movements required to complete a pull-up.
The breadth of the latissimus dorsi’s origin means that a well-developed latissimus dorsi widens the visual appearance of the back significantly, creating the V-taper (broad upper back tapering to a narrower waist) that pull-up training is classically associated with producing.
The pull-up may also contribute to posture improvement over time — the scapular retraction and depression patterns trained through consistent pull-up practice directly counteract the forward-shoulder and rounded-upper-back postures associated with prolonged desk work and anterior chain dominance in modern fitness programming.
Pull-Up (Pronated) vs. Chin-Up (Supinated): The Key Difference
The most practically significant grip variation is the choice between pronated grip (palms facing away — the conventional pull-up) and supinated grip (palms facing toward you — the chin-up):
Shoulder-width (standard): The most biomechanically efficient grip — allows the latissimus dorsi to function through its optimal length-tension relationship
Wide grip: Reduces the range of elbow flexion, shortening the biceps contribution — places greater emphasis on the latissimus dorsi at the initiation of the pull. May increase shoulder impingement risk in individuals with limited shoulder external rotation.
Narrow grip: Increases elbow flexion range, enhancing biceps and brachialis involvement — provides a useful variation for trainees whose biceps are a limiting factor
Neutral Grip Pull-Up (Hammer Grip)
The neutral grip pull-up — palms facing each other, typically performed on parallel handles — occupies a middle ground between pronated and supinated variations:
The neutral forearm position reduces rotational stress on the elbow joint — making this variation particularly appropriate for trainees with existing elbow tendinopathy (irritation and degradation of the elbow tendons)
Brachialis and brachioradialis (the deep elbow flexor and the forearm muscle responsible for elbow flexion when the forearm is in neutral position) activation is maximised in this grip
Often the most comfortable starting grip for beginners due to reduced forearm pronation/supination stress
Ring Pull-Ups: The Advanced Free-Rotation Variation
Pull-ups performed on gymnastic rings rather than a fixed bar allow the wrists to freely rotate throughout the movement — positioning the forearms in the most biomechanically natural orientation at every point in the range.
Ring pull-ups demand significantly greater rotator cuff and shoulder stabiliser activation than bar pull-ups, because the rings can swing outward if stabilisation is lost. This instability is a feature — producing a comprehensive shoulder stability training stimulus alongside the latissimus dorsi development of conventional pull-ups.
For trainees who experience wrist or forearm discomfort during bar pull-ups from the fixed pronation demand, rings may provide a more comfortable long-term option — though the instability requires a period of adaptation before ring pull-ups can be performed as efficiently as bar variations.
Understanding these grip nuances allows trainees to make deliberate programming choices rather than defaulting to the same variation every session — extracting targeted development across all relevant pulling muscles over a complete training cycle.
Pull-Up Technique: Setup, Execution, and Critical Cues
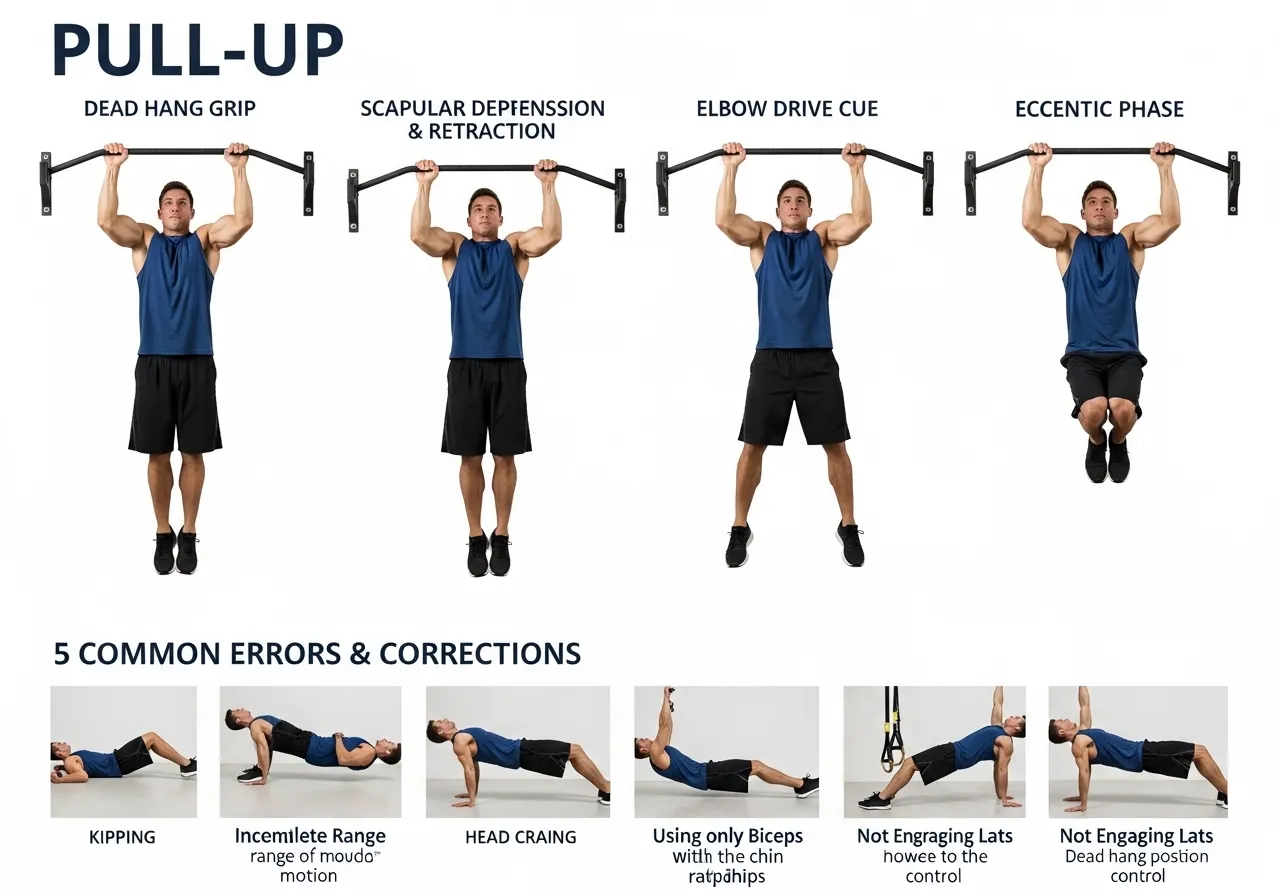
Setup: Grip, Bar Height, and Dead Hang Position
The quality of a pull-up is largely determined before the movement begins:
Grip: Full hand grip around the bar — not a fingertip grip. Thumbs wrapped around the bar (not alongside the fingers) for security under heavy loads. Bar height: Arms fully extended at the start — achieving the dead hang position (hanging from the bar with arms completely straight and shoulders in full elevation) before initiating each rep. Foot position: Feet crossed and knees slightly bent — prevents leg swinging that transfers momentum to the pull and reduces the pulling muscles’ required contribution.
The Critical Initial Movement: Scapular Depression and Retraction
The most important technical cue in pull-up training — and the one most commonly missed — is the initiation of each rep through scapular movement rather than elbow bending.
Correct execution sequence:
Step 1: From the dead hang, actively depress the shoulder blades downward (“pull your shoulders away from your ears”) — this engages the lower trapezius and creates the stable shoulder position for the pull
Step 2: Retract the shoulder blades slightly toward each other — this positions the latissimus dorsi optimally before it begins to shorten
Step 3: Drive the elbows down and back toward the hips — not pulling the hands toward the shoulders. This mental cue activates the latissimus dorsi as the primary mover rather than over-relying on the biceps
Step 4: Continue pulling until the chin clears the bar — or, for a more complete range, until the lower chest touches the bar
The Eccentric Phase: The Most Underused Strength Builder
The eccentric phase of the pull-up — the controlled lowering back to the dead hang — is often rushed or simply dropped to a dead hang without muscular control.
Research consistently shows that eccentric-focused training produces greater muscle hypertrophy per unit of mechanical work than concentric-only training. Deliberately slowing the eccentric to 3–5 seconds per rep dramatically increases the training stimulus per set, and training the eccentric with more weight than can be lifted concentrically (negative pull-ups — jumping to the top position and lowering under control) is the single most effective method for developing pull-up strength in people who cannot yet perform a full rep.
Common Pull-Up Errors and Corrections
Error
What It Looks Like
Correction
Shrugged shoulders throughout
Shoulders riding up toward ears
“Shoulders down” before initiating — active scapular depression
Kipping
Swinging the hips to generate momentum
Dead stop at the bottom each rep; cross feet to prevent swing
Half reps
Not reaching full elbow extension at bottom
Full dead hang between every rep — do fewer reps with full ROM
Forward head position
Chin jutting forward to clear the bar
Keep the neck neutral — reduce the range target until strength allows
Dropping on the eccentric
Falling to the dead hang without control
3-second eccentric minimum on every rep
The Role of Grip Strength in Pull-Up Performance
Grip failure — the inability to maintain a secure hold on the bar before the primary pulling muscles are fatigued — is a common limiting factor for beginners and a performance constraint at advanced levels with added weight.
Grip strength development strategies specifically applicable to pull-up training:
Dead hang holds: Passive hanging from the bar for 30–60 seconds develops the specific grip endurance required for pull-up sets — the load matches pull-up demands exactly
Towel pull-ups: Looping towels over the bar and gripping the towels dramatically increases grip demand — the unstable cylindrical grip requires far more forearm activation than a standard bar
Farmer’s carry: Walking with heavy dumbbells or kettlebells at the sides — develops general grip endurance that transfers to bar work
Chalk: Magnesium carbonate chalk applied to the hands reduces moisture-related friction loss on the bar — allowing grip strength to be tested more honestly without skin-bar slippage limiting performance
Developing the habit of a controlled, deliberate eccentric phase from the very first session — rather than adding it after months of sloppy lowering — produces significantly better long-term results by maximising the stimulus of every rep performed rather than squandering half the training time in the portion of the movement that often produces the greatest hypertrophic response.
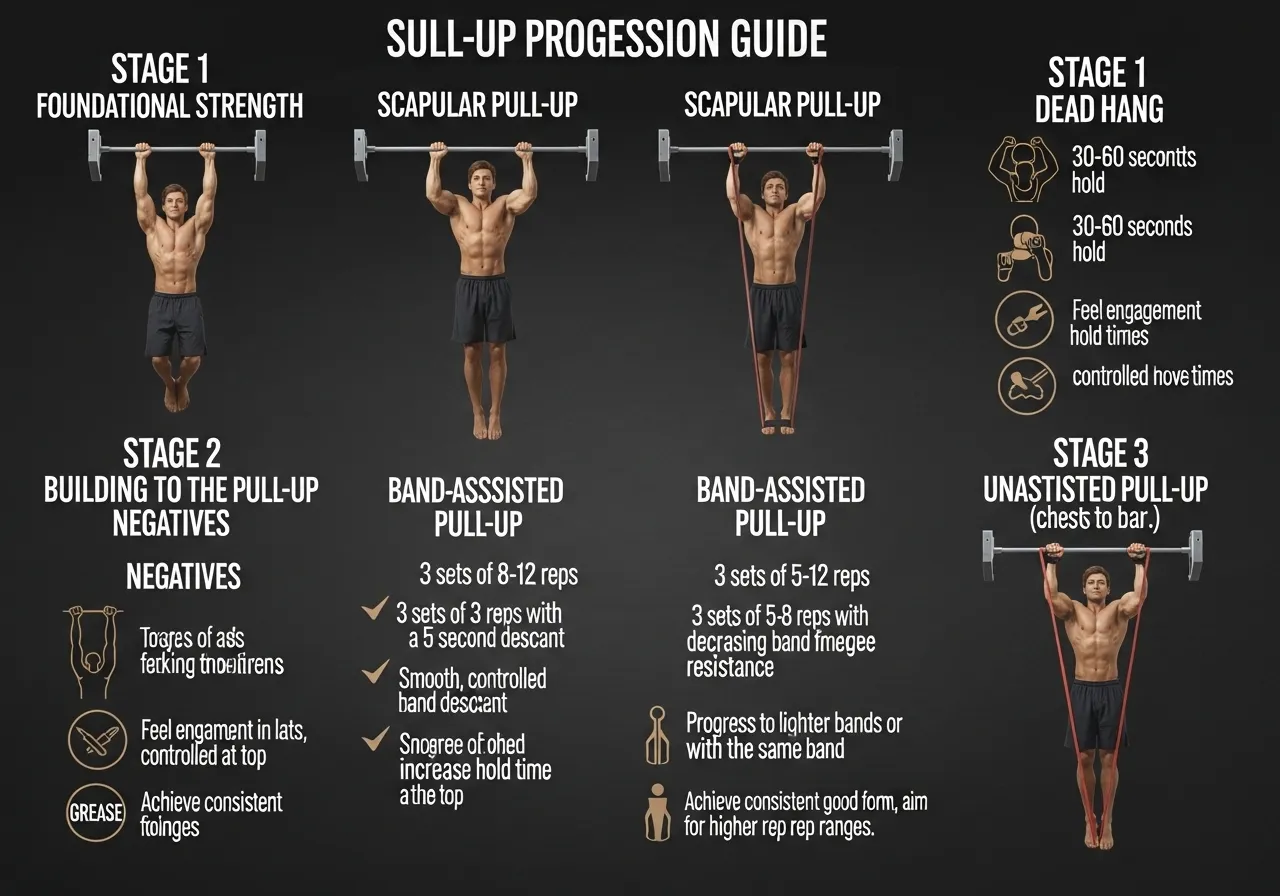
Pull-Up Progressions: From Zero to Weighted
Stage 1: Dead Hang and Scapular Pull-Up (Foundation)
Before attempting full pull-ups, two foundational exercises build the necessary shoulder girdle strength and motor patterns:
Dead hang: Simply hanging from the bar with fully extended arms and actively depressed shoulders. Develops grip strength, shoulder joint stability, and the ability to maintain the starting position necessary for quality pull-ups. Target: 3 × 30–60 seconds.
Scapular pull-up: From a dead hang, actively depress and retract the scapulae (shoulder blades) without bending the elbows — the body rises 3–5 cm purely from shoulder blade movement. Directly trains the lower trapezius activation that initiates every quality pull-up. Target: 3 × 10 reps.
Stage 2: Negative Pull-Ups and Band-Assisted Pull-Ups
Two methods for building pulling strength before achieving unassisted reps:
Negative pull-up: Jump or step to the top position (chin above bar) and lower yourself under control over 4–5 seconds to the dead hang. The eccentric phase can be trained at loads heavier than the concentric maximum — making negatives the most efficient strength builder for beginners. Target: 3–5 × 3–5 negatives.
Band-assisted pull-up: Loop a resistance band around the bar and place one or both knees in the band — the band’s upward force reduces the effective load. Use the thinnest band that allows clean reps with proper form. Target: 3 × 5–8 reps. As strength develops, progress to thinner bands.
Stage 3: Unassisted Pull-Ups and Volume Building
Once the first unassisted rep is achievable, the goal shifts to accumulating volume:
Grease the groove method: Perform sets of 50–70% of maximum reps multiple times throughout the day (e.g., 3–4 reps every hour during waking hours). Produces rapid strength and rep gains through high-frequency practice without accumulating the fatigue of traditional set formats. Highly effective for building from 1–3 reps to 8–10+ reps.
Traditional sets: 4–5 sets of submaximal reps with 2–3 minutes rest — once 5+ consecutive reps are achievable, structured sets with progressive volume become the primary development tool.
Stage 4: Weighted Pull-Ups and Advanced Variations
For trainees capable of 8–10 consecutive clean reps, adding external load via a weight belt or weighted vest is recommended rather than continuing to increase reps indefinitely:
Keep load additions small (2.5–5 kg) to maintain technical quality across the full range
Work in the 4–8 rep range with added weight before returning to bodyweight for higher-rep accessory sets
Advanced variations — archer pull-ups (one arm taking primary load while the other extends), L-sit pull-ups (legs held horizontal throughout), and ring pull-ups — provide progressive challenges beyond standard weighted work
The Relationship Between Pull-Up Strength and Other Lifts
Pull-up strength does not develop in isolation — it both supports and is supported by the broader training program:
Overhead press: Strong scapular stabilisers from pull-up training directly support safe and efficient overhead pressing mechanics — the muscles that control the shoulder blade during pulling are the same ones that provide the stable base for pressing
Deadlift: The latissimus dorsi actively stabilises the spine during heavy deadlift execution — a trained latissimus dorsi from pull-up work may contribute to safer deadlift mechanics and upper back position under load
Rowing movements: Pull-ups and horizontal rows address complementary aspects of back development — vertical pulling (pull-ups) develops the latissimus dorsi in its adduction function, while horizontal rows develop the rhomboids and middle trapezius in scapular retraction
A complete back development program generally benefits from including both vertical pulling (pull-ups, lat pulldowns) and horizontal pulling (barbell rows, dumbbell rows) — the two planes address the back musculature from different angles and through different functional demands.
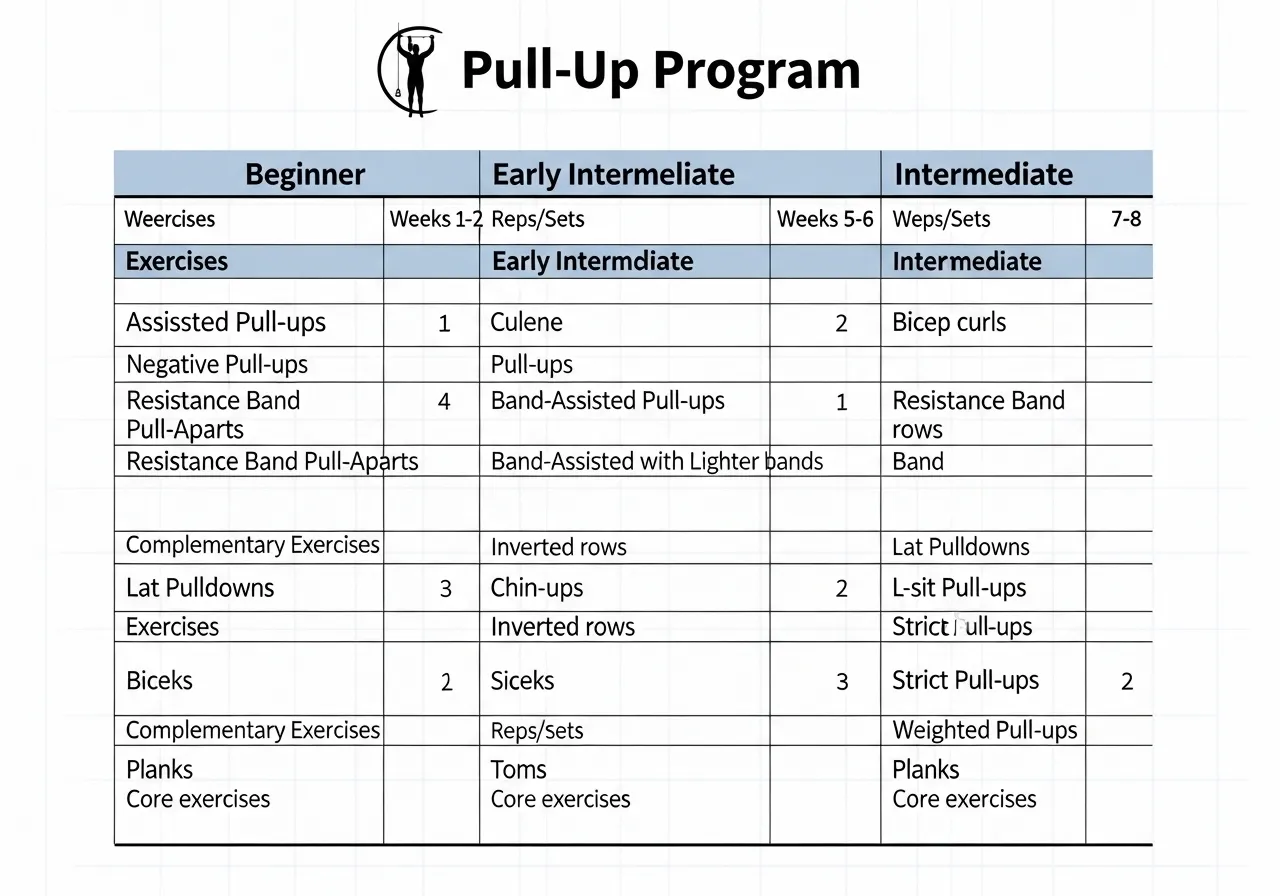
8-Week Pull-Up Program: Beginner to Intermediate
Program Design Principles
Pull-up frequency is the primary driver of progress for most trainees. Unlike large lower body movements that require 48–72 hours of recovery between sessions, the pulling muscles — particularly the latissimus dorsi — tend to recover relatively quickly and respond well to 3–4 training sessions per week.
Week
Beginner (0 reps)
Early Intermediate (1–4 reps)
Intermediate (5–8 reps)
1–2
Dead hang 3×30s + Scapular pull-up 3×8 + Negative 3×3
Band-assisted 4×5 + Negative 3×3
Max reps × 5 sets (60s rest) — daily grease the groove
3–4
Dead hang 3×45s + Scapular 3×10 + Negative 3×4 (5s lowering)
Thin band 4×4 + Negative 3×4
4×4–6 with 2–3 min rest — add 2.5 kg if 8+ reps achievable
1–2 unassisted + band sets — aim for 5 consecutive
5×3–5 weighted (+5 kg) + bodyweight back-off sets
7–8
Negative 4×5 + Thin band 3×5 + First unassisted attempt
Grease the groove protocol daily — aim for 5 consecutive
Work up to top set of 3 @ +7.5 kg; 2 back-off sets bodyweight
Complementary Exercises for Pull-Up Development
Pull-up strength develops most completely when trained alongside complementary exercises that address its supporting musculature:
Inverted row: A horizontal pulling movement (body under a bar, pulling the chest upward) that develops the rhomboids and middle trapezius — scapular retractors that support the pull-up’s initiation phase
Face pull: Cable or band exercise pulling toward the face with elbows high and wide — develops the rear deltoids and infraspinatus that stabilise the shoulder joint throughout pull-up execution
Lat pulldown: The most practical alternative when pull-up bars are unavailable — maintains the vertical pulling pattern at adjustable loads
Bicep curl: Direct biceps work supports the elbow flexion component — particularly relevant for trainees whose bicep strength limits their pull-up performance
How do I add variety to pull-up training without reducing effectiveness?
Variation in pull-up training may serve progression without sacrificing the core latissimus dorsi stimulus:
Rotate between pronated, supinated, and neutral grips across training weeks — each slightly emphasises different synergist muscles while maintaining the primary latissimus dorsi stimulus
Vary grip width between shoulder-width and slightly wider across sessions — maintaining biomechanical efficiency while addressing different portions of the back
Alternate between weighted pull-ups (heavy, 4–6 reps) and bodyweight pull-ups (moderate, 8–12 reps) across weekly sessions — addressing both strength and hypertrophy adaptations
Introduce pause reps (1–2 second pause at the top of each rep) periodically — the isometric loading at peak contraction increases time under tension and may enhance mind-muscle connection with the latissimus dorsi
Pull-Up Training for Women: Addressing the Common Misconceptions
Women are statistically less likely to be able to perform unassisted pull-ups than men at equivalent training ages — primarily because women carry a higher proportion of lower body mass relative to upper body pulling muscle mass, not because the exercise is inherently more difficult for the female neuromuscular system.
The progression approach is identical: negatives, band-assisted reps, inverted rows, and lat pulldowns build the necessary strength regardless of sex. Research on pull-up training in women has shown that consistent, well-designed progression produces full pull-up capability within similar timeframes to men when starting strength is normalised relative to bodyweight.
Women who regularly perform pull-up progressions tend to develop proportionally excellent relative pulling strength — often surpassing many male trainees on a bodyweight-relative basis once the initial strength foundation is established.
Tracking Pull-Up Progress: What to Measure and When
Meaningful pull-up progress tracking requires measuring the right variables at regular intervals:
Maximum consecutive reps: Tested fresh at the start of a session after a thorough warm-up — the most direct measure of current pulling capacity. Test monthly rather than every session to avoid the fatigue-induced variability that makes weekly testing unreliable.
Maximum added load for 3 reps: For intermediate trainees, the heaviest load achievable for 3 clean reps is a useful strength benchmark — analogous to working-weight tracking in barbell lifts.
Volume per session: Total reps across all sets in a pull-up session — this volume metric, tracked across weeks and months, provides the most reliable indicator of overall program progression for trainees focused on hypertrophy rather than raw strength.
Progress photographs of the upper back taken monthly under consistent lighting and posing conditions provide a qualitative progress record that complements the quantitative rep and load tracking — latissimus dorsi development is visually evident in back width and V-taper measurements that numbers alone do not fully capture.
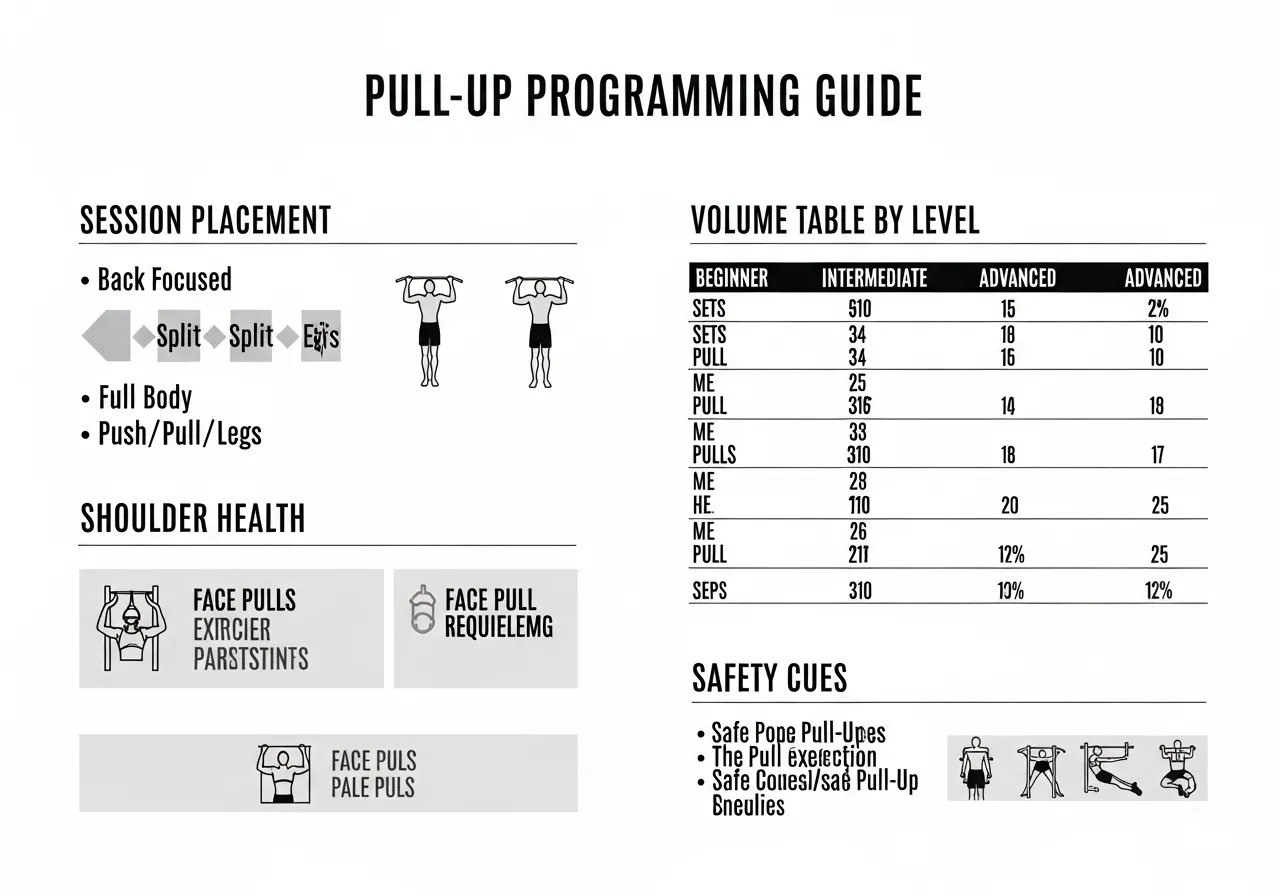
Programming Pull-Ups Into a Complete Training Plan
Where Pull-Ups Fit in Upper Body Training
Pull-ups are a compound multi-joint exercise and should be performed early in a session — while the primary pulling muscles are fresh — rather than as an afterthought following other back work.
Full-body sessions: Pull-ups in the first half of the session alongside or after the primary lower body movement
Push/pull/legs splits: Pull-ups are the primary exercise on pull days — program them before lat pulldowns, rows, and arm work
Volume Recommendations by Training Level
Level
Weekly Sets
Rep Range
Frequency
Beginner (0–3 reps)
Progression work (negatives, band)
3–5 negatives or 5–8 band-assisted
3–4 days/week
Early intermediate (3–8 reps)
12–20 quality reps/week
All available reps in 4–5 sets
3 days/week
Intermediate (8–15 reps)
15–25 sets/week (mixed weighted + BW)
4–6 weighted, 6–10 bodyweight
2–3 days/week
Shoulder Health and Pull-Up Safety
The pull-up places significant demand on the shoulder joint — particularly the rotator cuff and the structures of the subacromial space (the area beneath the acromion process, or the bony protrusion at the top of the shoulder, through which the supraspinatus tendon passes).
Key shoulder health practices for pull-up trainees:
Always initiate from a full dead hang with active scapular depression — never pull from a passive shrug with the shoulders at the ears
Include face pulls (2–3 × 15–20) in every session that includes pull-ups — the posterior deltoid and external rotator strengthening they provide directly protects against the anterior shoulder impingement that develops in pulling-dominant programs without corrective work
Shoulder pain that begins, worsens during the set, or persists after training warrants assessment by a physiotherapist before continuing pull-up training
Breathing and Core Bracing During Pull-Ups
Effective intra-abdominal pressure management during pull-ups significantly affects both performance and spinal safety — particularly under added load:
Take a breath before initiating each rep — fill the abdomen completely and brace the core 360° (expanding outward in all directions, not just forward)
Exhale at the top of the rep or during the eccentric phase — not during the primary pulling effort
For weighted pull-ups with substantial added load, a full Valsalva-style brace (holding the breath through the concentric phase) may be appropriate — as with heavy barbell movements, the intra-abdominal pressure generated protects the spine under compressive loading
Core engagement during pull-ups also prevents the excessive anterior pelvic tilt and lumbar extension that some trainees use to “assist” the pull — particularly when approaching failure. A hollow body position (slight posterior pelvic tilt with the core engaged) is the optimal trunk position for both mechanical efficiency and spinal safety throughout the pull-up range.
Pull-Up FAQ
How long does it take to do my first pull-up?
With consistent training — 3–4 sessions per week of negatives, band-assisted reps, and lat pulldowns — most beginners may achieve their first unassisted pull-up within 4–10 weeks, depending on starting strength, bodyweight, and training consistency.
The range is wide because the determinants vary significantly: a person starting with reasonable lat pulldown strength may achieve their first rep within 3–4 weeks, while someone with no pulling background and higher relative bodyweight may require 8–12 weeks of consistent progression work.
Why are my biceps always more sore than my back after pull-ups?
Biceps-dominant soreness after pull-ups is the most common indicator of technique error — specifically, initiating the pull with elbow flexion rather than scapular depression and retraction.
When the arms pull first, the biceps take the initial load rather than sharing the demand with the larger latissimus dorsi. The correction — consciously initiating every rep by pulling the shoulder blades down and back before the elbows begin to move — typically shifts the muscle activation pattern within 2–4 sessions of focused practice.
Should I do pull-ups every day?
Daily pull-up training can be appropriate for trainees who maintain low enough volume per session that recovery is not compromised. The “grease the groove” protocol — multiple sets well below maximum reps throughout the day — is practiced daily by many coaches and athletes with excellent results.
High-volume pull-up training (close to maximum reps, weighted, or to muscular failure) should not be performed daily — 48 hours between high-intensity sessions may allow adequate recovery for most trainees. Signs that frequency is too high include persistent biceps or elbow tenderness, declining rep counts across sessions, and reduced shoulder range of motion.
✅ Key Takeaways
The pull-up produces latissimus dorsi activation exceeding 100% MVIC — among the highest of any back exercise studied
Pull-ups begin with scapular depression and retraction — not elbow bending. Initiating with the arms first transfers load to the biceps and reduces lat stimulus
Chin-up (supinated) produces higher biceps and pectoral activation; pull-up (pronated) produces higher lower trapezius activation — both are valuable in a complete program
Negatives (eccentric-only reps) are the single most effective method for building pull-up strength in beginners who cannot yet complete a full rep
Always include face pulls in pull-up sessions — they protect against the anterior shoulder imbalances that develop in pulling-dominant programs
Every squatter has a sticking point. For most it sits just above parallel, where the bar decelerates and the question becomes whether the rep continues or fails. More squatting does not fix a sticking point. More squatting simply repeats the same force production pattern, including the same weakness at the same position. The paused squat…
⚠️ Fitness Disclaimer: The information in this article is for general educational purposes only and does not constitute professional fitness or medical advice. Always consult a qualified healthcare professional before starting any new exercise program, especially if you have existing injuries or medical conditions. The Posterior Chain Exercise Debate That Every Serious Lifter Faces I…
The good morning is one of the most effective posterior chain exercises in existence. It is also one of the most avoided. The name sounds casual. The movement is not. A barbell loaded across the upper back while the torso hinges forward to near-parallel creates a tremendous demand on the spinal erectors, hamstrings, and glutes…
⚠️ Health & Fitness DisclaimerThis article is for general educational purposes only and does not replace professional medical advice. If you have any elbow, shoulder, or wrist conditions, please consult a qualified healthcare professional before beginning any tricep training programme. The triceps brachii makes up roughly two-thirds of upper arm mass — yet most trainees…
The front squat is the most technically honest squat in any strength programme. The barbell sits on the front of the shoulders. The elbows point forward. The torso stays vertical. When the technique is correct, it works. When one element breaks, whether wrist immobility, collapsed elbows, or forward lean, the bar rolls forward and the…
⚠️ Health & Fitness DisclaimerThis article is for general educational purposes only and does not replace professional medical advice. If you have any lower back, hip, or hamstring conditions, please consult a qualified healthcare professional before beginning a deadlift program. The deadlift is the simplest expression of the most fundamental human movement pattern — picking…